Advanced Topics
Table of Contents
- Database Servers
- Controlling via the command line
- Remote synchronization
- Keys
- GPS Outliers
- Web Update
Database Servers
Introduction
A CyberTracker database is normally a Microsoft Access database or .MDB file. This is convenient because a single file can hold the entire database. However, only one user can connect at a time and the database size is limited to 2 GB.
CyberTracker supports connections to Server databases such as MySQL and Microsoft SQL Server. This is done using a connection file, which tells CyberTracker how to communicate with the server.
Installing and configuring MySQL
Download and install MySQL from http://dev.mysql.com/downloads/mysql/5.0.html. Version 5.1 or later is recommended.
Add the following line to \MySQL\MySQL Server 5.1\my.ini:
max_allowed_packet = 64M
Download and install MySQL Connector from http://dev.mysql.com/downloads/connector/odbc/5.1.html.
Installing and configuring PostgreSQL
Download and install PostgreSQL from http://www.postgresql.org/download.
When installing, also install the ODBC driver (or download and install it separately from here https://odbc.postgresql.org/).
In the PostgreSQL console, create a new database.
In CyberTracker, use the Tools->Create database connection option to set up a connection in the usual way. Don’t forget to set the type rules to “PostgreSQL”.
Examine the resulting EDB file and make sure that ByteaAsLongVarBinary=1.
Creating a connection
CyberTracker supports connecting to a database via an EDB (External Database) file. An EDB file is an XML file that tells CyberTracker how to connect to the database. Here is an example EDB file:
<?xml version="1.0" encoding="UTF-8"?>
<Database>
    <TypeRules>`MySQL`</TypeRules>
    <ConnectionString>
        Provider=MSDASQL.1;
        User ID=root;
        Password=root;
        Persist Security Info=True;
        Data Source=MySQL DataSource;
        Initial Catalog=MyDatabaseName
    </ConnectionString>
</Database>
- TypeRules specifies how to treat data types. Acceptable values are “MySQL” and “SQL Server”. This is to handle differences in SQL database types.
- User ID and Password should be set according to your credentials.
- Data Source is the name of a User Data Source as configured by the windows “ODBC Data Source Administrator”. This tool binds a database driver to a data source so that applications can access it easily. The tool can be run by using Start->Run and typing “odbcad32.exe”. Make sure that an ODBC driver is available for your database before setting this up. For MySQL, this is the “MySQL Connector”.
- Initial Catalog is the name of the database. This database can be created using the “CREATE DATABASE MyDatabaseName” SQL command.
Converting an existing database
Once you can successfully connect to the server database by opening the .EDB file (using File->Open from the CyberTracker main menu), the next step is to import an existing database. The most common way to do this is:
- Load the old MDB database, using File->Open
- Export it to a CTX file, using File->Export
- Open the new EDB database, using File->Open
- Import the CTX file, using File->Import
- Save the new database
Multiple simultaneous connections
By distributing the EDB file within your organization, multiple users can connect to the database simultaneously. This has 2 implications to be aware of:
- As new sightings come in from remote sources, users will need to press “F5” (or use Edit->Refresh) to see new sightings
- Conflicts may arise if multiple users are making changes to the same database. To restrict this, end-users should be restricted in the operations they can perform. In all cases, the most recently saved data wins.
Using Export Data Tables
An Export Data Table is a table in a database that holds captured sighting data in an exported tabular form.
In order to view sighting data within CyberTracker, it is projected onto a table. This simply means that each sighting attribute is mapped to a column. This table is a very natural way to view and query the data.
CyberTracker has the ability to export the Query View table to a database table. However, doing this requires some setup: the table must already be created in the target database and must have certain pre-defined fields.
To get started, create a table in your database named “Export” with the following SQL command:
CREATE TABLE Export (ID CHAR(38) NOT NULL UNIQUE, Date DATE, Time TIME, Latitude DOUBLE, LONGITUDE DOUBLE, Note LONGTEXT)
The perform the following steps:
- Load CyberTracker and open a report with sightings
- With the Query Editor selected, click on the “Export View” button
- In the “Save As Type” drop down, select “External database” and select the database you want to export to
- Click Okay. Note you will get a message about overwriting this file, but it can be ignored (the .EDB file will not be overwritten, but duplicate data in the “Export” table will be)
Finally, use the following SQL command to see the data in the “Export” table in the database:
SELECT * FROM Export
Here is the list of field names (and their associated types) which CyberTracker recognizes specially:
| Field name | SQL Type | Description |
|---|---|---|
Id | CHAR(38) NOT NULL UNIQUE | The primary Id of the sighting. This must be indexed for merging reasons. |
DeviceId | CHAR(38) | The Id of the device used to capture the observation. This can be used to group sightings created by a single observer. |
Deleted | SMALLINT | Whether or not the sighting has been deleted. Using this field allows deleted sightings to be correctly merged. |
The UI component of this feature is designed mainly for experimentation. It can be more fully controlled via the command line interface.
CyberTracker matches fields by name, so the column name in CyberTracker must be the same as the field name in the table to work correctly. Column names can be changed using the “View Properties” dialog.
Controlling via the command line
Introduction
Several CyberTracker features can be triggered via the command-line. This functionality is usually intended for server side scripts that operate on the database as a whole. To use the command line, use:
Start->Run "cmd.exe"
cd <directory where CyberTracker is installed>
ct3 /?
Note:
- The install directory is either: “\Program Files\CyberTracker Software\CyberTracker3” or “%userprofile%\AppData\Local\CyberTracker3”
- Do not use “ct3.exe /?”, because this will trigger the windows application. Instead, just type “ct3”.
“System” folders are mentioned below. These are sub-folders of “Documents\CyberTracker Databases\System”. This folder can be opened in Explorer to see the way data moves through the system.
System Folders
| Folder | Description |
|---|---|
Orphans | Data that could not be inserted into a database is placed into this folder. Typically is caused by renaming of a database. The system does not process this folder again, so users should access this data using the “Data recovery console” feature on the “Tools” menu in CyberTracker. |
Backup | Once data has been successfully added to a database, it is moved to this folder. If the database later becomes corrupt, it acts as a second line of defense. |
ClientSD | When creating sightings on the local machine, these are backed up to this location if the application has the “Use SD card for backup” option checked. This directory is only used if no removable storage card is found. |
CrashDump | If CyberTracker crashes, the changes that have been made since the last save are exported to a CTX file and placed here. |
History | When a database update occurs and new history (past sightings) need to be uploaded to a client, then they are placed in this folder. |
Incoming | When files are downloaded from the internet, they are temporarily held in this location. |
Logs | CyberTracker keeps a log of all sync operations. Check out the download.txt file in this location to understand errors. |
Outgoing | Once files have been downloaded via a local sync, they may need to ultimately be sent to an internet server. Check out the “Send on Sync” option on the “Database Properties” dialog. This is a holding location for them before they are processed. |
Recover | When data is recovered from a PDA or SD card, it is placed in this folder. |
Settings | Local system settings, e.g. the current client screen selection and zoom level. |
Staging | Data that is waiting to be inserted into a database is placed into this folder. This folder is processed by CyberTracker routinely, e.g. on startup, on sync, etc. If the data cannot be uploaded into the target database for any reason, data will be moved to the Orphan folder. |
Commands
Command line option | Description |
|---|---|
| Disable console output. |
| Create a CTX file from the files in the specified directory. |
| Connect to a mobile device and download any data that is on it. As soon as data is downloaded from the PDA, it is placed in the Staging (see above) folder. |
| Use the download settings of the associated |
| Used with DownloadUrl to process one file at a time. |
| Upload application to the mobile device. Takes a database name, ctx name or directory. The directory is an unpacked ctx file. |
| Process the Outgoing (see above) folder. |
| Specify a data file (.CTX) for use with data operations, for example as an input for the /ExportTable mechansim. If the full path is not present, the system will attempt to locate the file in "Documents\My CyberTracker Databases". |
| Specify the database to use for data operations, for example as an input for the /ExportTable mechanism. |
| The export rule file. The export rule file can be created by using the "Export View" toolbar button with the "Query Editor" active. Use the "Save as type" drop down on the File Save dialog to select "Export Rule File". |
| The target database for export operations. Must be accompanied by a /ExportRule and /ExportTable. The input for this operation comes from a /Datafile, /Database or /DownloadURL command. If the full path is not present, the system will attempt to locate the file in "Documents\My CyberTracker Databases". |
| The table name in the target database. This table must already exist and be properly configured. See "Using Export Data Tables" in CyberTracker Server Setup. |
| Export data in the specified data file to an XML file. |
| Export data in the specified data file to a CSV (comma separated values) file. |
| Export data in the specified data file to an TSV (tab separated values) file. |
| Export data in the specified data file to a JSON file. |
Examples
ct3 /Database mydb.mdb /DownloadUrl
Open the database mydb.mdb, get the download settings and execute a download using the parameters in the “Database Properties” dialog. This is equivalent to clicking the “Download” button on the “Database Properties” dialog box.
ct3 /DownloadPda
Download all data from the currently connected device.
ct3 /Database myin.edb /DownloadUrl /ExportDatabase myout.edb /ExportRule myrule.exr /ExportTable mytable
Open the database myin.edb and get the download settings. Download all the files available using the parameters in the “Database Properties” dialog. Export this data to the myTable table in the myout.edb database. Note, myin.edb and myout.edb can be the same database.
Using this method is the preferred way of configuring a schedule task that keeps an export table up to date, because only the newly downloaded data is considered for export.
Remote synchronization
Introduction
If your project involves multiple users sending data to a single database, then this feature may be of interest to you. Remote Synchronization involves CyberTracker desktops and PDAs sending data over the internet to a central server. The database administrator can then download this sighting data into a consolidated database.
Getting set up
- Get an FTP site. These are widely available and come with most web hosting solutions. Use a search engine for “Web hosting” and pick the one you are most comfortable with. They will provide you with an FTP site, username and password. If your organization has an IT department, contract them first. They may already have something set up.
- Use an FTP client like FileZilla and log in
- Create a directory
CTData - Open CyberTracker, load the database and click “File->Database Properties”
- In the “Upload Settings”, setup the Url to: ftp://ftp.yoursite.com/CTData and also set user name and password
- Leave “Download Settings” as “[Same as Upload]”
- Ensure “Send on Client” is checked
- Click the “Download” button. This will report connection errors if any.
- Close the dialog, save your database and re-sync your PDAs
Note: if the PDAs do not have an internet connection and your users sync their data to their own PCs, then check “Send on Sync”. This will cause any data downloaded off the PDA to be sent to the same central server.
Note: the auto-send frequency will cause CyberTracker to send data in the background at timed intervals. This is useful if you would like a consistent incoming data stream and are less concerned with battery life.
Testing the system
- On the PDA, create a few sightings
- Open the “Options” dialog
- One of the tabs should be “Send Data”. If not, make sure the “Send on Client” checkbox is enabled (see above)
- Tap the button where it says “Tap to send”. This will kick start the sending process.
- If the send fails for any reason, check your connection settings. If any changes are made in the “Database Properties” section on the desktop, PDAs will need to be re-synced.
- Go to the “File->Database Properties” dialog and click the “Download” button
- Once downloading is complete, close the dialog
- The new sightings should appear the report
Other configurations
If the FTP server is also the database server, then it is possible to bypass a step. In this case, the Download Settings protocol should be “File share”, with the url being of the form “\\server\directory”, or possibly even “c:\ftpfiles”.
If all the devices are on the same wireless network, it is possible to bypass FTP altogether. In this case, set the “Upload settings” protocol can be “File share”.
HTTP and HTTPS are also provided for upload. However these don’t work for download, because these protocols don’t provide file-system like functionality.
Data can also be uploaded and downloaded directly via the CyberTracker Command-Line. This allows a database administrator to create a scheduled task on the server which routinely picks up data files and adds them to the database.
Keys
Introduction
CyberTracker has a feature called Keys which allows progressive refinement of data on lists. As data is entered, you can filter a result set down to just those matching specific attributes. For example, a bird list can be keyed on the colors and characteristics of each species.
Normally this information would be entirely contained within CyberTracker, but it is often convenient to describe Keys in Excel and paste them into CyberTracker when complete. The Screen Element Filter dialog contains a “Paste From Excel” button that can be used for this purpose.
Filter sample

To configure a key outside of CyberTracker, follow these steps:
- Create a key in Excel in the above format (colors don’t matter)
- Select all populated cells
- Copy to the clipboard
- Paste into CyberTracker
The above key and demo can be downloaded here.
GPS Outliers
What is an outlier?
An outlier is a GPS point provided by the GPS that is incorrect by more than 300 meters. In addition, the GPS does not provide any direct information that identifies the point as such. Outliers are sometimes just a single bad reading among good readings, but other times outliers may persist for a minute or more.
What is Dilution of Precision (DOP)?
Dilution of Precision (DOP) is a number provided by the GPS that describes the quality of the satellite geometry and hence the precision of a reading. Check out this article for a more detailed description.
What causes Outliers?
In principle, outliers should not happen. However, possibly because of the requirement to provide a fix very quickly, some GPS receivers have created heuristics that generate poor readings when they are first powered on. It’s difficult to match the underlying GPS chipset with individual device manufacturers, because this is often hidden by software layers. Most causal GPS users do not experience outliers, because of the way the GPS is typically used. They turn the device on and leave it on more or less continuously throughout their travel.
Outliers and CyberTracker
CyberTracker presents a unusual use-case. In order to conserve battery, the system is often configured to turn the GPS on just long enough to get a reading and then turn it off again. If this pattern occurs throughout a patrol, then it creates the ideal environment for outliers to happen.
Note that if the track timer is set at 60 seconds or less, CyberTracker leaves the GPS on.
Research has shown that Outliers do have distinguishing characteristics. On some devices, the DOP is very high, but this is not guaranteed. On other devices, the travel speed is unreasonably high.
CyberTracker therefore provides a way to filter data from the GPS by both DOP and Speed. While this is not guaranteed to completely eliminate outliers, it removes many of them.
Challenges with filtering readings
The largest issue is that by filtering readings by DOP and speed, CyberTracker may not actually take enough readings in the field. For example, suppose we set the DOP filter to “2” and the speed to “10”. This means that if the DOP is higher than “2” or we happen to be travelling faster than 10 km/h, CyberTracker will not take a reading. In other words, a simple change in your application on the desktop could effectively prevent CyberTracker from using the GPS! Therefore it is vital that your use of this system be well tested on devices before going into the field.
Using outlier detection in CyberTracker
CyberTracker has three levels for specifying GPS behavior: application properties, configure GPS action and Element properties.
Application properties
The “Edit Application” dialog contains a GPS tab. This tab allows the specification of the “Accuracy filter”. Make sure “Filter enabled” is checked and then the settings will apply.
Configure GPS action
Drop a “Configure GPS Action” control onto a screen. These settings will override the “Application properties”, once the enters a screen with this action control on it.
Element properties
In CyberTracker version 3.391 or later, CyberTracker has “Accuracy filter” settings for each Element. These can be reached using the “Edit Element” button when creating new Elements. If an Element with these settings is present in a Sighting, these settings will be used. Element based accuracy settings will trump all other accuracy settings.
Accuracy filter in action
If the accuracy is set using the Element properties, then the name of the Element appears just below the fix type. For example, in the image below, the “Walk” Element was used to specify the accuracy settings. If the settings were not specified using Element properties, then this line will not be visible. Note that if the required accuracy is not met, the metric shows in red.

A demo of using Element properties to set the accuracy can be downloaded here.
Web Update
Web Update is a way to distribute CyberTracker applications over the web. This reduces the need to connect with a USB cable to install and update apps.
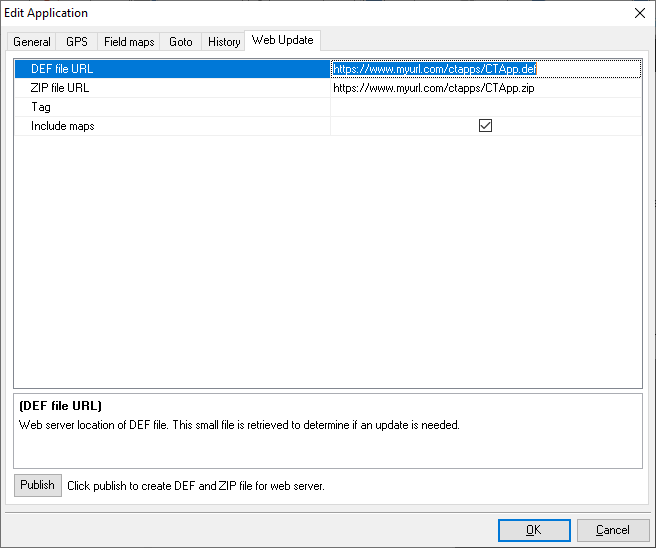
Edit Application dialog
Concepts
An update consists of two files: a DEF and a ZIP. The DEF file is a small text file which contains a version and a web link to the ZIP file. The ZIP contains the application along with any offline maps. The mobile app reads the DEF file for initial installation and for update checks.
Initial setup using file hosting (advanced)
If the web location where these files will be hosted is known, then the process is straighforward:
- On the CyberTracker desktop application, open the “Edit Application” dialog and go to the “Web Update” tab.
- Enter the URLs for the DEF file and the ZIP file and click “Publish”.
- Copy the newly created files (CTApp.def and CTApp.zip) from the “CT” folder on the desktop to the file host.
- On the mobile application, go to the Connect page, then select the CyberTracker connector, then Web Install. Enter the DEF link and the app will be installed.
- See the section below on sharing the link in a more user friendly way.
- Remember to save the database, so in future you know where the link and def file are.
Initial setup using Google Drive or Dropbox
- Login to Google Drive or Dropbox and create a new folder. The name does not matter.
- On the CyberTracker desktop application, open the “Edit Application” dialog and go to the “Web Update” tab. Click the “Publish” button. This creates a “CT” folder on the desktop. Open this folder in Windows Explorer by double clicking on it. Note that the property settings on the dialog do not matter at this point.
- Drag CTApp.def and CTApp.zip to the newly created folder in your browser.
- Right click on CTApp.def in the browser and select “Copy link”. On Google Drive change “General Access” to “Anyone with the link” and click “Copy link”. Paste the link into CyberTracker in the “DEF file URL” property.
- Right click on CTApp.zip in the browser and select “Copy link”. On Google Drive change “General Access” to “Anyone with the link” and click “Copy link”. Paste the link into CyberTracker in the “ZIP file URL” property.
- Click “Publish” again in CyberTracker. Drag the CTApp.def and CTApp.zip files from the desktop CT folder into the browser and overwrite the existing ones. On Google Drive, make sure to choose overwrite, rather than create copies. This is to prevent the links from changing.
- On the mobile application, go to the Connect page, then select the CyberTracker connector, then Web Install. Enter the DEF link and the app will be installed.
- Remember to save the database, so in future you know where the link and def file are.
Subsequent updates
- On the CyberTracker desktop application, open the “Edit Application” dialog and go to the “Web Update” tab. Click the “Publish” button.
- Replace the files on Google Drive, DropBox or the file server with the newly created DEF and ZIP from the “CT” folder on the desktop.
- CyberTracker Mobile will recognize an update and offer to install it.
Sharing
- On the CyberTracker mobile app, long press on the project to bring up the Project details screen.
- Tap the “QR Code” option. Share the link or the QR code with others. If CyberTracker is not installed on the device, then the user will be prompted to install it. If it already installed, then the project will be immediately downloaded and installed.
AB Testing
The “Tag” property can be surfaced in the collected data. To enable this, enter Layout mode, select “Actions” from the Toolbox on the right and place an “Add Attribute” action on the first screen. Set the “Result Element” and then check the “Update tag” property. This causes the system to add an attribute to sightings with the value of the tag property in the DEF file.
By sending different DEF links to different users, it is possible to label user data according to which DEF file link they used to install the application.