SMART Mobile User Manual
 Zoological Society of London
Purpose
The purpose of this training resource is to provide a guide on how to configure SMART Mobile and use it to collect field data. The intended target groups for training are field rangers, other frontline staff and ecological monitoring staff who work on site in terrestrial and marine protected areas, community conservancies, private reserves and other conservation areas.
Acknowledgements
The training handbook was prepared by the SMART Training Taskforce, a group of dedicated SMART users who work broadly across geographic regions, sites and situations where SMART is being implemented, in terrestrial and marine environments. The Training Taskforce is one working group under the SMART Partnership which currently comprises the following organizations: Frankfurt Zoological, Global Wildlife Conservation, North Carolina Zoo, Panthera, Peace Parks, Wildlife Protection Solutions, WCS, WWF, and ZSL.
Overview
This training resource covers the practical aspects of field data collection using patrol forms, navigation using GPS, data recording on handheld devices using SMART Mobile in conjunction with configured data models, and data upload to SMART. The section of the handbook discusses the installation and configuration of SMART Mobile. The second section covers data capture in the field. The final section covers troubleshooting and frequently asked questions.
Table of Contents
- 1. Introduction
- 2. Demo of SMART Mobile in action
- 3. Installation
- 4. Kiosk mode
- 5. Retrieving data
- 6. Configuration
- 6.1. Data model
- 6.2. Configurable data model
- 6.3. Packages
- 6.4. Routes
- 6.5. Device Settings
- 7. General usage
- 8. Project usage
- 9. Troubleshooting
- 10. Frequently Asked Questions
- 10.1 On which types of patrols should there be data collection?
- 10.2 Which observations should be recorded?
- 10.3 What handheld devices/smartphones should we buy for our protected area?
- 10.4. What should we do if SMART Mobile device stops working during a patrol?
- 10.5. What should we do if GPS battery dies?
- 10.6. What should we do if we run out of datasheets?
- 10.7. What should we do if the camera stops working/battery becomes flat?
- 10.8. I am running SMART on a Mac computer but cannot import patrols from SMART Mobile, why?
- 10.9. My Android device will not connect to my computer and I can’t install CyberTracker/import patrols, what can I do?
- 10.10 Android settings and troubleshooting SMART Mobile
- 10.11 BlackView, DoKe OS and Android 12
- SMART Partners
1. Introduction
This manual describes the functions and usage of the SMART Mobile software application.
The intended audience is users of the SMART Desktop application who are configuring field data collection. Field users or rangers may also use this manual to understand the various configurations and how they function.
The manual does not describe the SMART Desktop application, although it may make reference to various desktop configuration options. Readers are encouraged to learn the desktop application before reading this manual.
1.1. What is SMART Mobile?
SMART Mobile is a mobile phone application that is used by rangers to capture data from the field.
The SMART Desktop application defines the data model and SMART Mobile uses this definition to prompt the rangers to collect data.
Rangers capture data and then download it into SMART Desktop for reporting and analysis.
1.2. Related resources
1.2.1. Resource Library
SMART Conservation Tools maintain a resource library: https://smartconservationtools.org/Resources/Resource-library
This includes many documents and guides for leveraging and extending SMART features. Readers are encouraged to use the library to grasp the core concepts ahead of using this manual. For example, a Patrol is a set of related observations and attributes. This term will be used through the manual.
1.2.2. Community Forum
There is a moderated community forum which is responsive to questions and comments: https://forum.smartconservationtools.org/
When reporting an issue, it is very helpful to attach a bug report.
1.2.3. Tutorial videos and more
Additional resources related to SMART Mobile may be found here: https://cybertrackerwiki.org/smart/
2. Demo of SMART Mobile in action
This section describes how to quickly see SMART Mobile in action. The idea is to try it out on an Android or iOS device and help to create an understanding of what it is by example.
This is a disconnected example, so do not capture important data. This demo requires an iOS or Android device with internet access.
2.1. Get SMART Mobile
Search for and install “SMART Mobile for Conservation”:
iOS AppStore: https://apps.apple.com/us/app/smart-mobile-for-conservation/id1546455676?platform=iphone
Android Play Store: https://play.google.com/store/apps/details?id=org.cybertracker.mobile.sm&gl=US
2.2. Connect to a SMART Package
Scan the following QR Code on your phone. It will download and install a sample package into SMART Mobile.
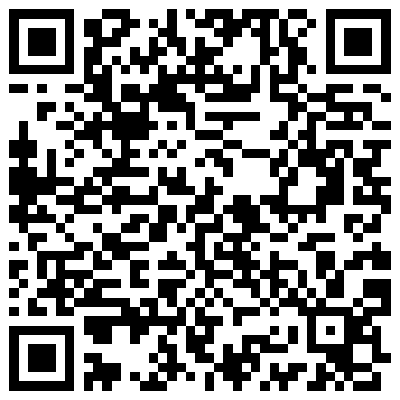 |
Or click the applink.
2.3. Capture data
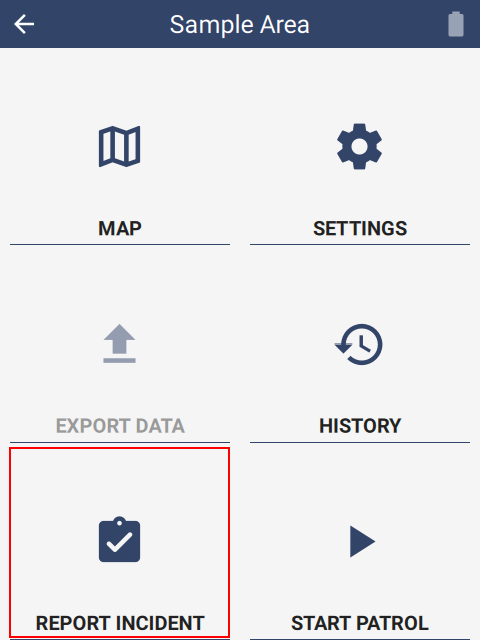
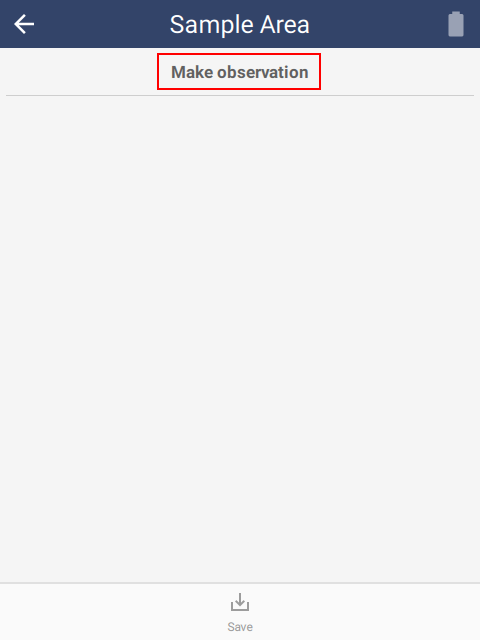
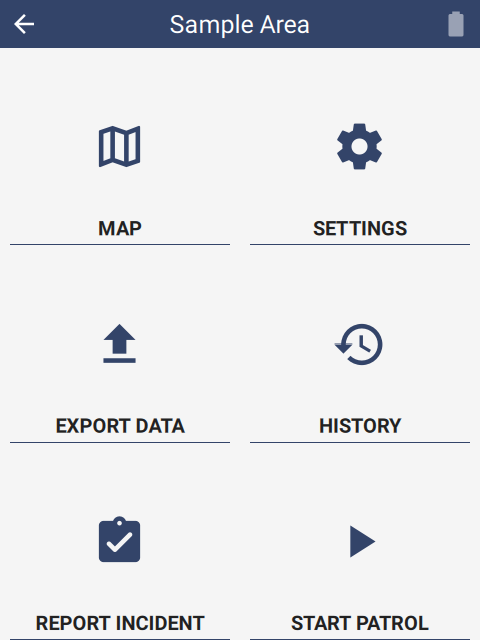
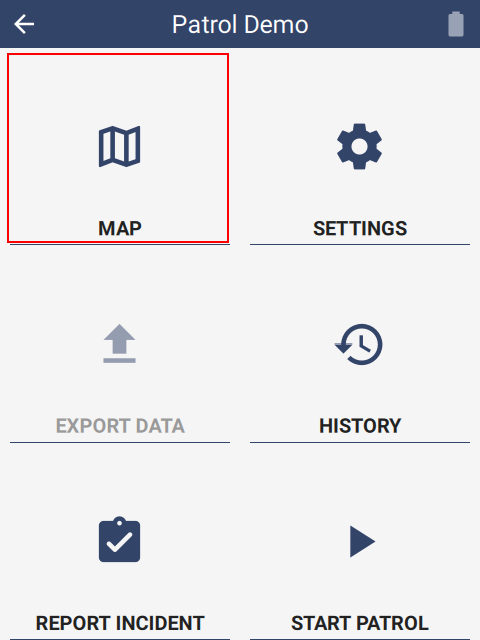
Tap REPORT INCIDENT, Make observation, Wildlife
 |  | 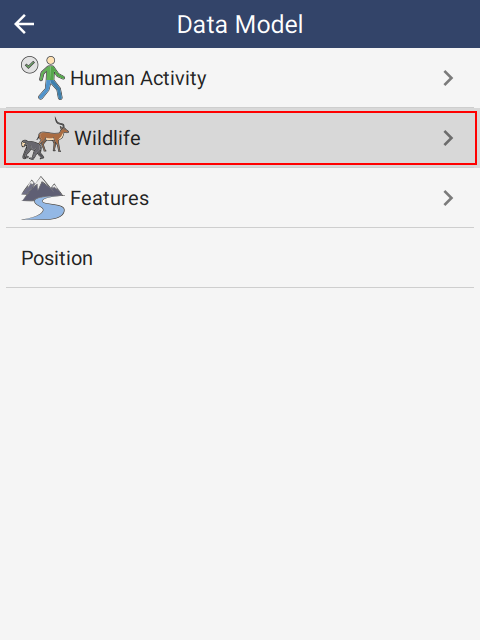 |
Tap Wildlife - direct observation, then try tapping on some of the options and entering data.
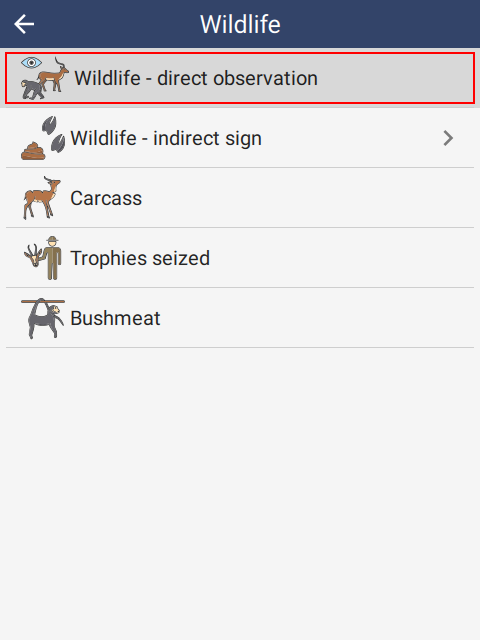 | 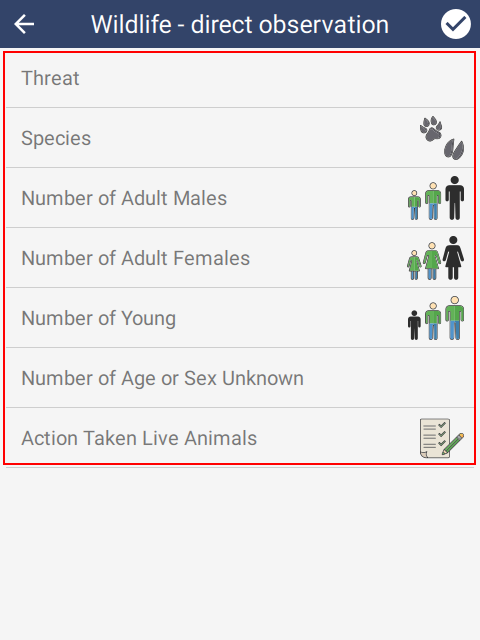 | 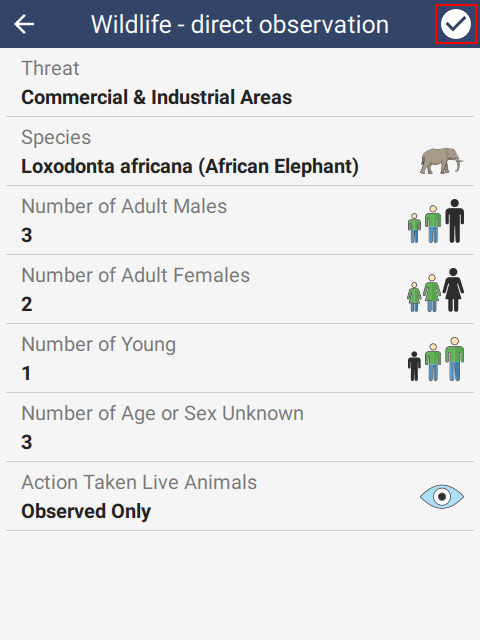 |
Tap the icon in the top right corner. Then tap the Save button at the bottom.
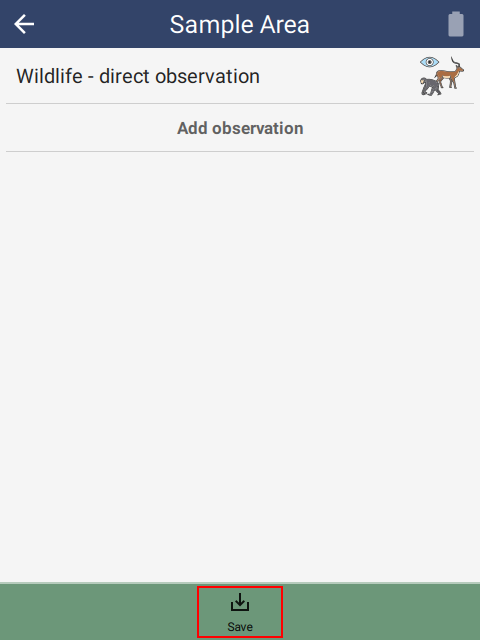 |  |  |
2.4. Summary
The example shows how to acquire SMART Mobile and use it to capture a single observation. There are many options and configurations available and these will be explored in later sections.
3. Installation
SMART Mobile is a software application and therefore must be installed before use. There are several ways of doing this and the choice depends on the scenario and requirements. Each approach has advantages and limitations.
3.1. Supported operating systems
SMART Mobile is supported on Android, iOS and Windows Desktop. The latest version of each platform is recommended, but older versions are supported.
iOS requires version 14 or higher.
Android requires version 6 (Marshmallow) or higher. It is recommended that testing is conducted on a device prior to purchasing a larger number of devices. Strength of GPS signal, battery life and other attributes vary substantially from one manufacturer to the next.
Windows Desktop running Windows 10 or higher. This version is maintained for training purposes only and is not supported as a way to capture field data.
3.2. Apple AppStore
SMART Mobile is available on the Apple AppStore by searching for “SMART Mobile for Conservation” or the link: https://apps.apple.com/us/app/smart-mobile-for-conservation/id1546455676?platform=iphone
This version will be routinely updated to resolve issues and add new features.
Limitations:
- SMART Connect is required as there is no support for USB cable transfer
- Kiosk mode is not supported on iOS.
3.3. Android Play Store
SMART Mobile is available on the Google Play Store by searching for “SMART Mobile for Conservation” or the link: https://play.google.com/store/apps/details?id=org.cybertracker.mobile.sm&gl=US
This version will be routinely updated to resolve issues and add new features.
Limitations:
- Kiosk mode is not supported on this version. Use the APK version if kiosk mode is required.
3.4. Android APK
SMART Mobile can be installed directly onto an Android using an APK. An APK is a single file that holds an Android application.
The APK file for SMART Mobile is available for download from the Download option on the SMART Conservation Tools website: https://smartconservationtools.org/.
Limitations:
- Updates will not be automatic.
- Updates will require repeating the installation process with a new APK.
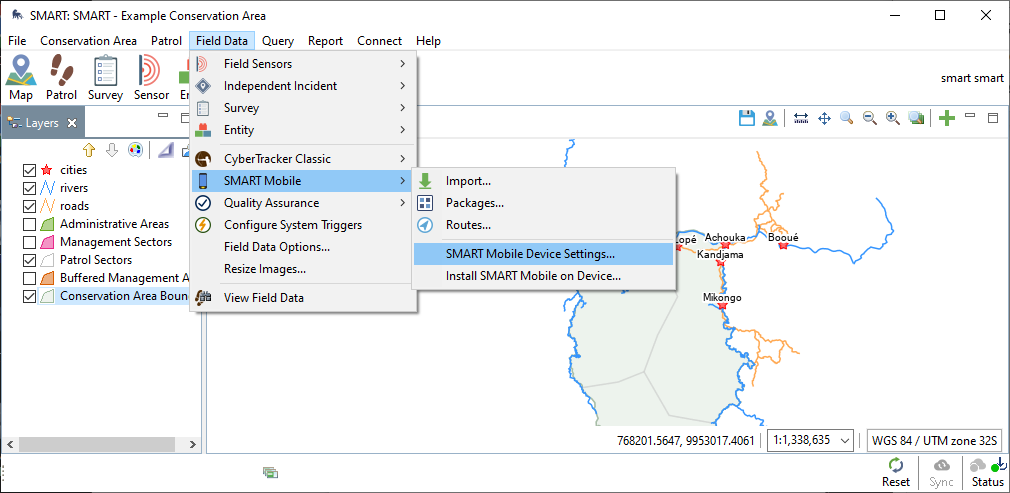
To start, select Install SMART Mobile on Device… from the Field Data menu and SMART Mobile submenu:
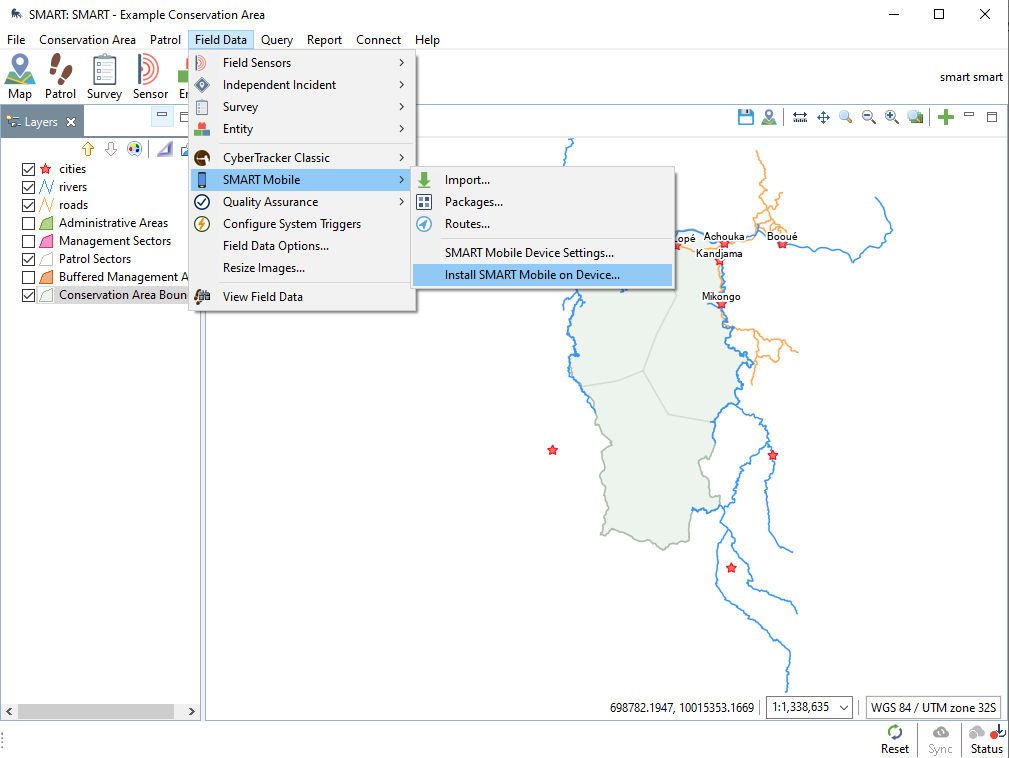 |
Use the ‘…’ button and select the APK file from the file system and click Next:
 |
Then select Copy SMART Mobile to device and click Next:
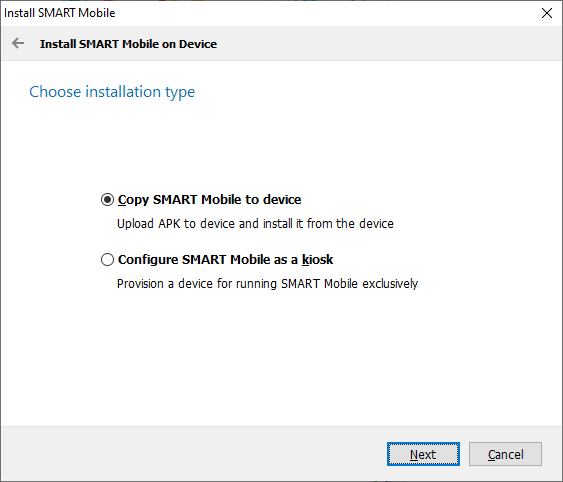 |
Select the device to copy SMART Mobile to and then click Copy application to selected devices. Devices will have more than one entry if they have an additional SD card. There is no harm in selecting all of them.
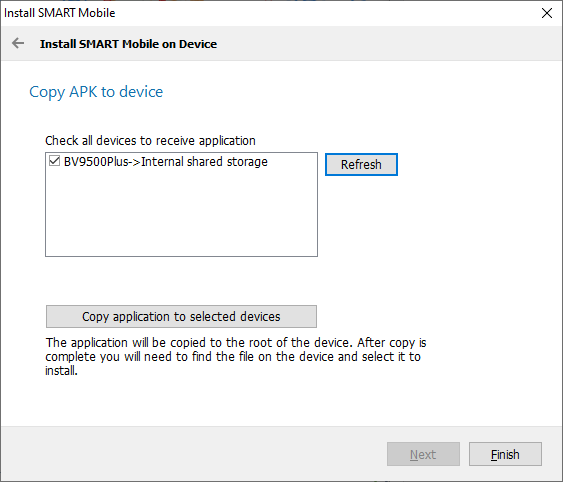 |
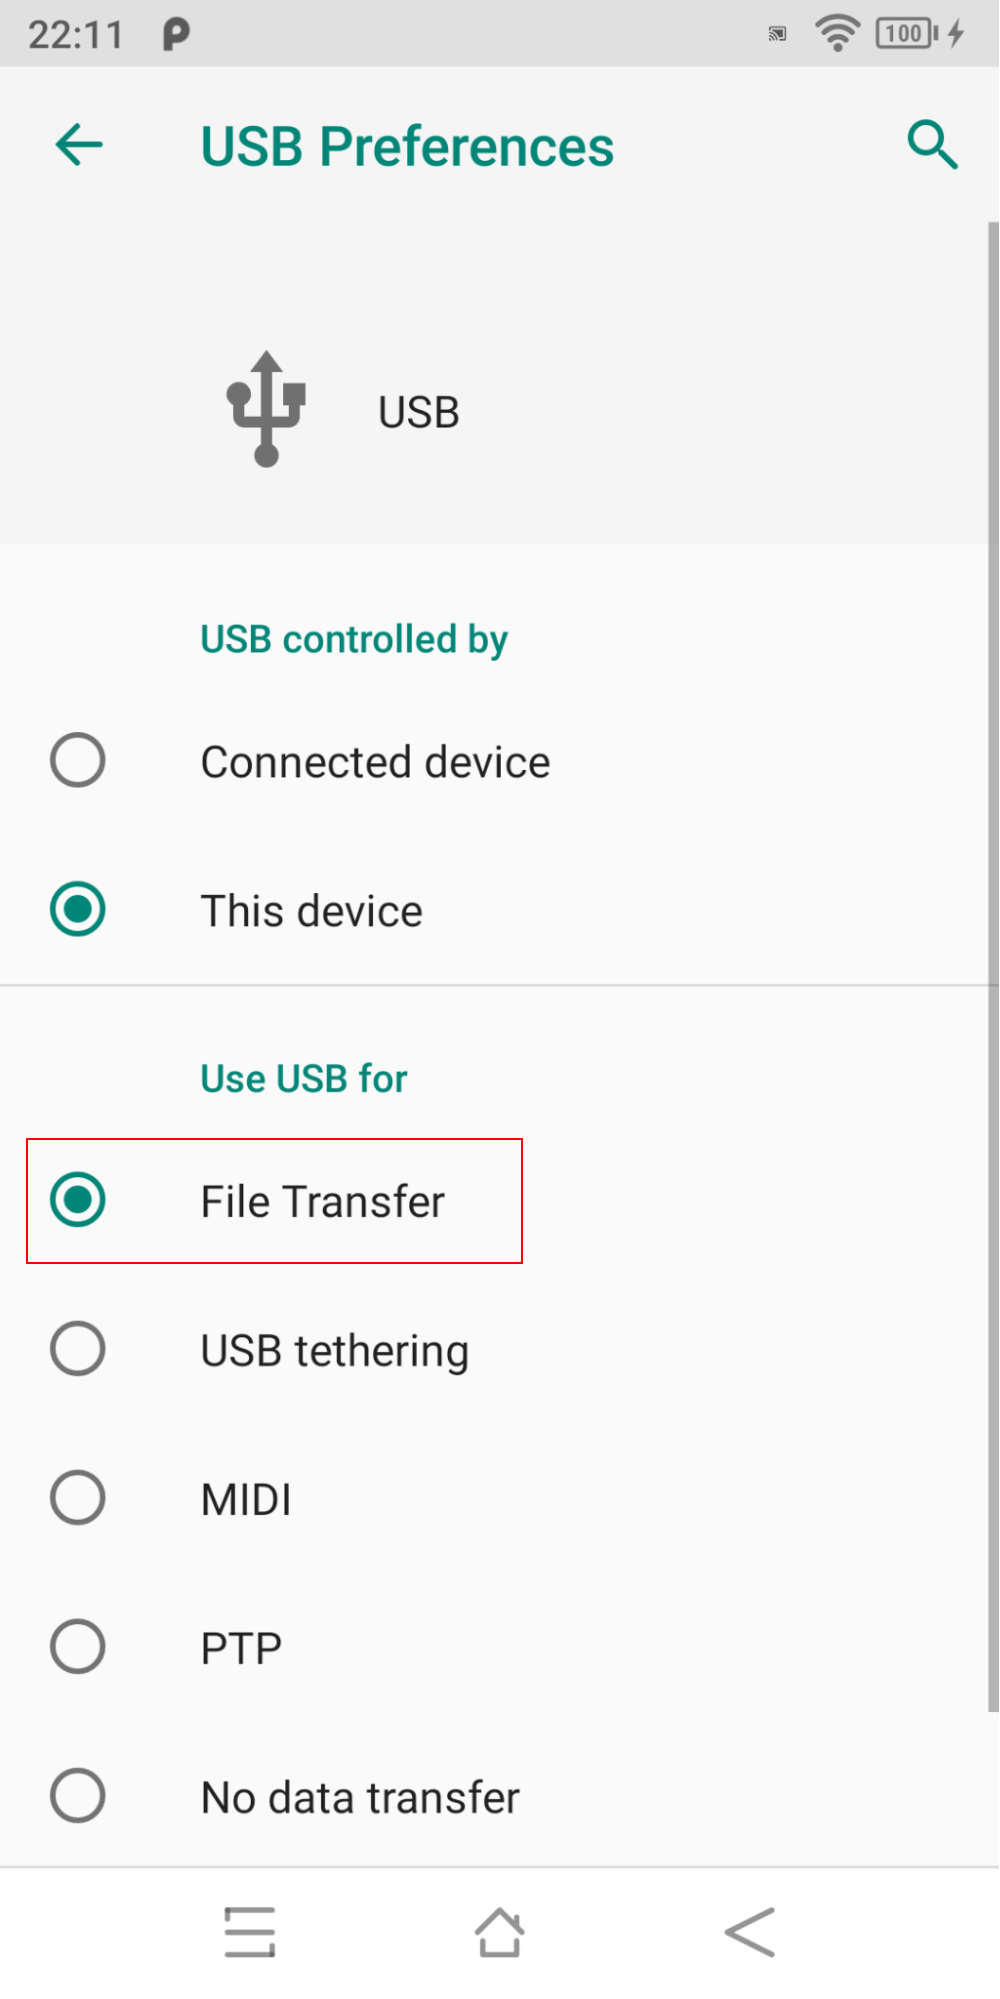
If the device does not show up in the list, make sure the USB cable is connected to your PC and that the USB mode on the device is set to File Transfer:
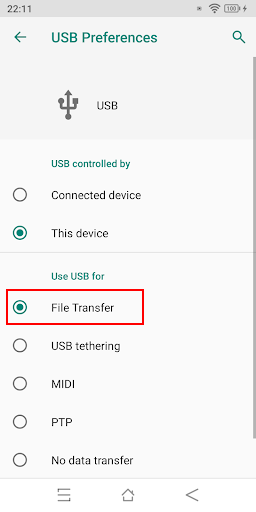 |
Clicking Refresh will retry the connection.
Note that this can be used to copy to several devices, just plug in a new device and repeat the process (Refresh then Copy).
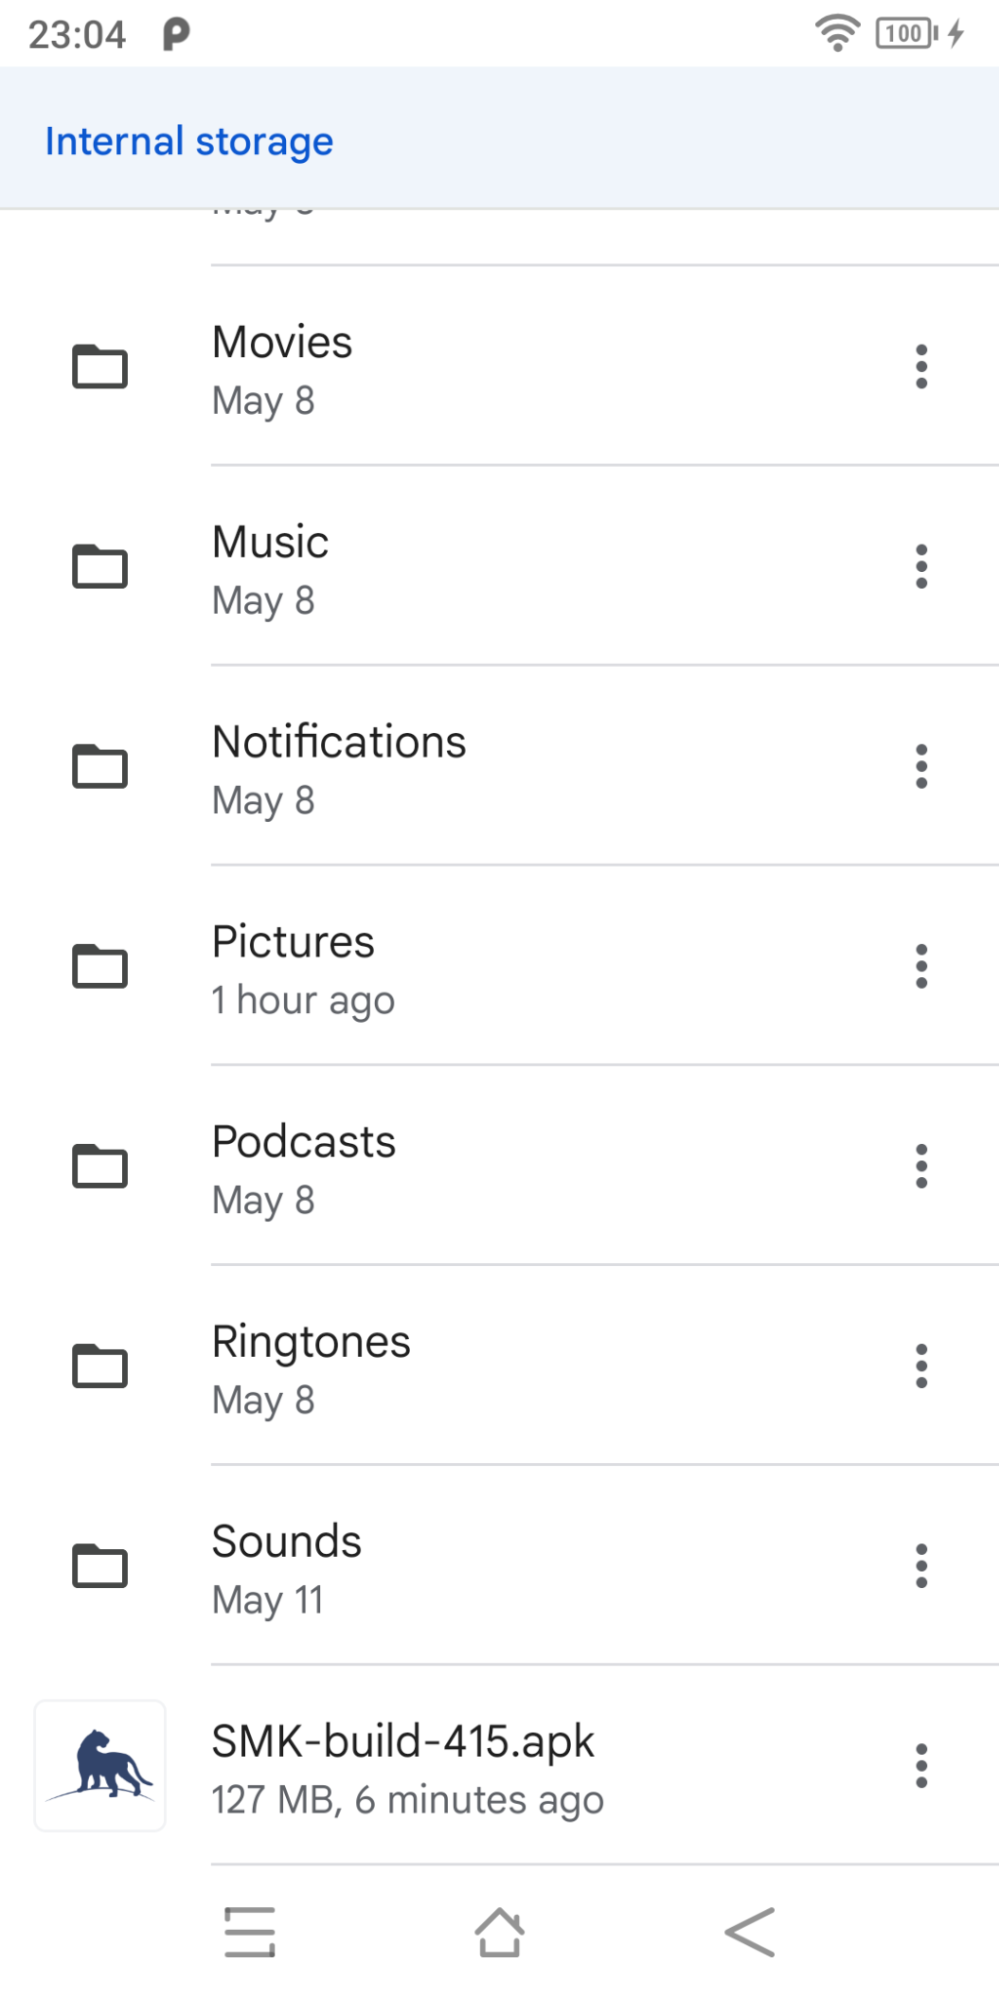
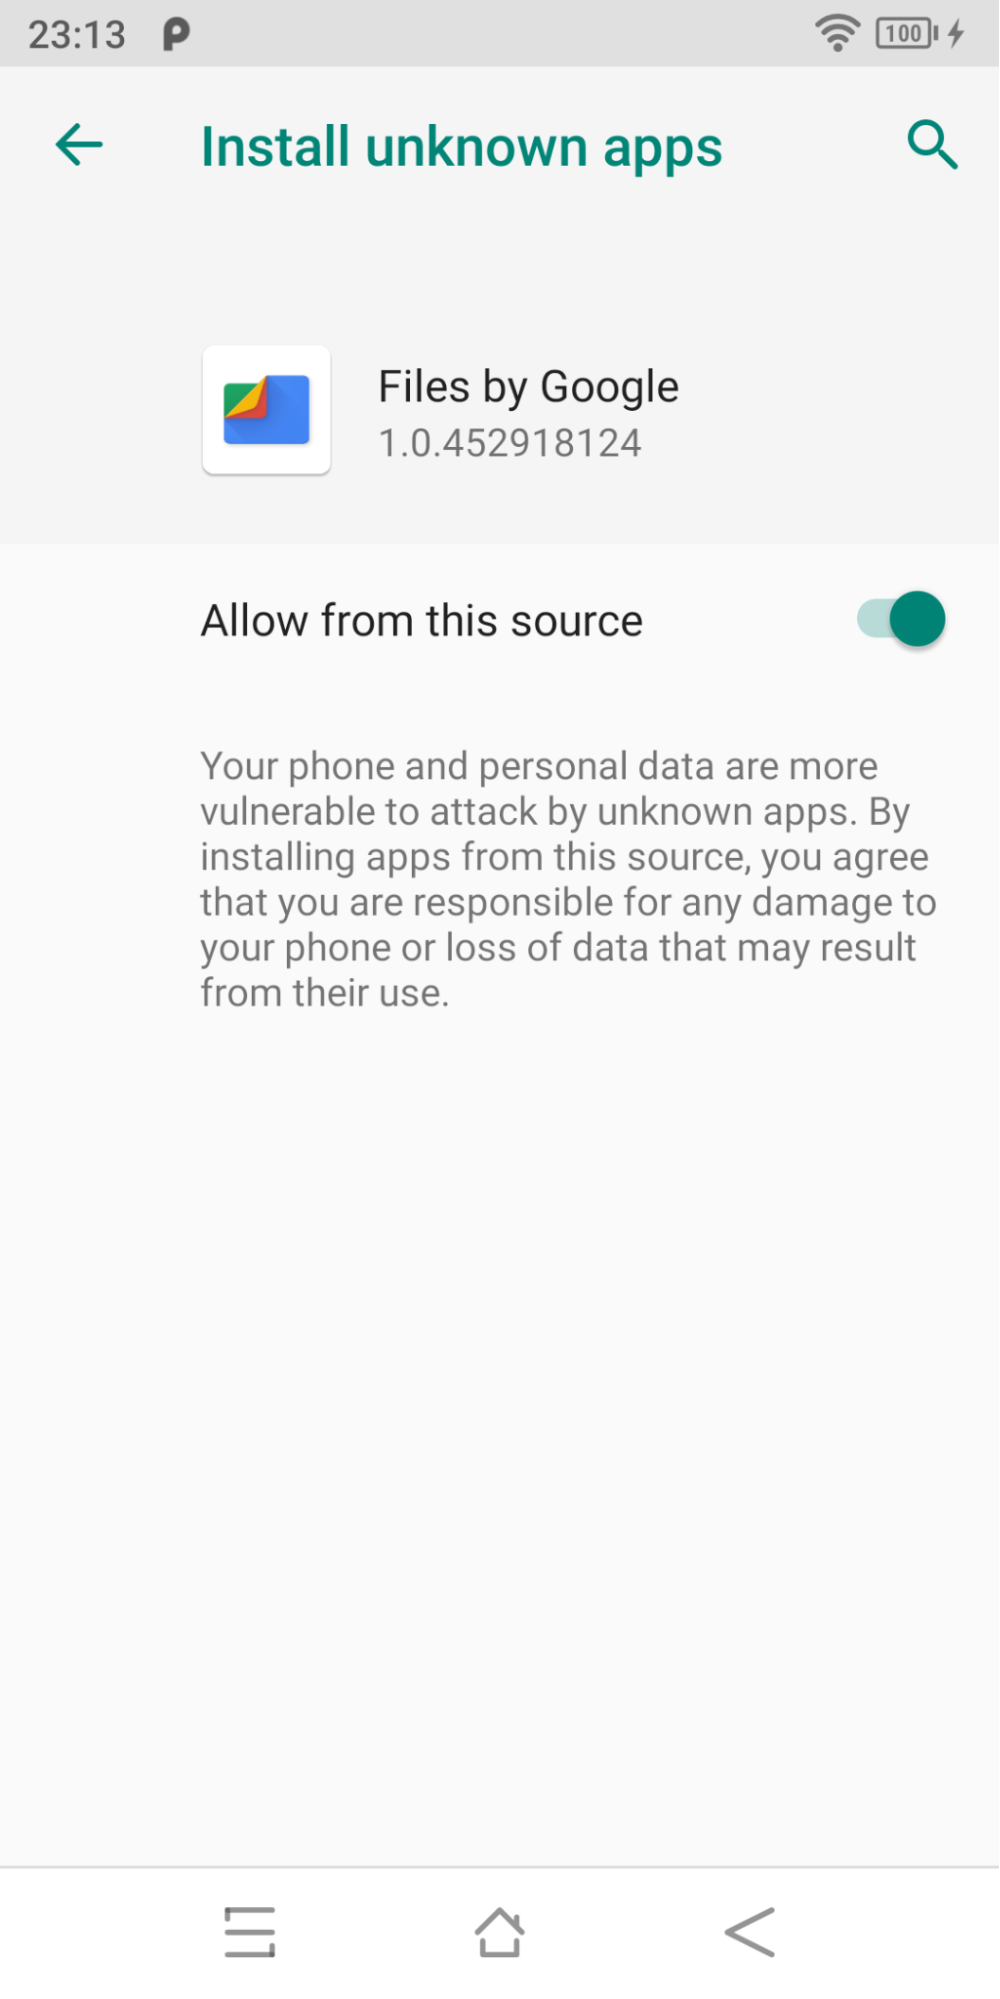
Next open the Files viewer application on the device and navigate to the Internal Storage folder and find the APK. Then tap on it to install it.
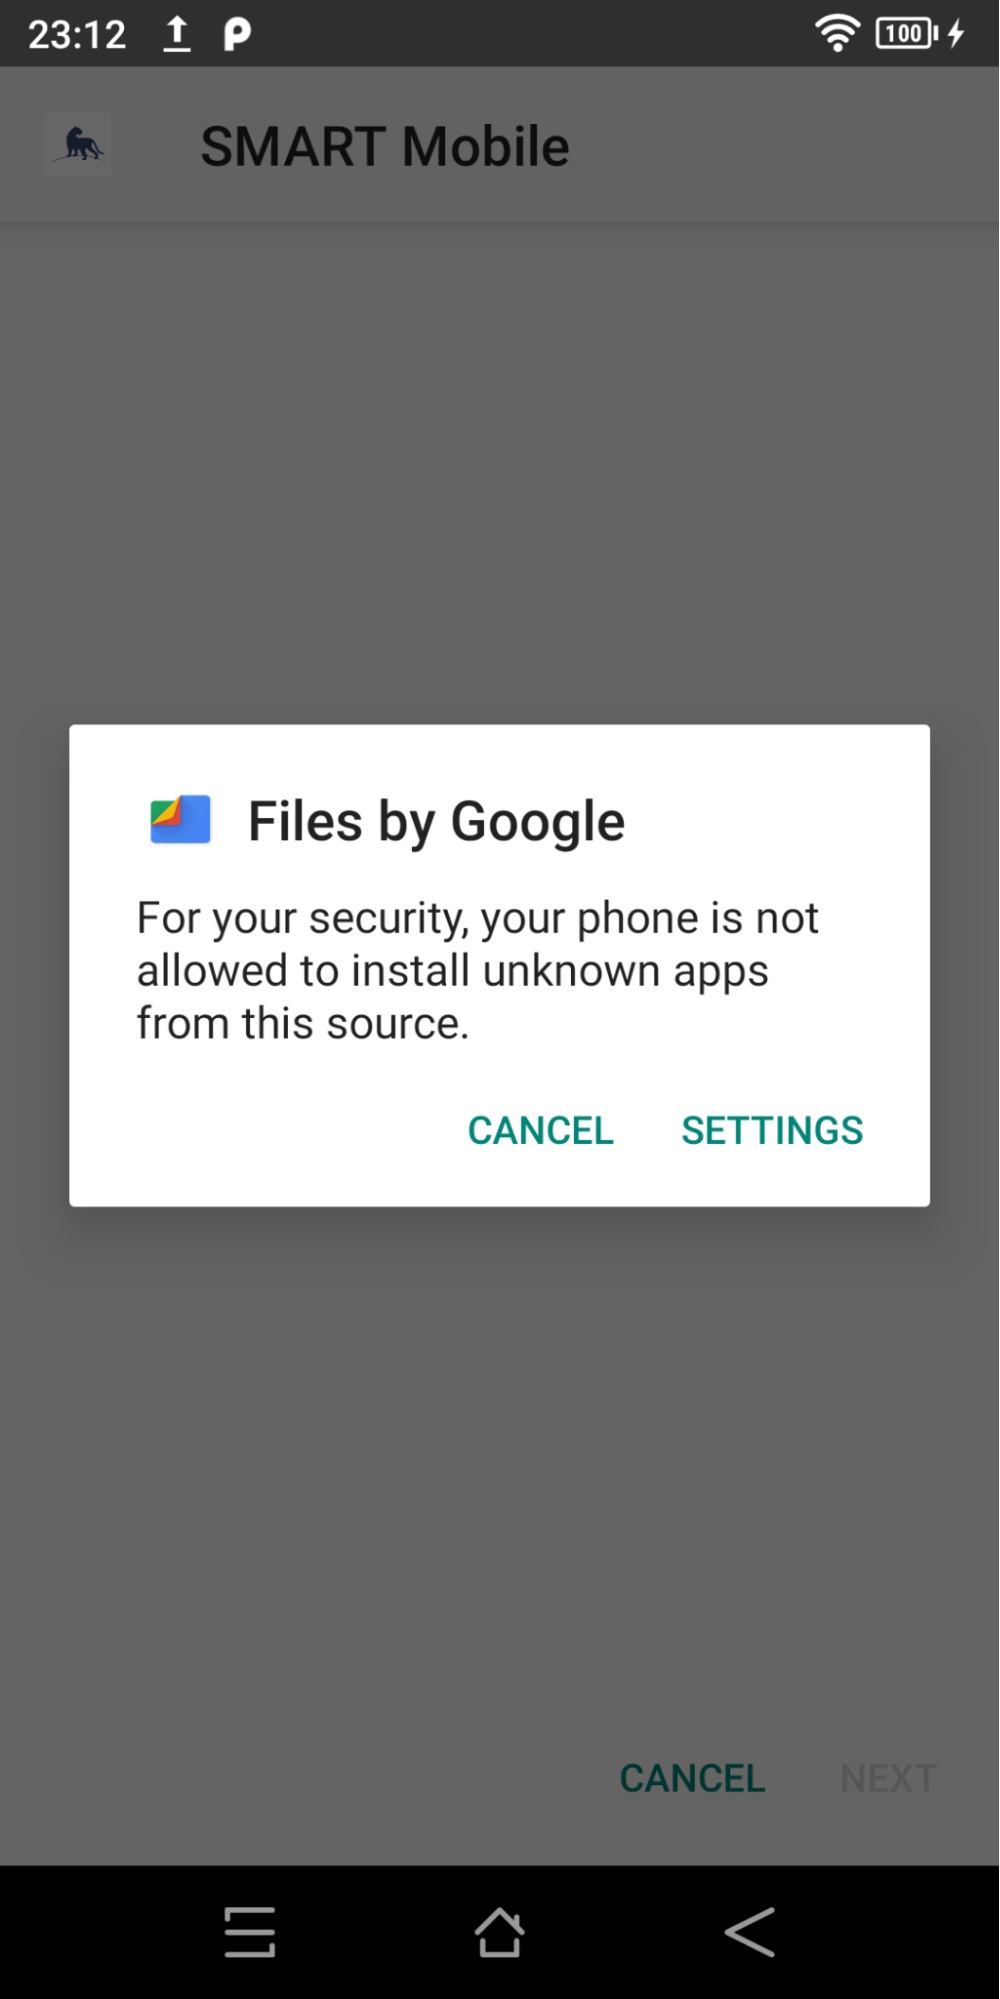
A prompt may appear to allow installation of apps from unknown sources. If so, choose Settings and then enable Allow from this source:
 |  |  |
When running SMART Mobile for the first time, a prompt will appear to switch your Android home launcher app to SMART Mobile. Do not switch the launcher to SMART Mobile.
3.5. Windows desktop
SMART Mobile is available as a Windows desktop application. While data could be collected using this version, it is recommended only for testing and training purposes.
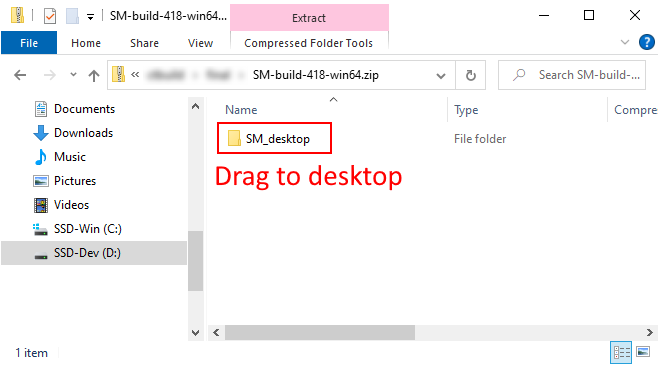
A ZIP file for SMART Mobile is available for download from the Download option on the SMART Conservation Tools website: https://smartconservationtools.org/. Once downloaded, open the file in Windows Explorer and drag SM_Desktop folder to the Windows desktop:
 |
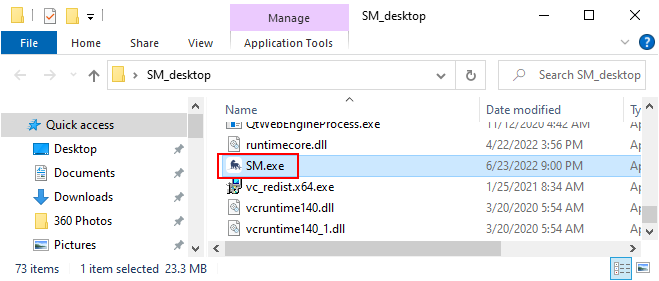
Now open the SM_Desktop folder from the Desktop and locate the SM file and double click it to launch:
 |
4. Kiosk mode
Kiosk mode allows SMART Mobile to lock the device so that other phone functions are not accessible. During kiosk mode, users will not be able to exit SMART Mobile to use other applications or phone functions.
The installation process is similar to Android APK mode (see above), however the device must be provisioned. The provisioning process requires that the device be factory reset.
The APK file for SMART Mobile is available for download from the Download option on the SMART Conservation Tools website: https://smartconservationtools.org/.
Limitations:
- Updates will not be automatic.
- Updates will require repeating the installation process with a new APK. It is not necessary to reprovision the device, the new version can be installed over the old one using the Android APK installation mode (see above).
- Other phone applications cannot be used until first exiting kiosk mode.
4.1. Installation
To start, select Install SMART Mobile on Device… from the Field Data menu and SMART Mobile submenu:
|
Use the ‘…’ button and select the APK file from the file system and click Next:
|
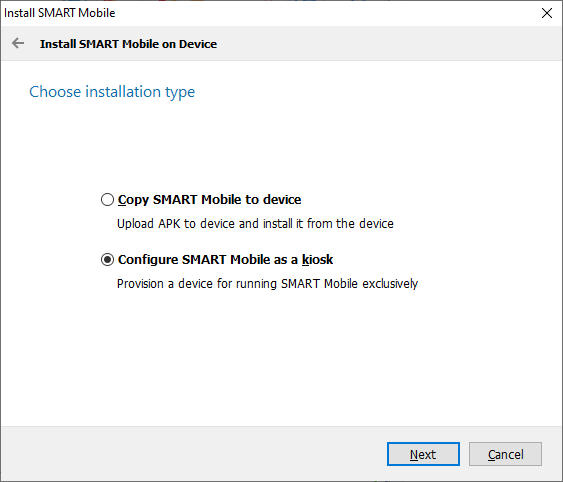
Then select Configure SMART Mobile as a kiosk and click Next:
 |
Click Install driver - once it is installed once, then the button caption will change to Reinstall driver. This is a one-time operation on Windows. If the button reads Reinstall driver, then there is no need to repeat this process:
 |
Right click on “android_winusb” (file type: Setup Information) and select Install.
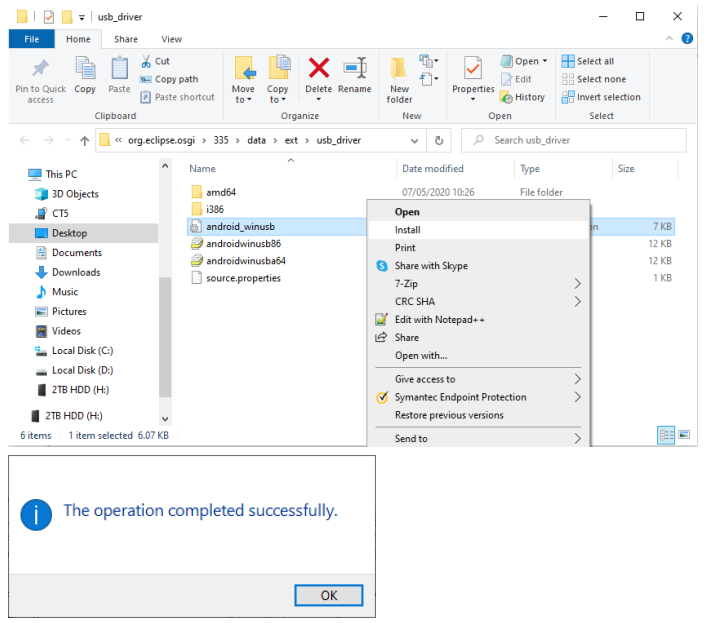 |
Once the driver is installed, click Next.
4.2. Preparing the device
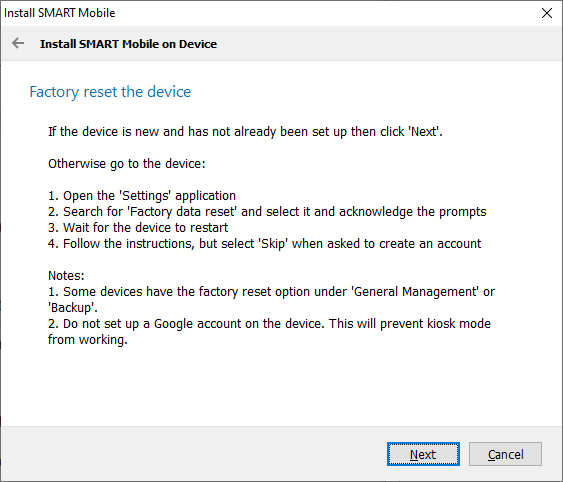
If the device is brand new, then there is no need to reset it. Otherwise, factory reset the device by opening Settings and selecting Factory data reset. Accept all prompts and wait for the device to restart.
Note: it is important to skip creating an account. If an account is active on the device, kiosk mode will not work.
Follow the instructions below and click Next:
 |
Follow the instructions to enable Developer mode and USB debugging and click Next:
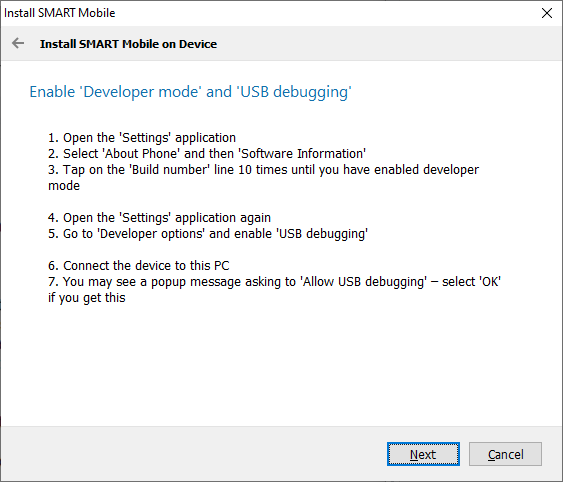 |
Click Provision the device when ready:
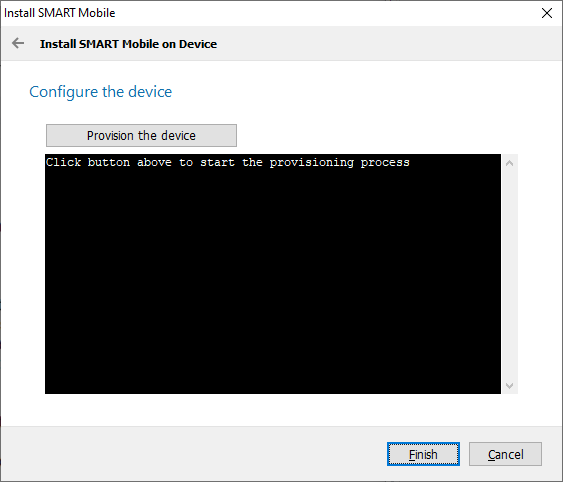 |
If the process is successful, the following will be shown:
 |
Other devices may be provisioned directly from here, but plugging them in. When done, click Finish.
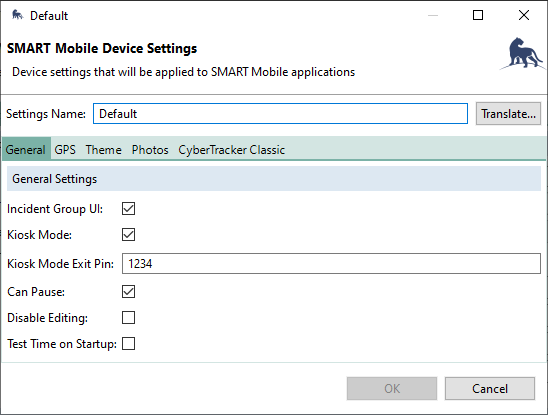
4.3. Desktop configuration
Kiosk mode is configured on a package using Device settings on the SMART Desktop:
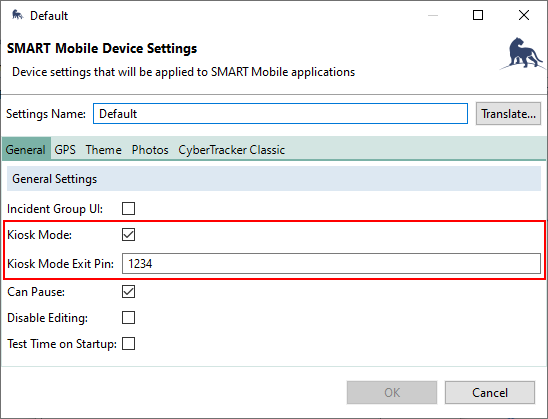 |
Kiosk mode is a check box. If checked, then launching a Project will activate kiosk mode. Note that this only works if the kiosk version of SMART Mobile is installed.
Kiosk Mode Exit Pin controls the pin code needed to exit kiosk mode. When tapping back on the start page, the following popup will be displayed:
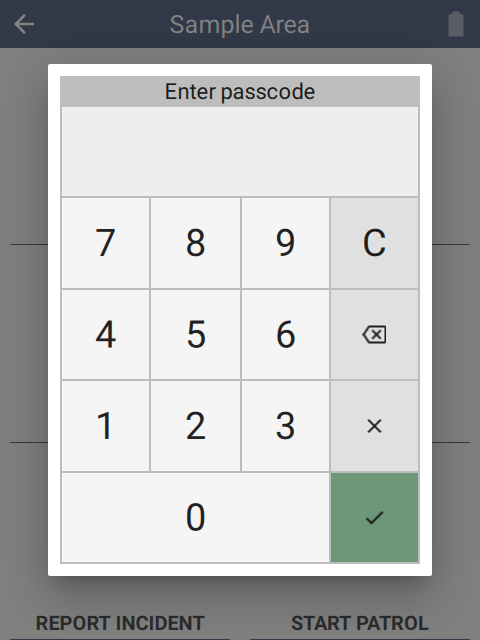 |
Entering the selected code will disable kiosk mode and exit the project.
4.4. Field operation
While kiosk mode restricts general use of the device the active project can be changed from the Settings Page using Change project.
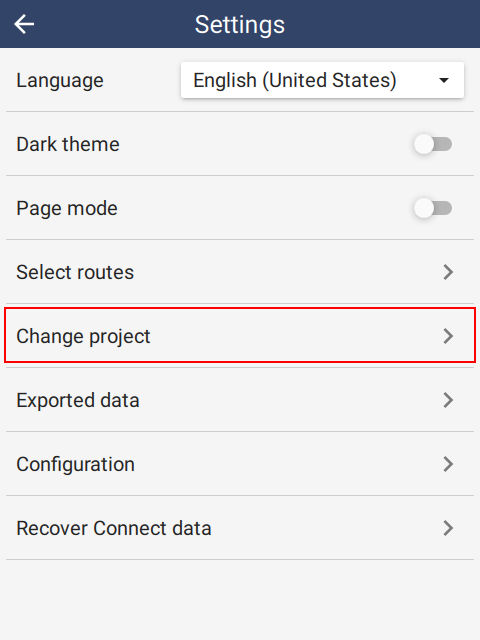 |
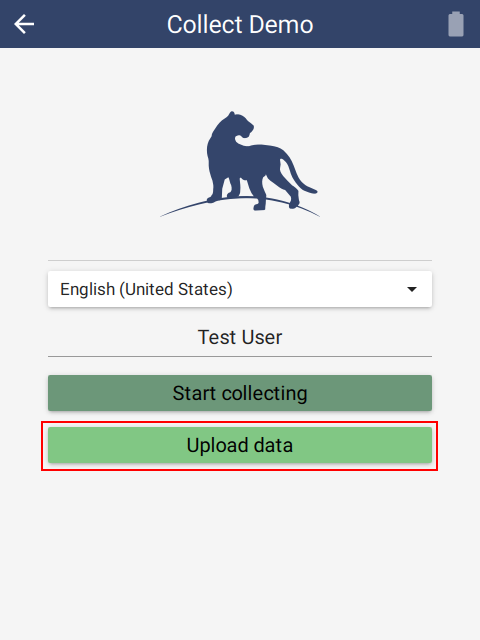
From the Start page, data can be exported or uploaded. When connected to a Windows PC via USB cable, the data can be downloaded without leaving kiosk mode.
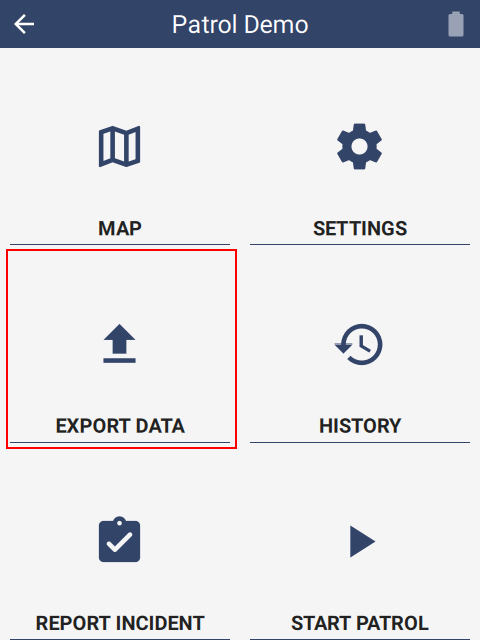
5. Retrieving data
Once data has been entered, use the Export data button on the project home page to ready the process. For Collect, click on the Upload data button to complete data upload.
 |  |
5.1. USB cable
Connect the USB cable from the desktop to the device. Ensure the device is in File Transfer mode.
|
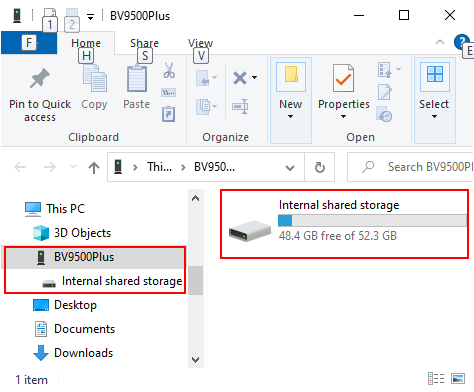
When correctly configured, the device will be present in Windows Explorer:
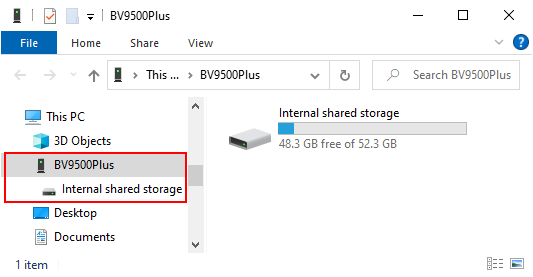 |
Choose Import… from the Field Data -> SMART Mobile menu.
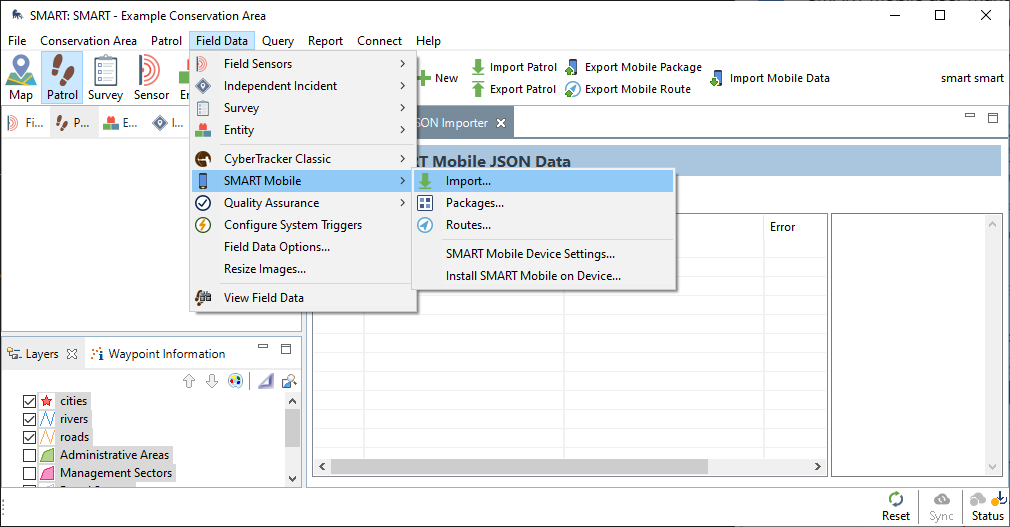 |
This will open the Import SMART Mobile Data dialog. Select Device and then click Import.
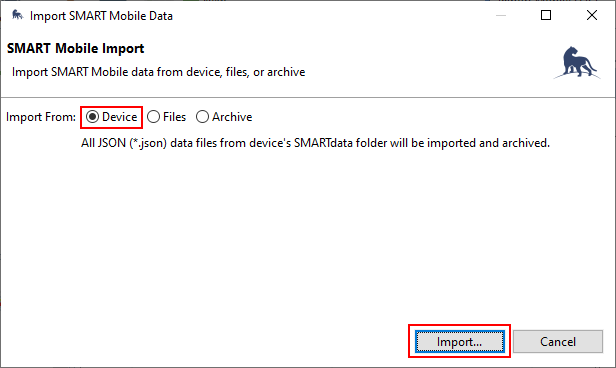 |
5.2. Connect
When SMART is configured with a Connect server, it can be configured to send data automatically. If Upload Data To Connect is unchecked, then data must be retrieved using the USB cable (see above). Otherwise, it will be sent directly to the Connect server over the network.
 |
Since the connection to the server may be interrupted, the Export data option will attempt to send all unsent data to the server.
5.3. Collect
Collect automatically sends data to the server. After collection has completed, the Upload data button becomes visible. This sends any unsent data and resets the project.
6. Configuration
6.1. Data model
Data collection begins with the creation of a Data Model in SMART Desktop. The Data Model defines the data which SMART Mobile will collect.
More information can be found in the SMART Essentials Handbook in the SMART Resource Library: https://smartconservationtools.org/Resources/Resource-library
The Data Model editor can be reached from the Conservation Area menu:
 |
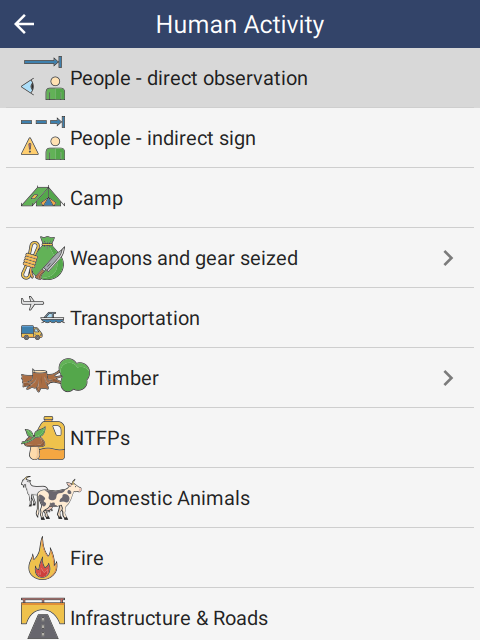
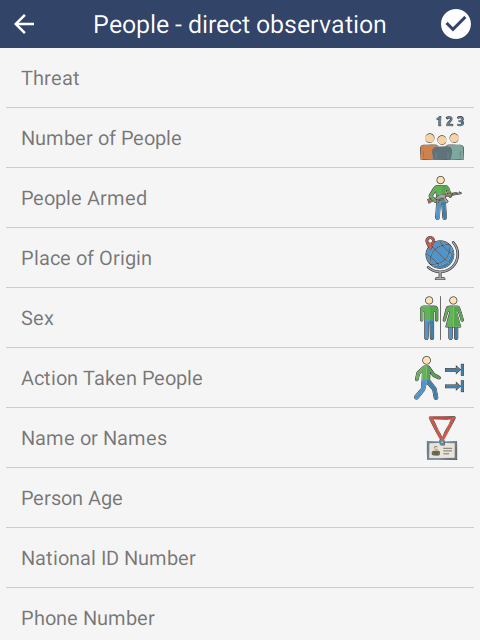
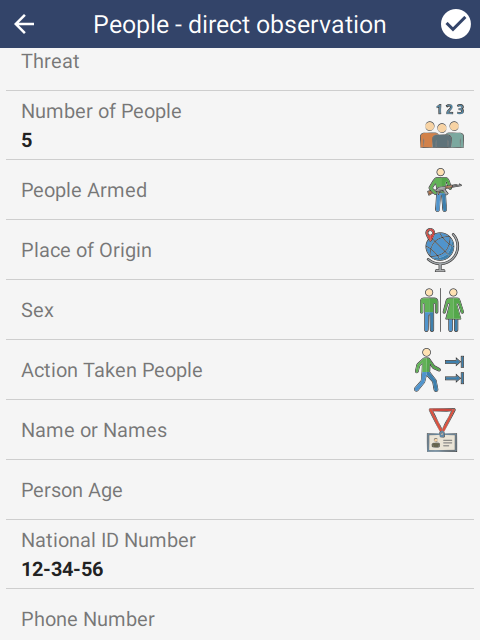
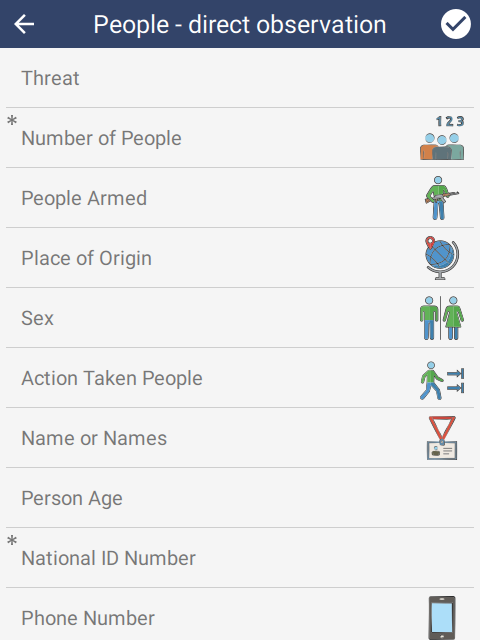
The Data Model is organized as a hierarchy. SMART Mobile users will drill into Categories until reaching a set of Attributes. For example, the Human Activity -> People - direct observation category will show the attributes Threat, Number of People, People Armed, etc.
Note: while Threat is not in the People - direct observation category, it is in the Human Activity Category and is therefore part of the required attributes:
 |  |  |
6.1.1. Category
The Data Model is organized as a hierarchy with Categories and Attributes. Categories are used for grouping (they can contain other Categories) and they can contain Attributes.
Categories have an icon and a name for display.
6.1.2. Attribute
Attributes are data values that SMART Mobile collects, e.g. a number, a note, etc. An Attribute has a type which governs what kind of data it can hold. The supported types are:
- NUMERIC - numbers
- TEXT - for text
- LIST - a single select list of options
- MULTI LIST - a check list of options
- TREE - a hierarchical single select list
- BOOLEAN - an on/off or yes/no value
- DATE - a date value
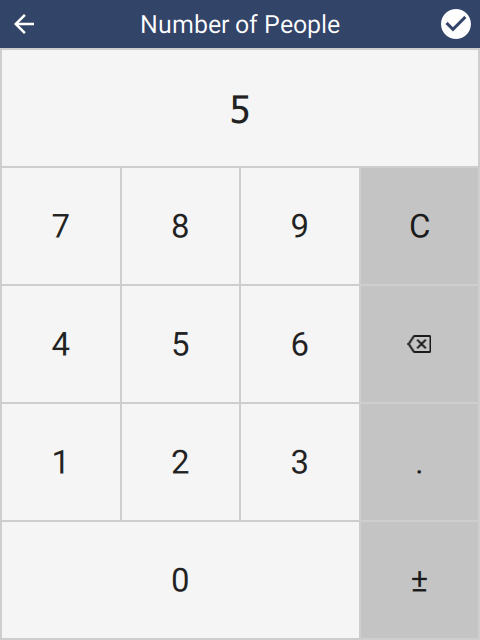
6.1.2.1. NUMERIC
Numeric attributes are collected with a keypad. Once the number has been entered, tap the check in the top right corner of the screen:
 |  |
6.1.2.2. TEXT
Text attributes are collected using a full screen text editor. The keyboard will pop up from the bottom of the screen:
 |  |
6.1.2.3. LIST
List attributes allow the selection of a single option from a list:
 |  |
6.1.2.4. MULTI LIST
Multi list attributes allow selection of multiple options from a list:
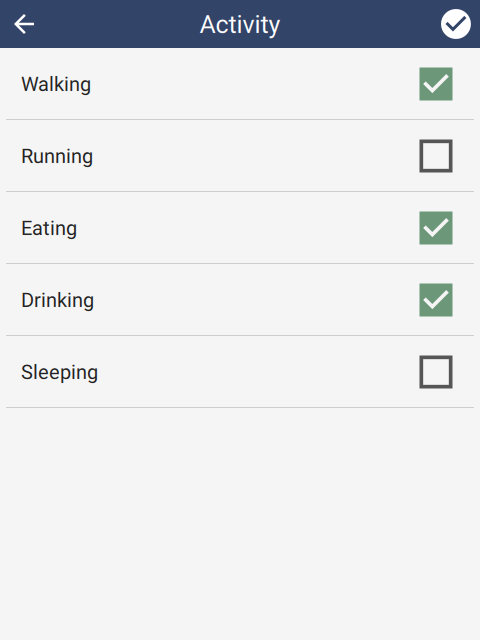 |  |
6.1.2.5. TREE
Tree attributes allow selection of a single option from within a categorized tree of options. For example, selecting Biological Resource Use and then Logging & Wood Harvesting:
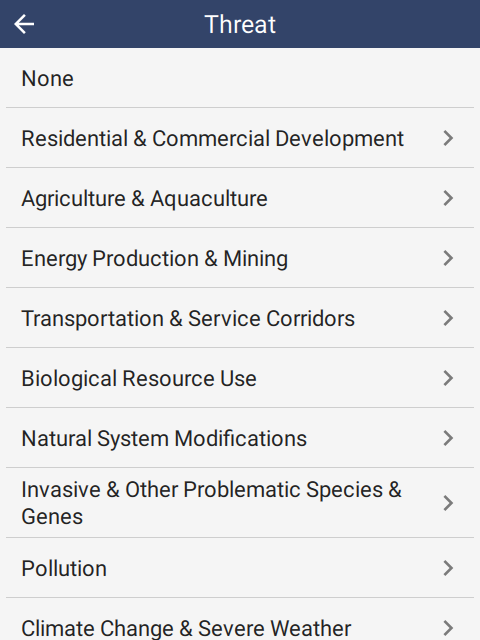 | 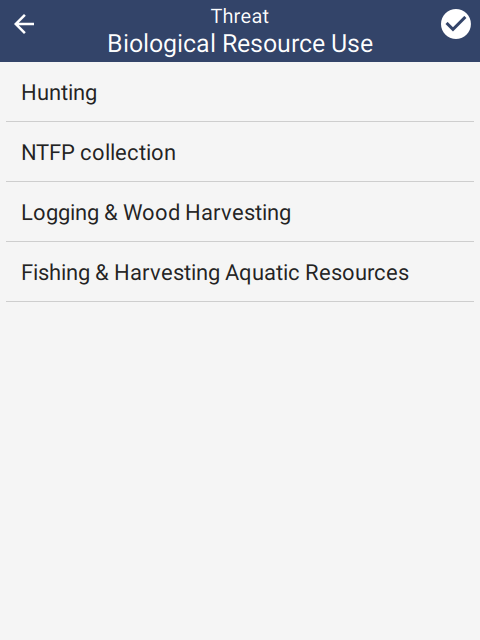 |  |
6.1.2.6. BOOLEAN
Boolean attributes allow selection of an on/off or yes/no type of value:
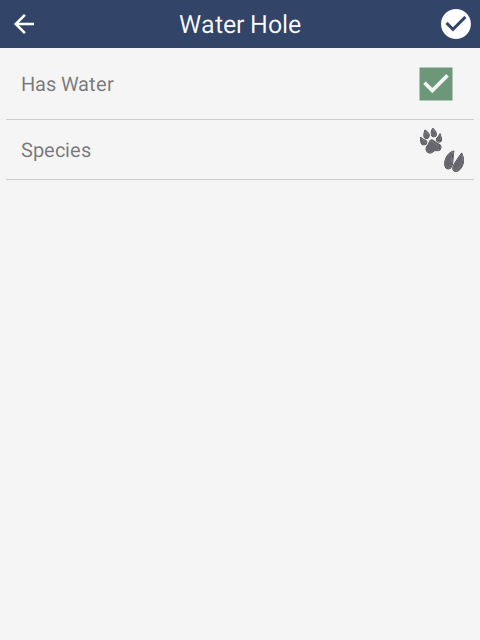 |
6.1.2.7. DATE
Date attributes allow selection of a date:
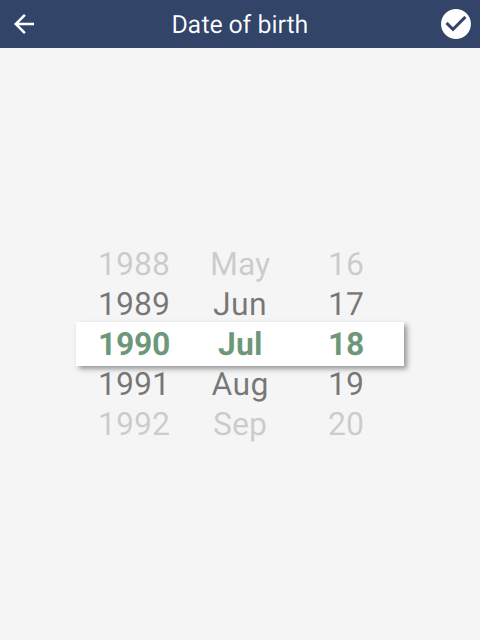 |  |
6.1.3. Required
Attributes can be marked as Required. This means that values must be set in order to save the observation. Attributes are marked with a ‘*‘ in the top left corner to indicate that they are required. If the check in the top right corner is pressed and a required attribute is not properly set, then that attribute will be highlighted in red.
 | 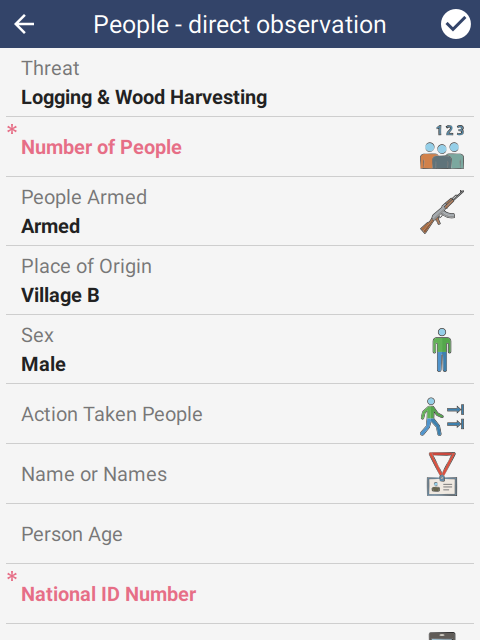 |
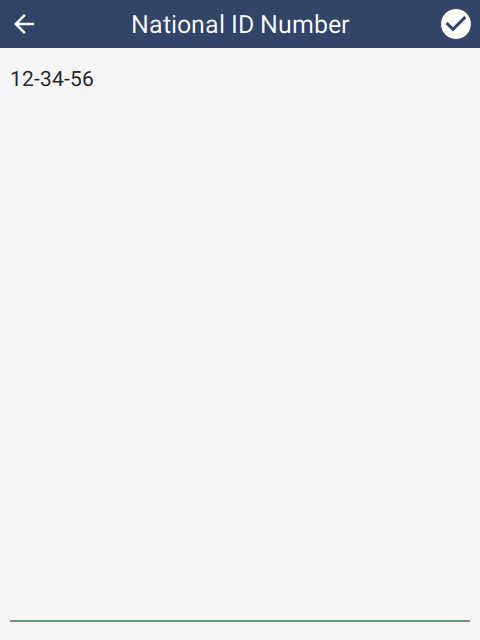
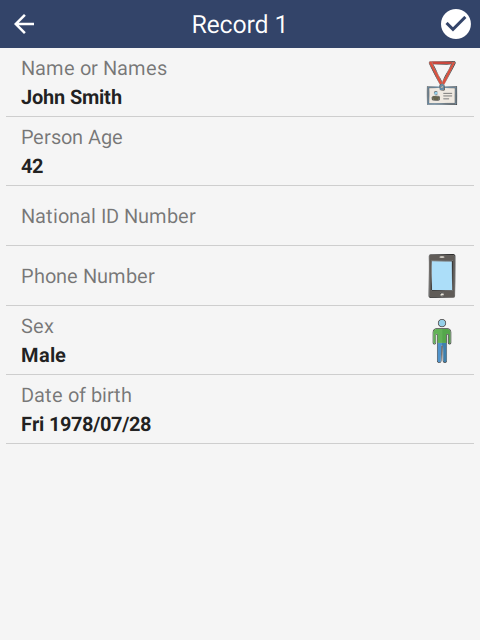
6.1.4. Regular expression validation
Attributes can also be validated with a regular expression. This is a test which must pass in order for the attribute value to be considered valid. For example, if the National ID Number must be of the form 12-34-56, i.e. number number dash number number dash number number, then the expression would be “(\d){2}-(\d){2}-(\d){2}”.
Regular expressions are a well known term in computing and more about them can be found here: https://en.wikipedia.org/wiki/Regular_expression.
A good online tool for creating regular expressions can be found here: https://regex101.com. SMART Mobile requires the expression to be Perl Compatible (PCRE2), so ensure that is set as the Flavor.
6.2. Configurable data model
The Configurable Data Model allows an additional layer of customization over the Data Model (see above). This is helpful when choosing which subset of data needs collecting using SMART Mobile.
More information can be found in the SMART Essentials Handbook in the SMART Resource Library: https://smartconservationtools.org/Resources/Resource-library
6.2.1. Top level Group
The topmost Group contains options which apply to the entire model:
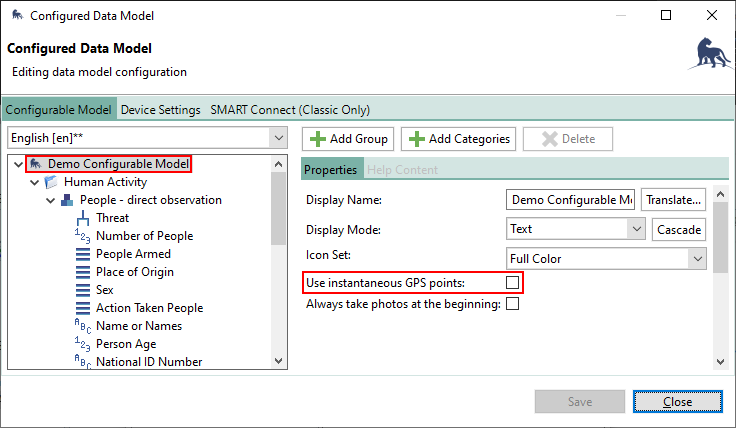 |
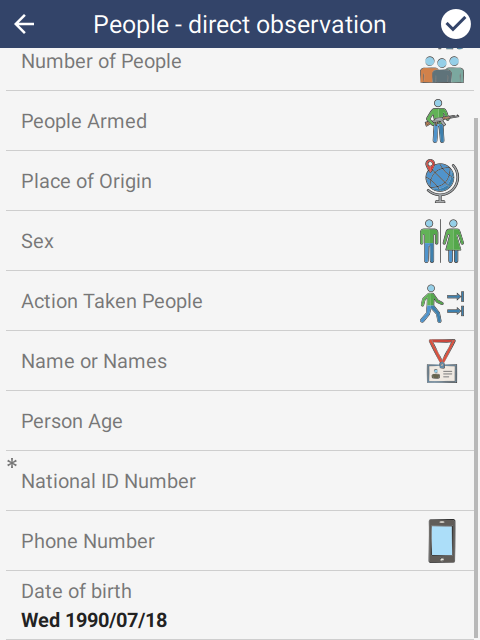
SMART Mobile respects Use instantaneous GPS points. When this option is checked, SMART Mobile will display a location editor bar on the observation home screen, just below the title. This allows users to choose when to take a GPS point, regardless of how long it will take to enter data:
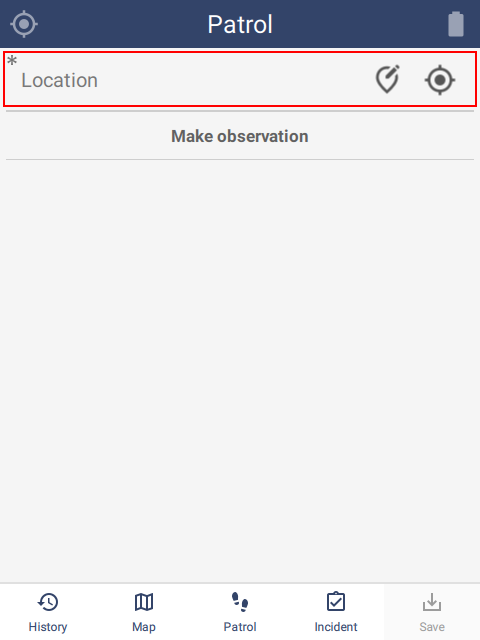 | 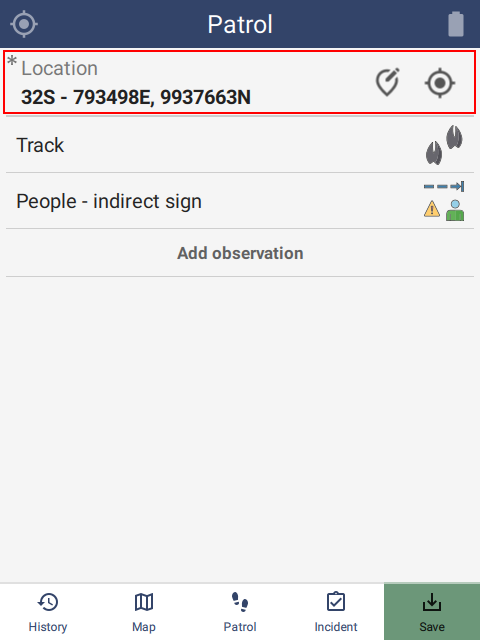 |
6.2.2. Group
Groups provide a way to organize the model so that users can navigate to the attributes that need to be collected. Groups can contain subgroups and can have a custom icon.
6.2.3. Category
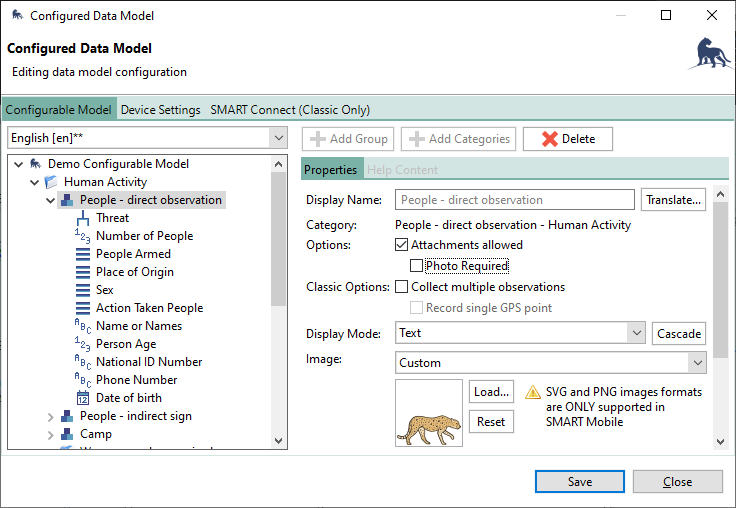
Selecting a Category primarily allows configuration of the attachments. Note that Photo Required will force the user to take a picture in order to save the observation:
 |
6.2.3.1. Photos
Photos are taken by tapping on the camera icon at the top of the Attribute list (see below). Each time a picture is taken, another picture icon will appear to the right. If the picture list exceeds the width of the screen, they can be scrolled using a side swipe gesture.
 | 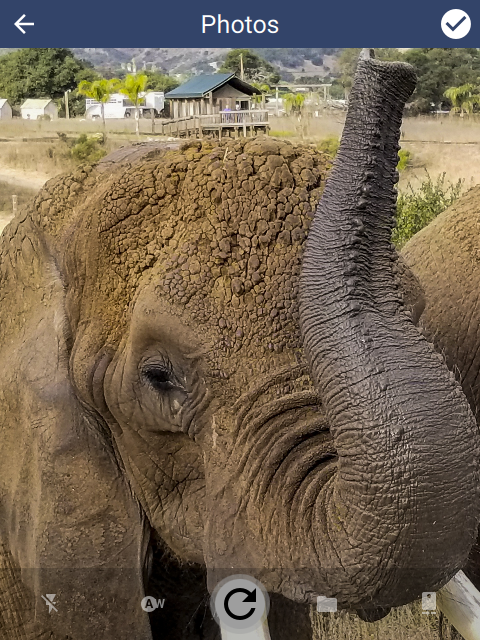 |
The icons along the bottom of the photo capture screen are:
- Flash mode - on, off and automatic
- White balance - automatic or disabled
- Capture - icon changes depending on the state:
- Capture - for first capture
- Recapture - retake the shot
- Delete - delete the current image and retake the shot
- Open existing image - use an image from the gallery
- Switch to back or front camera
To delete previously taken photos, tap the photo and then click Delete (trash icon) in the bottom middle of the screen. Click Yes, delete it on the prompt.
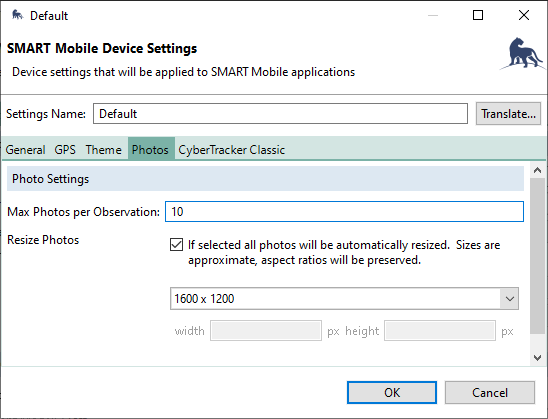
6.2.3.1.1. Additional photo settings
Photo settings can be further configured in SMART Mobile Device Settings. This allows control over the maximum number of photos and also whether to resize them. Resizing photos is recommended to reduce the burden on the database as large photos are relatively expensive. If a resize is not specified, then SMART Mobile will automatically size photos to 1600x1200:
 |
6.2.3.2. Audio recording
Audio recording is activated when Attachments allowed is enabled for a category. The audio recorder widget is shown below all other Attributes.
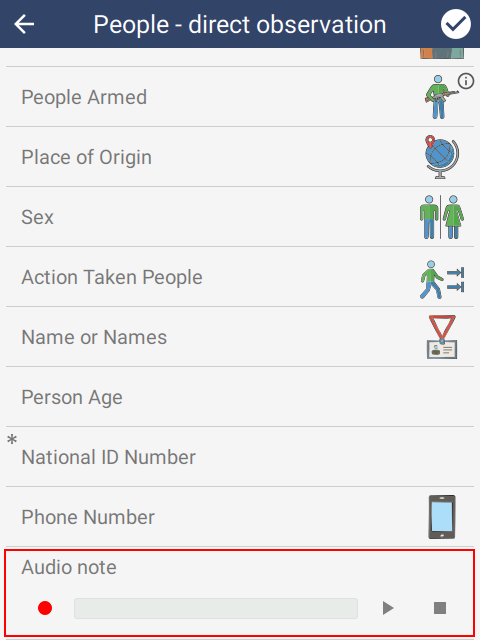 | 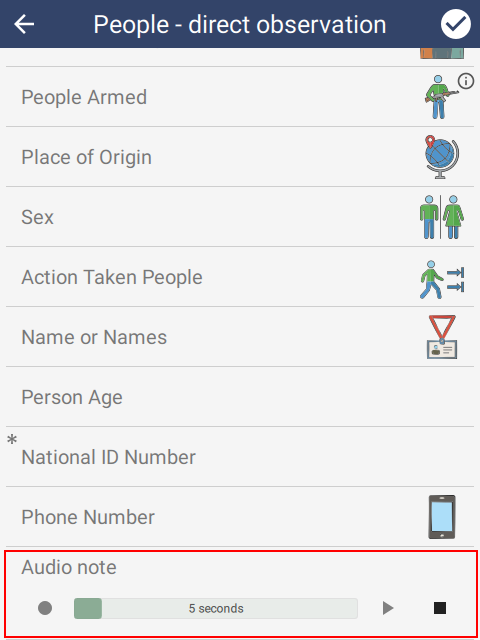 | 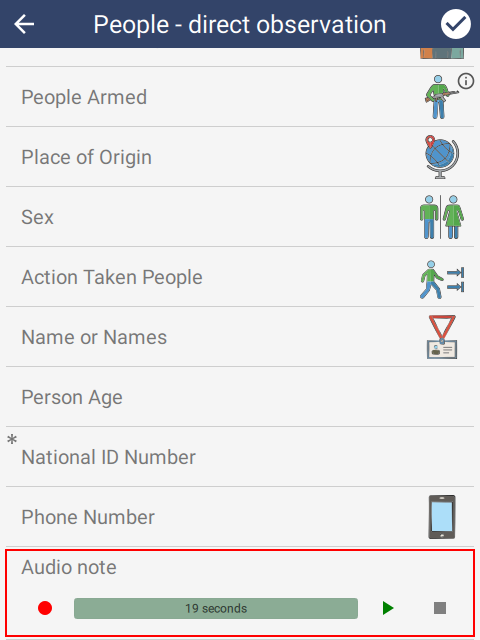 |
The buttons are:
- Red dot - start recording
- Play button - play existing recording through the speakers
- Stop button - stops recording or playback
To delete an audio recording, swipe the widget to the left and tap Yes.
6.2.4. Attribute
Attributes can be further customized in the Configurable Model. While the options vary according to the attribute type, all attributes support the following:
- Image - override the icon from the data model
- Enabled - specify when the attribute should be shown
- Always - attribute is always active
- Never - attribute is invisible and cannot be changed
- Custom - specify when the attribute is visible based on other attribute values
- Default value - the default value for the attribute
6.2.4.1. Help content
Help content can also be specified for attributes:
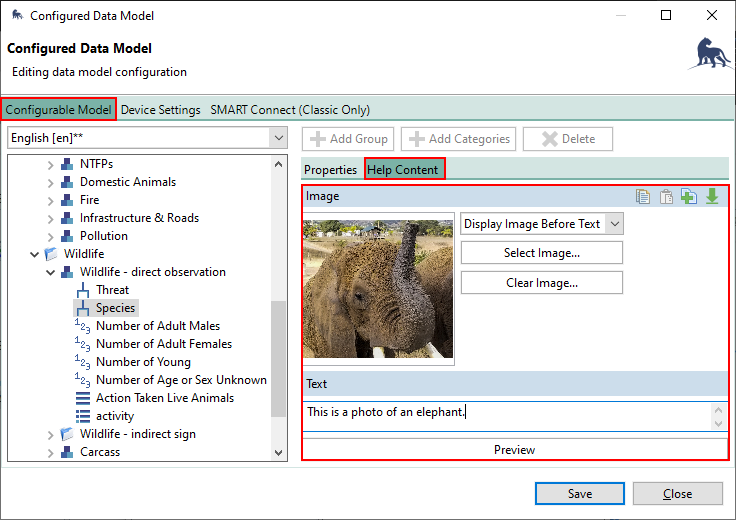 |
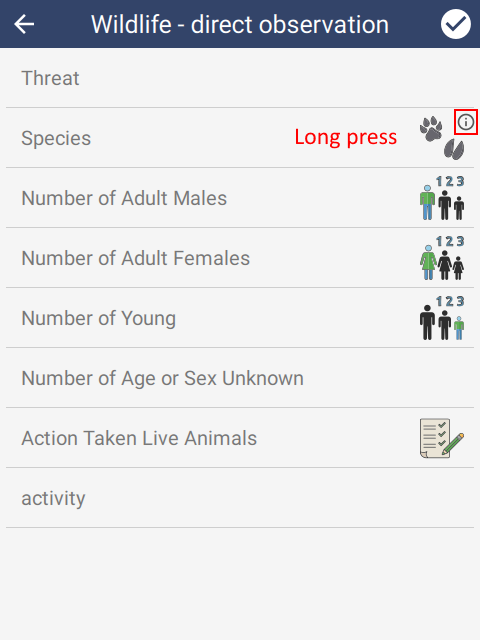
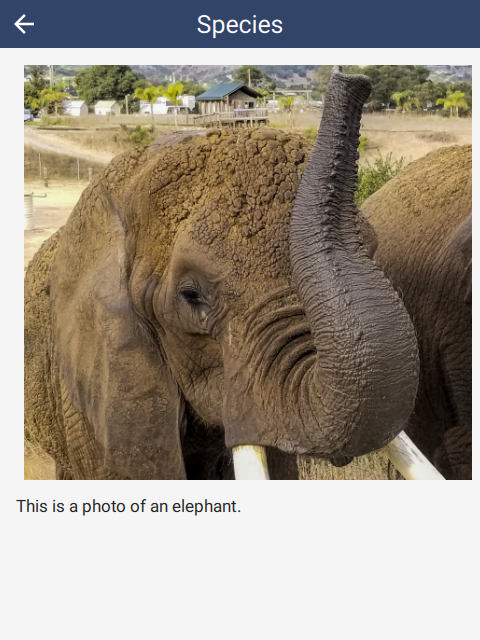
Tapping on the small ‘i’ icon on the top right of the Species row will show the help content. A long-press on the Species row will also show the help content.
 |  |
6.2.4.2. NUMERIC
Numeric Multi-Select can be checked on a NUMERIC attribute. This requires that the previous attribute be a LIST attribute with the Multiple Observations property checked (see LIST attribute below).
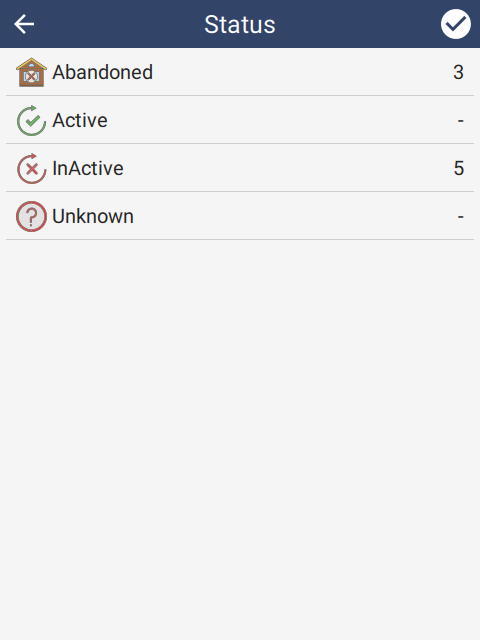
In the example below, there will be four sub-records: Abandoned, Active, Inactive and Unknown. Each of these will support entry of all subsequent attributes in the Category:
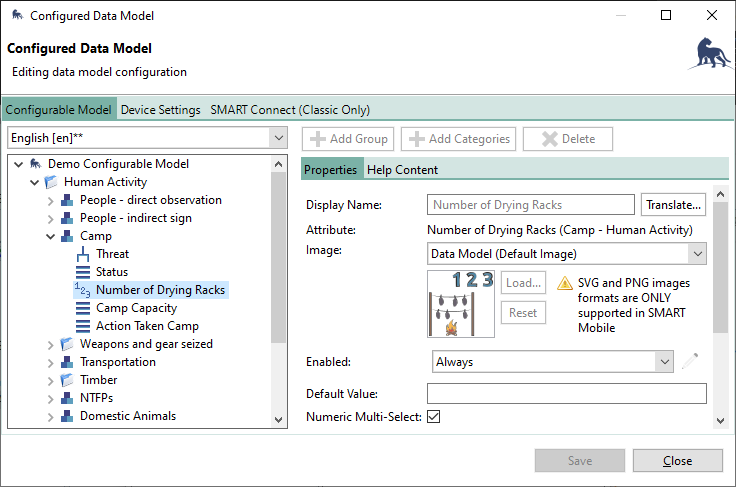 |
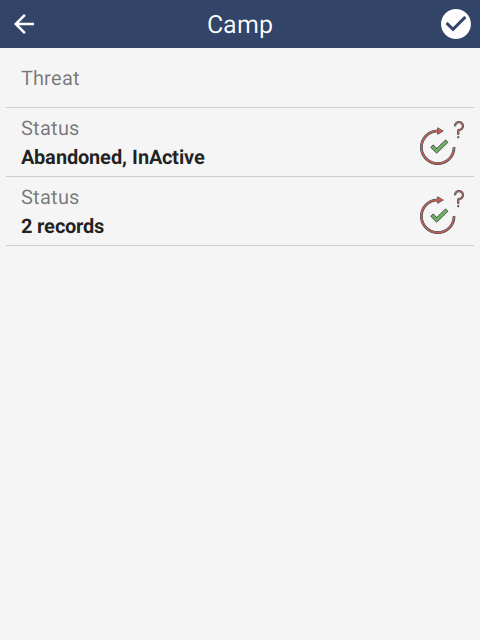
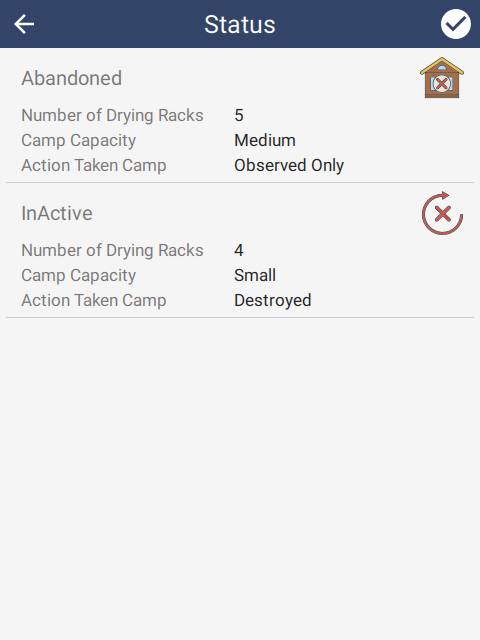
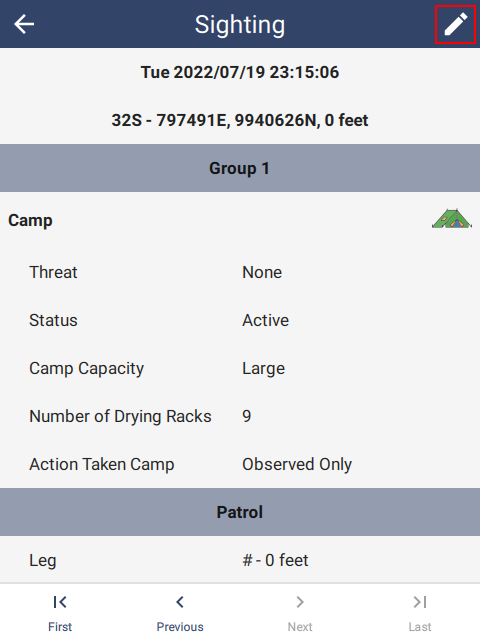
This transforms the prior list (Status) into a number list. For each specified item, all subsequent fields (i.e. Camp Capacity & Action Taken Camp) can be entered into a Record. In the example below, since two items were specified as non-zero, the second Status attribute reads “2 records”. Tapping on this row will allow entry of subsequent attributes for each of the specified items.
 | 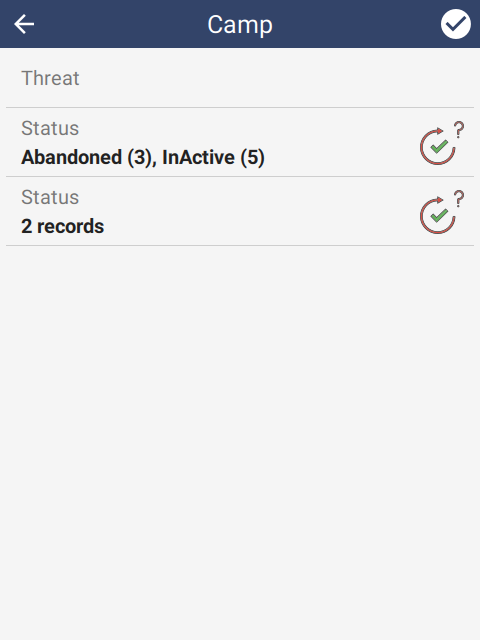 | 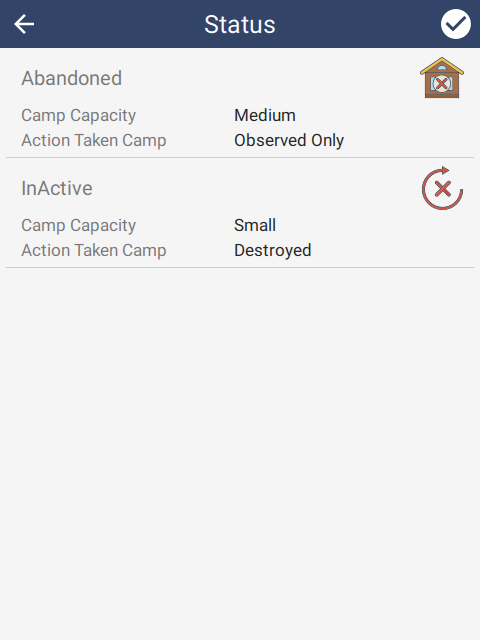 |
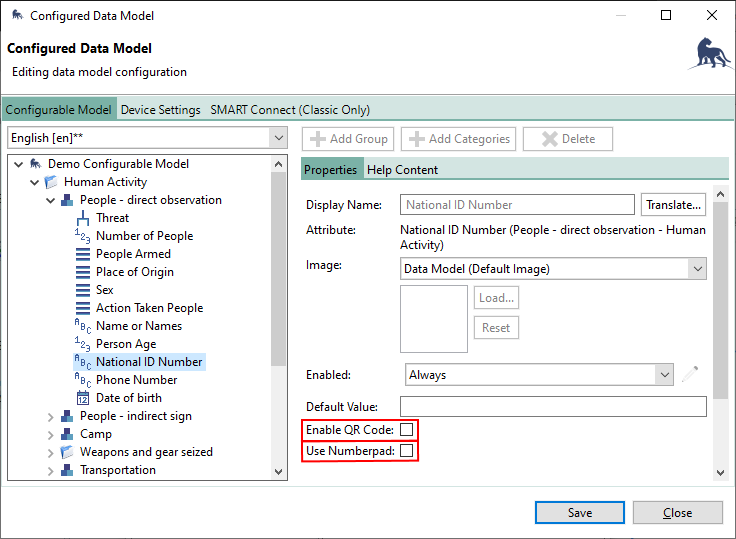
6.2.4.3. TEXT
Text attributes can contain any kind of text. If the text comes from a QR code, check the Enable QR Code option. This will activate a barcode scanner on the device for this attribute. The following barcode formats are supported: QRCODE, EAN 13, CODE 39, CODE 128, CODE 128 GS1.
Use Numberpad will cause SMART Mobile to trigger the number keypad (instead of a full text keyboard) as the text editor on the device.
 |
6.2.4.4. LIST
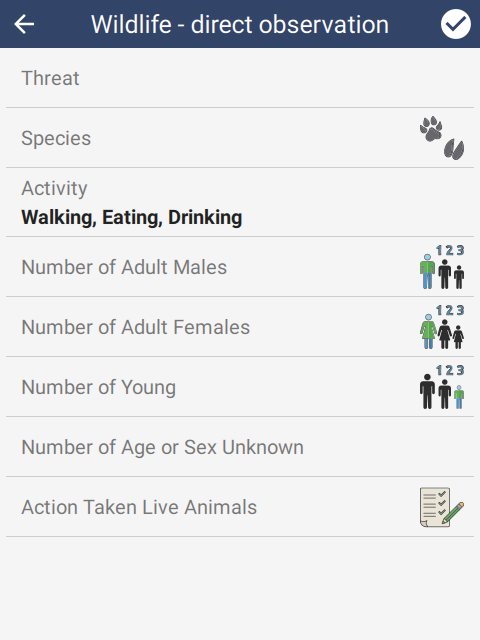
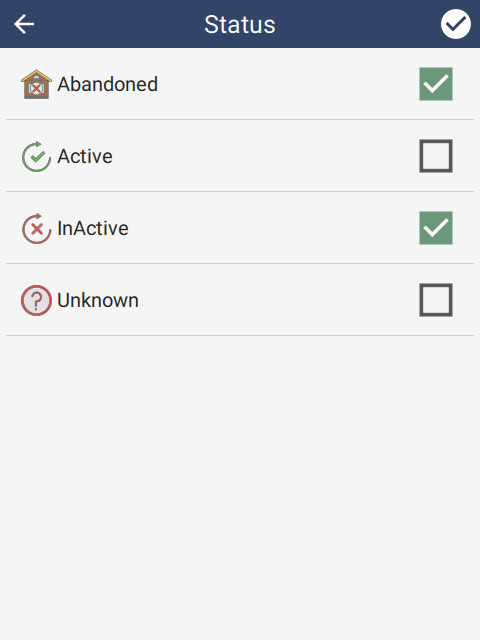
Multiple Observations is a feature which allows several records to be captured in a single observation - one for each item in the list. In the example below, there will be four sub-records: Abandoned, Active, Inactive and Unknown. Each of these will support entry of all subsequent attributes in the Category:
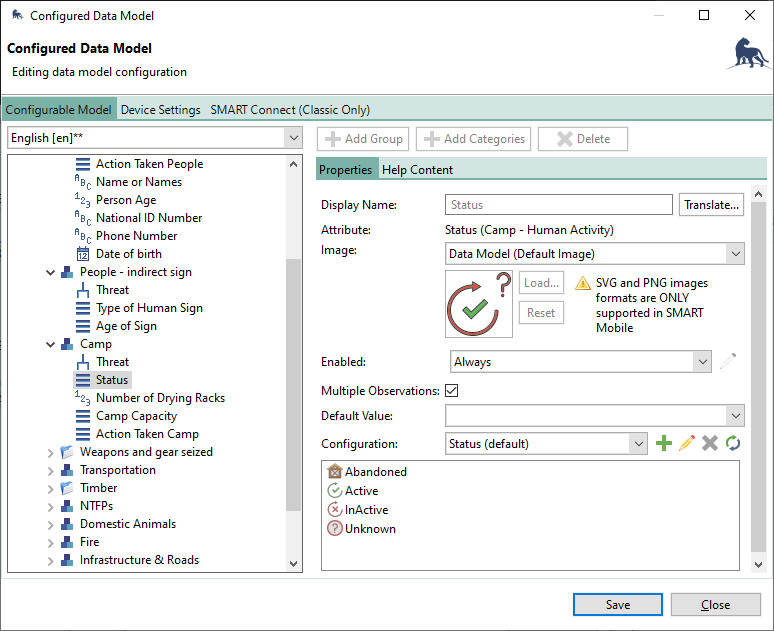 |
This transforms the list into a multi list. For each selected item, all subsequent fields (i.e. Number of Drying Racks, Camp Capacity & Action Taken Camp) can be entered into a Record. In the example below, since two items were checked, the second Status attribute reads “2 records”. Tapping on this row will allow entry of subsequent attributes for each of the checked items.
 |  |  |
6.2.4.5. TREE
Tree attributes have an additional property called Convert to List. This will flatten the tree into a single select list.
6.2.4.6. Attribute Groups
Attribute groups or matrices can be created by selecting multiple attributes together (holding down the control key while clicking on them), then right clicking the mouse and selecting Add to Attribute Group. This creates a matrix using the LIST attributes - each LIST attribute will add an additional dimension. In the case below, there are two LIST attributes, so it will be a two dimensional matrix:
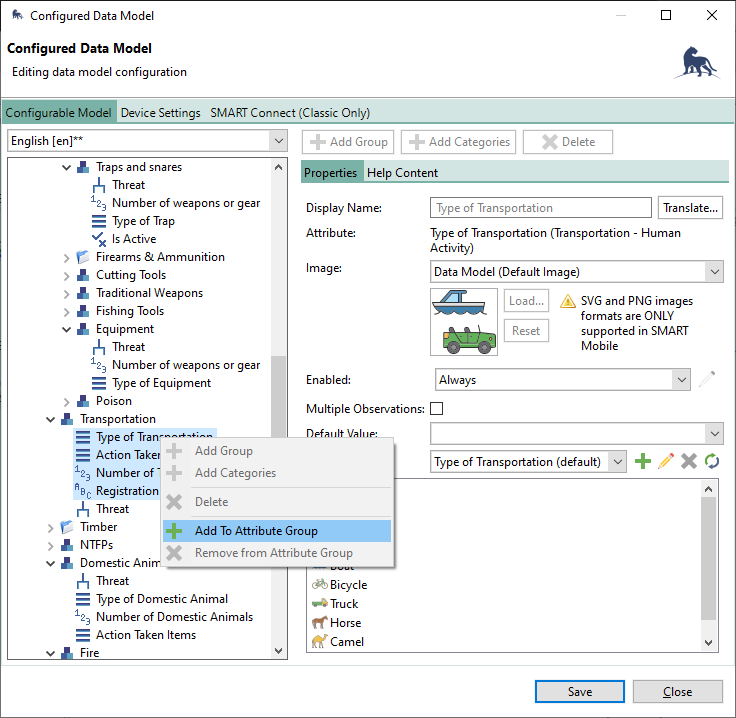 |
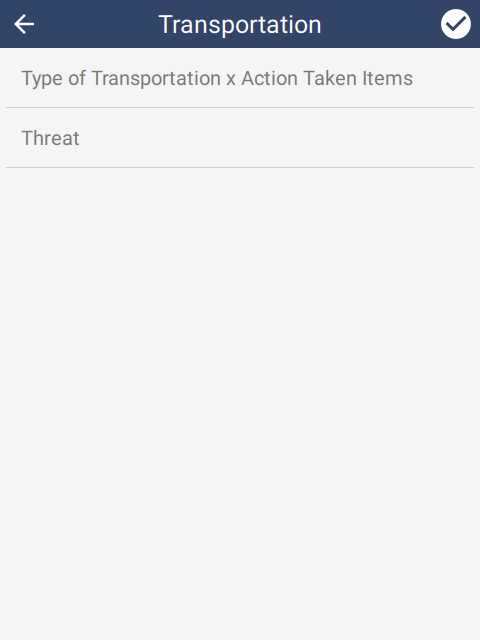 | 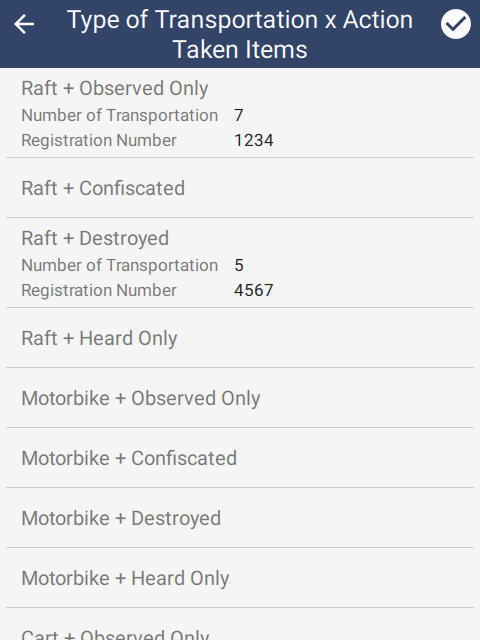 | 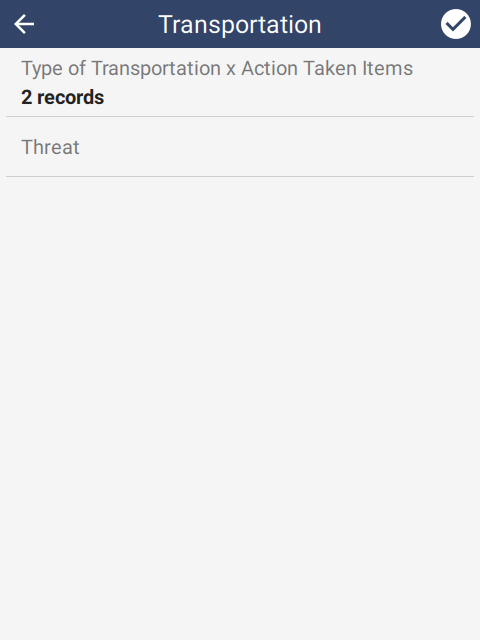 |
6.2.5. Collect multiple observations
SMART Mobile supports collection of compound observations using the Collect multiple observations feature.This is enabled at the Category level:
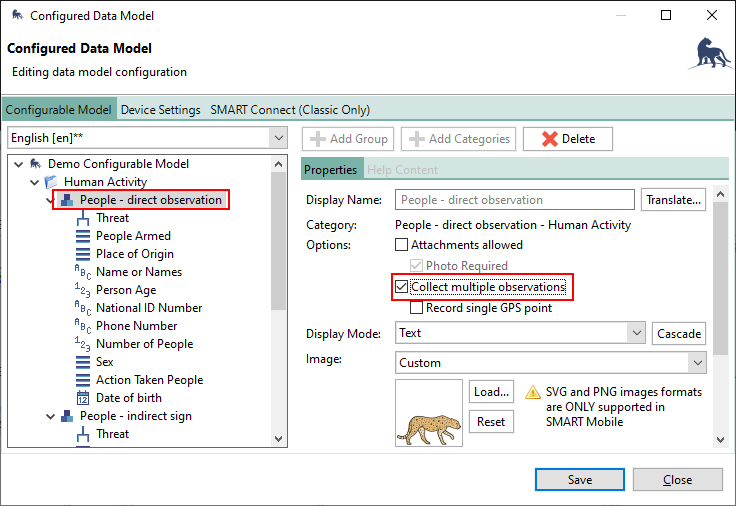 |
Once enabled, attributes have an additional property called Enter once with the options Disabled, At the beginning and At the end.
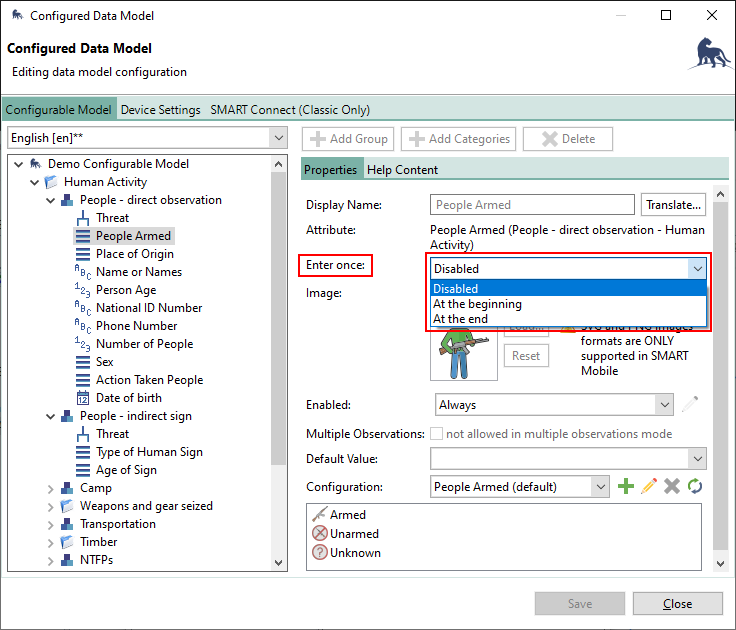 |
At the beginning and At the end specify that the attribute will not be repeated and will be asked only once for the incident - either at the beginning or end.
If Enter once is set to Disabled then the attribute will be replicated.
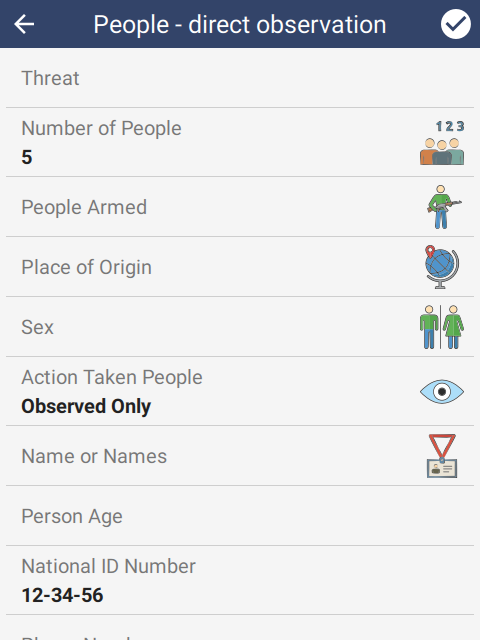
In this example, Threat, People Armed & Place of Origin are set to At the beginning and Action Taken People is set to At the end. All other attributes are set to Disabled.
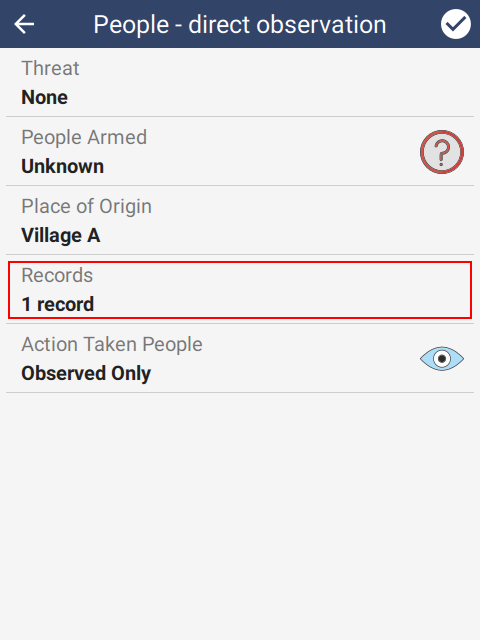 | 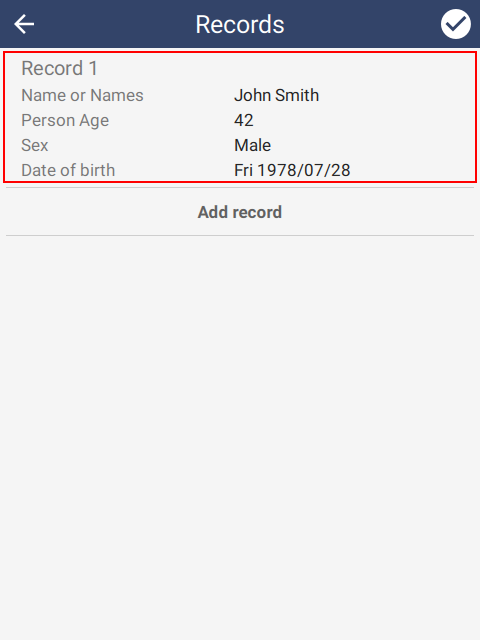 |  |
6.2.6. Data Collection Options
The Data Collection Options dialog provides several additional settings for data collection. It can be reached using the Field Data Options… option on the Field Data menu.
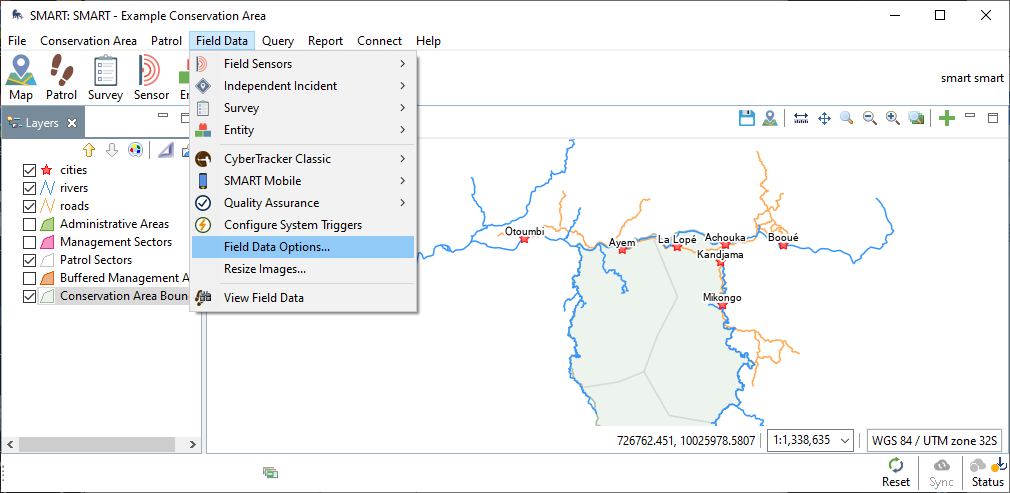 |
The dialog supports signature configuration, activation of distance and bearing and a feature to allow the user to be specified for each incident.
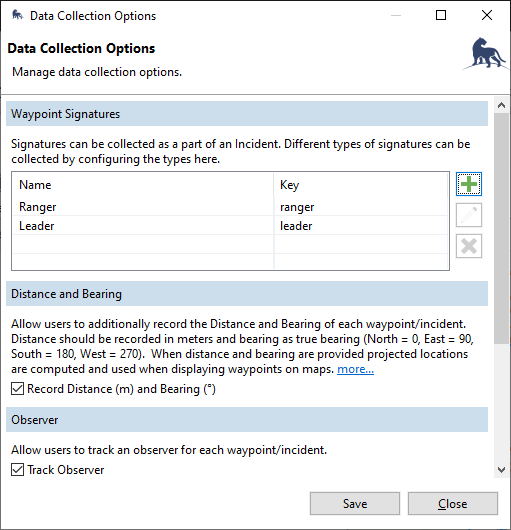 |
6.2.6.1. Signatures
SMART Mobile can capture signatures as part of an incident. Once configured on the Data Collection Options dialog, they can be enabled on the Configured Data Model dialog for a category:
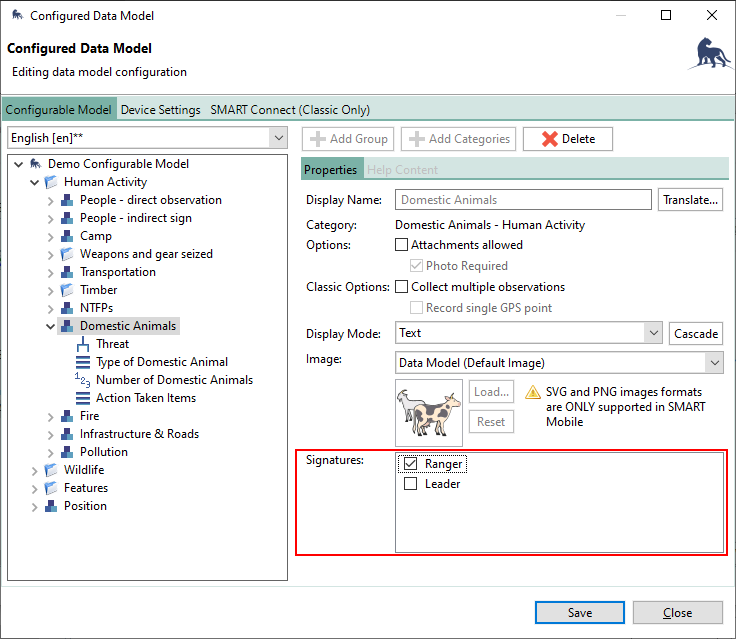 |
In SMART Mobile, the signature can be entered by drawing on a canvas. The trash icon will clear the canvas:
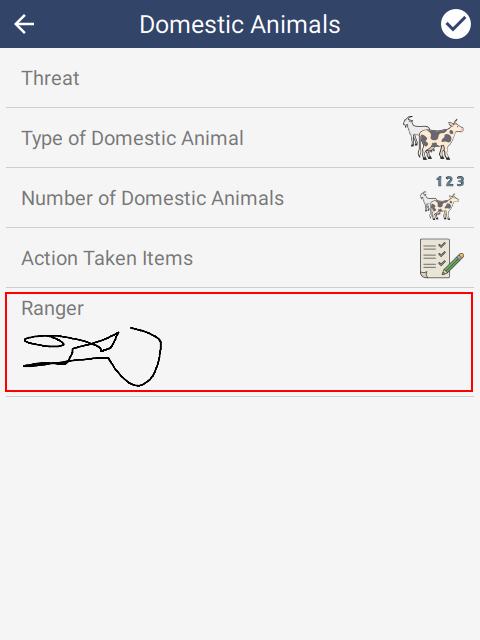 | 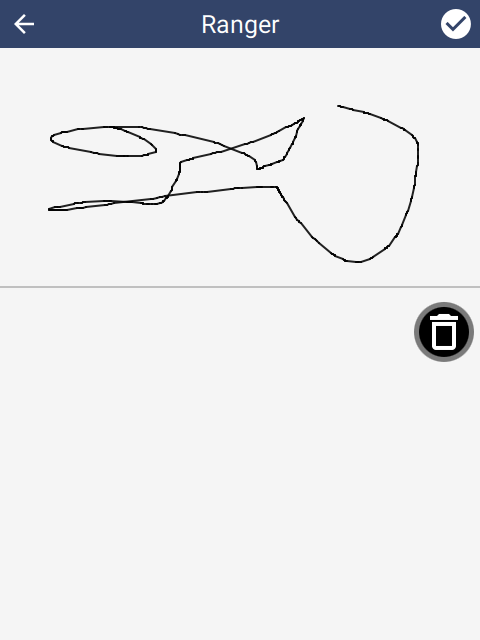 |
6.2.6.2. Distance and bearing
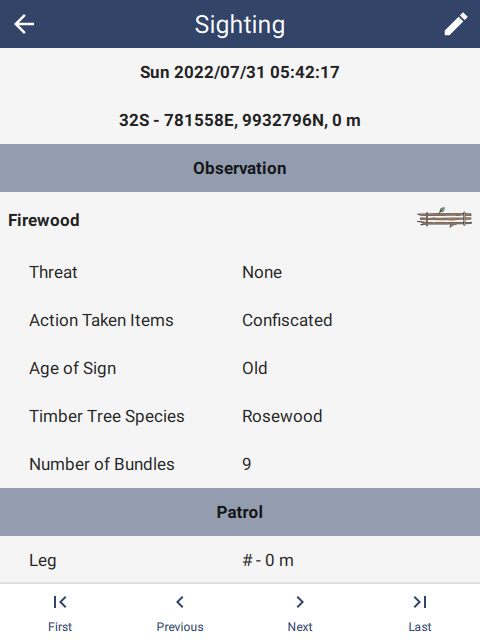
Checking Record distance and bearing shows two additional rows on the main sighting screen. These options will be interpreted by SMART desktop and relocate the position to a new location. In the example below, the fire is 125 meters away at a bearing of 45 degrees from North.
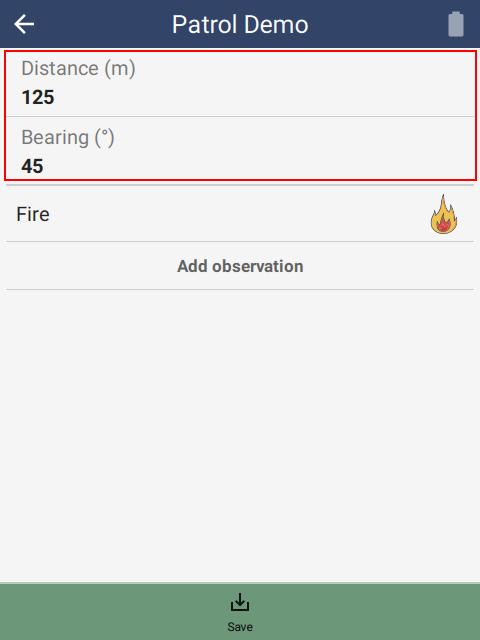 |
6.2.6.3. Track observer
Checking Track observer shows an additional row on the main sighting page. This option allows selection of a specific observer (taken from the employee list) for each incident.
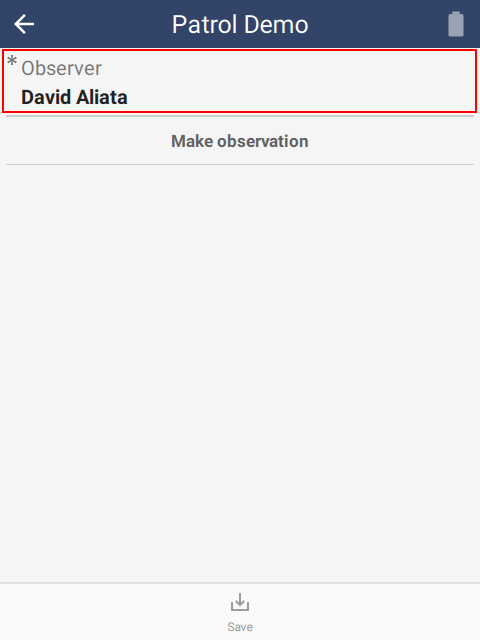 | 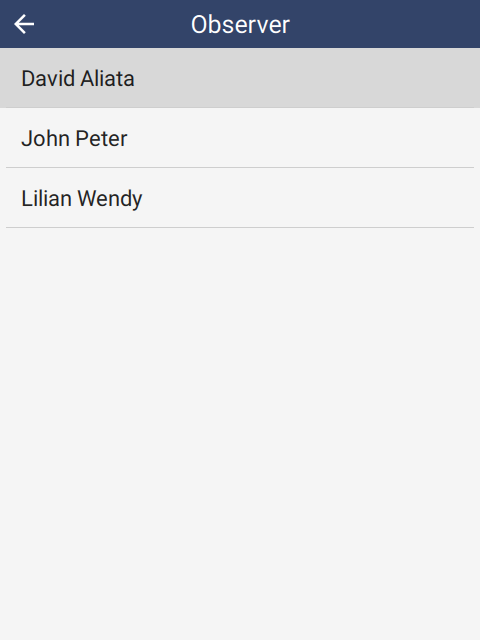 |
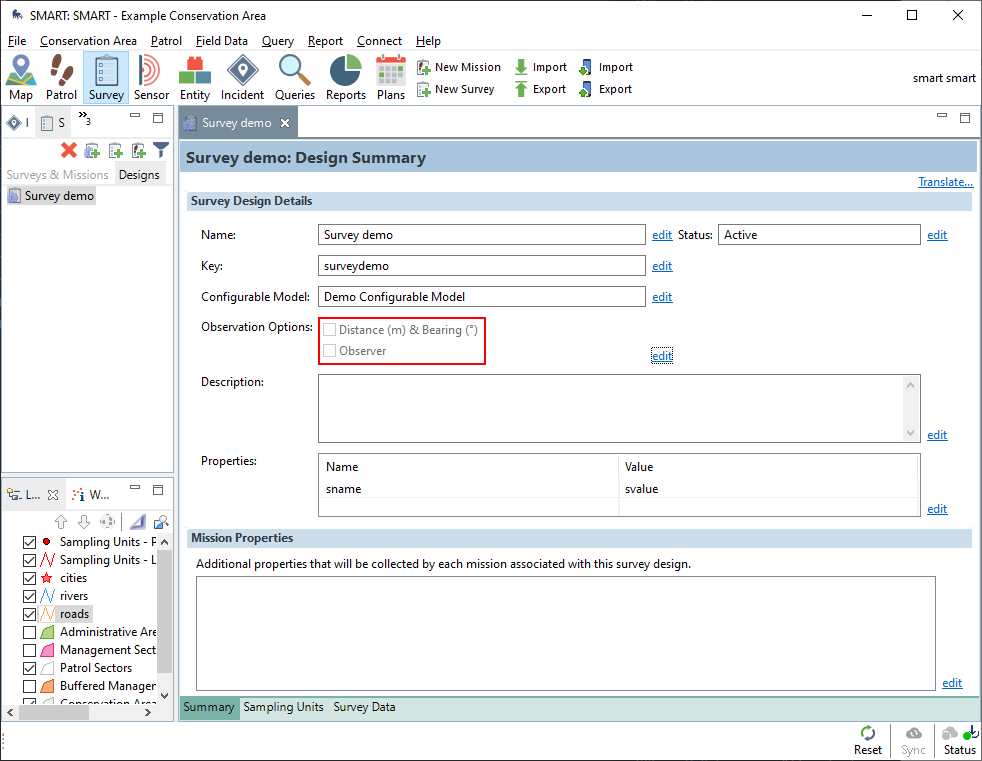
6.2.6.4. Distance and bearing, Track observer for Surveys
For Surveys, the Distance and bearing and Track observer settings are on the Survey Design page. These settings override the settings specified on the Field Data Options page (see 6.2.6.):
 |
6.3. Packages
SMART Desktop creates a Package to define how data should be collected by SMART Mobile. This package is installed on the device and collects data for the desktop.
6.3.1. Package logo
The package logo can be set in the Logo section of the Conservation Area Properties dialog. This dialog can be reached from the Conservation Area menu.
SMART Mobile supports a logo in PNG, JPG or SVG format. SVG format is recommended, since it will look good at all screen resolutions.
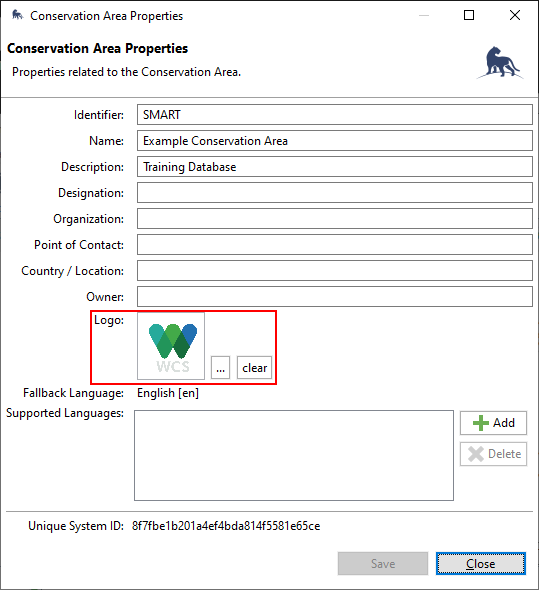 |
When viewed on the device, the logo will display alongside the Project title.
 |
Note that all packages in a conservation area will share the same logo.
6.3.2. Package types
There are several different package types: Patrol, Survey, Collect & Independent incidents.
6.3.2.1. Patrol package
Patrol packages support the capture of a patrol. A Patrol is a collection of observations which are grouped together because they share certain properties. Patrols are configured on the desktop from the Patrol menu and the package itself supports numerous metadata properties, e.g. Transport Type, Team, Mandate, etc. Patrol packages also support independent incidents, which can be made during or outside of a patrol.
 |
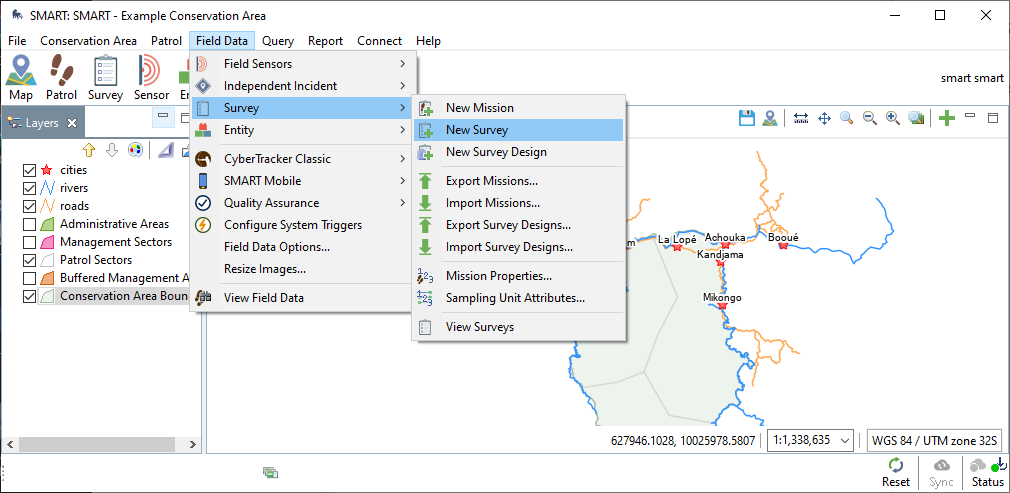
6.3.2.2. Survey package
Survey packages are similar to Patrol packages. They represent a collection of observations grouped together. Surveys can be configured from the Survey submenu off Field Data. Survey packages also support independent incidents, which can be made during or outside of a survey.
 |
6.3.2.3. Collect package
Collect packages are designed for public use and require users to be online. The SMART Mobile user interface is simplified and provides more limited configuration options.
6.3.2.4. Independent Incident Package
Independent incident packages support the entry of simple one-off observations. The SMART Mobile user interface disables Patrol and Survey options, but is otherwise identical.
6.3.3. Model settings tab
Model Settings are settings which apply to the entire package. These can be configured on the SMART Mobile Packages dialog. Note that Incident Configuration will only be displayed if the Independent Incident plugin is installed.
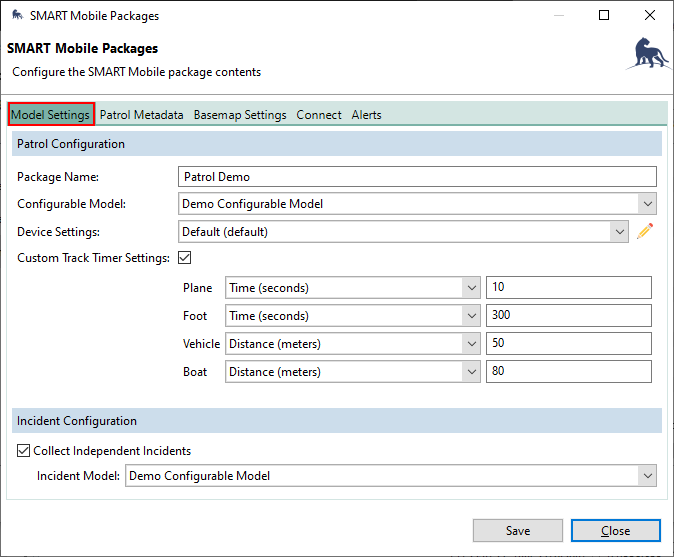 |
Custom Track Timer Settings allows customization of the track timer. The interval can be specified in meters or in seconds.
Example 1: an interval of 300 seconds means that a track point will be logged every 5 minutes. While infrequent this is appropriate for a slow moving party on foot.
Example 2: an interval of 50 meters means that a track point will be logged when the device has traveled at least 50 meters from the last logged point. This is useful for restricting the amount of data being logged.
The Distance interval generally uses more battery power, since the location must be constantly checked to see if the distance threshold has been reached.
The time interval should be longer the slower the transport type.
6.3.4. Patrol metadata tab
Patrol metadata is data that is associated with all the observations made in a patrol. Much of this data can be changed as the patrol progresses. For example, the mode of transport may change from foot to vehicle or employees may leave or join the party.
This configuration occurs at the package level:
 |
6.3.4.1. Transport type
Patrol transport types are defined on the Patrol Types & Transportation Options dialog. This dialog can be reached via the Patrol menu:
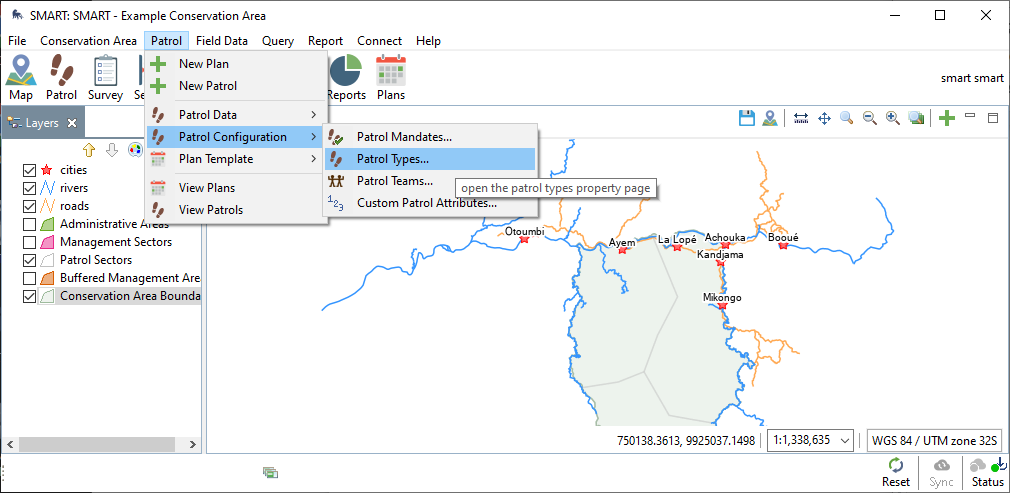 |
The Transportation Types tab defines the various types of transportation that can be selected in SMART Mobile:
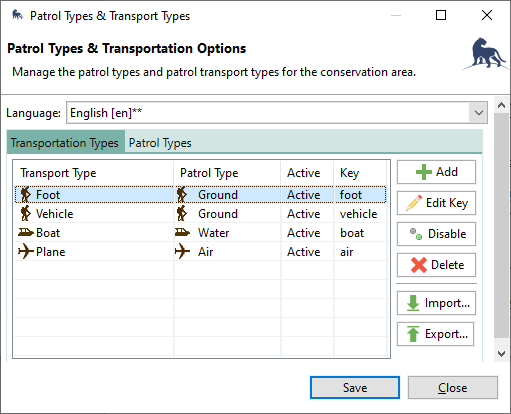 |
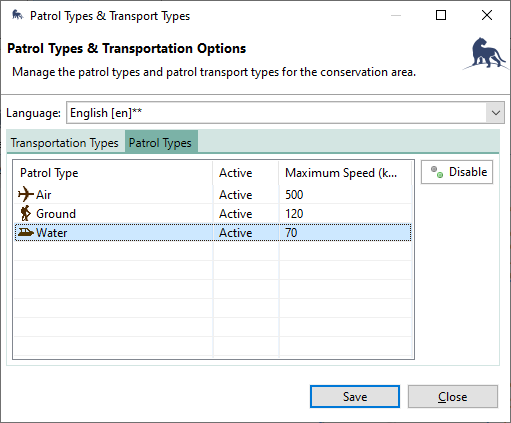
The Patrol Types tab shows the possible types along with the maximum expected speed. This speed value is used to detect bad GPS readings. GPS readings are occasionally (though rarely) incorrect by several thousand meters and this can be detected if the reported speed from the GPS is very different from the expected speed of travel.
For example, if the GPS reports a ground speed of 1000 km/h while on foot, the location value will be excluded with the message “GPS Outlier detected”. If this message is showing up unexpectedly, then it is likely that the transport type has not been selected properly.
 |
6.3.4.2. Armed
Armed is a BOOLEAN attribute. Once set for a patrol, it cannot be changed for the duration of the survey.
6.3.4.3. Team
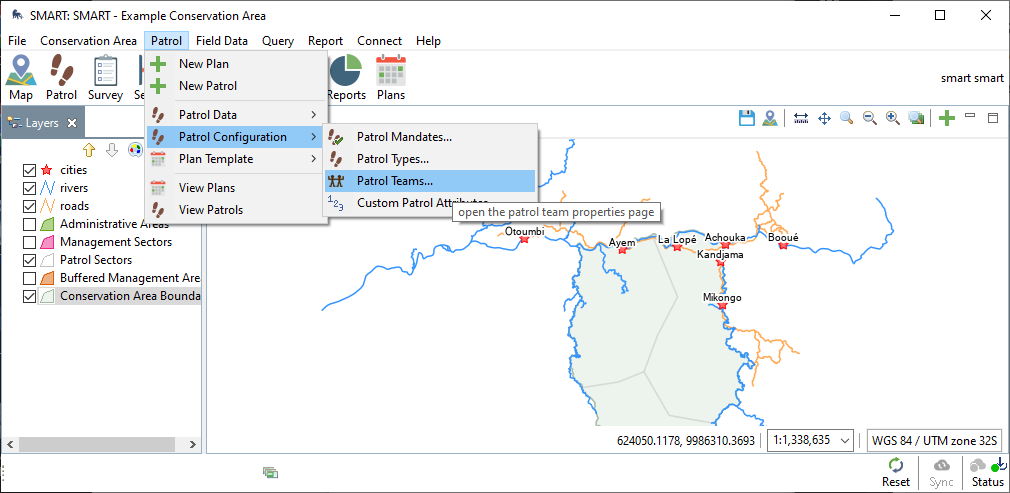
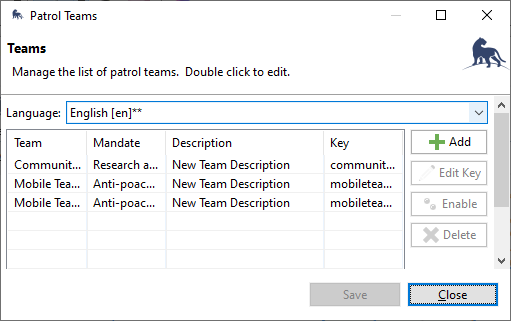
Patrol teams are defined on the Patrol Teams dialog, which can be reached via the Patrol menu:
 |
 |
6.3.4.4. Station
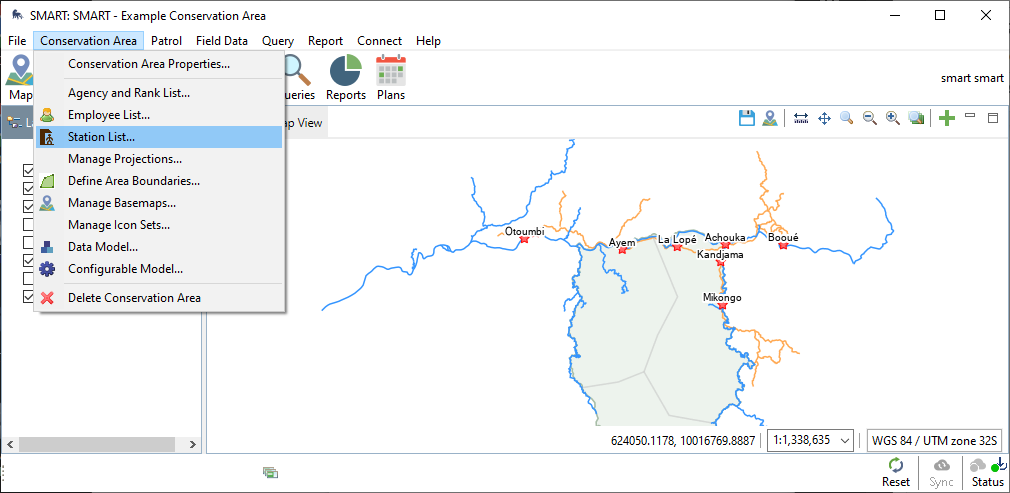
Stations can be specified on the Station List dialog. This can be reached via the Conservation Area menu:
 |
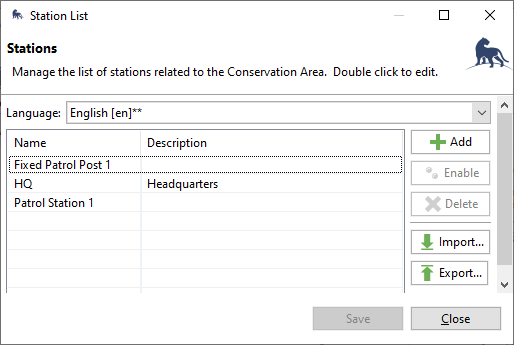 |
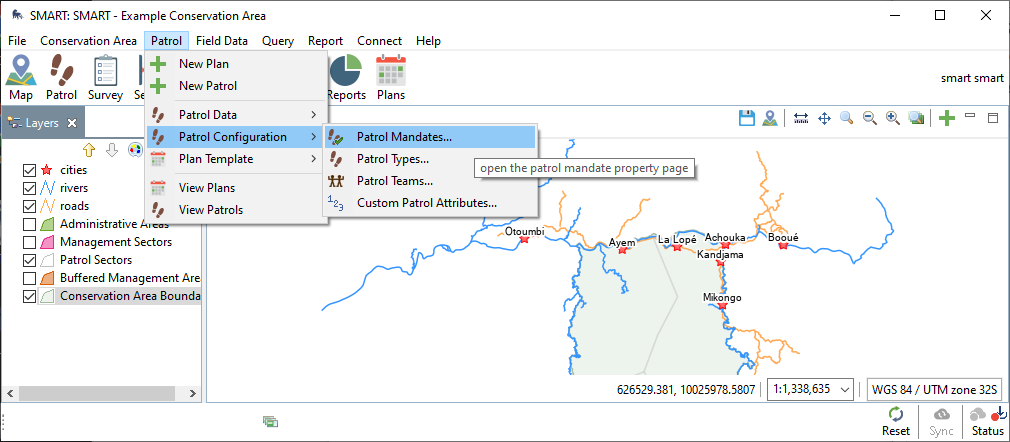
6.3.4.5. Mandate
Mandates can be specified on the Patrol Mandates dialog. This can be reached via the Patrol menu:
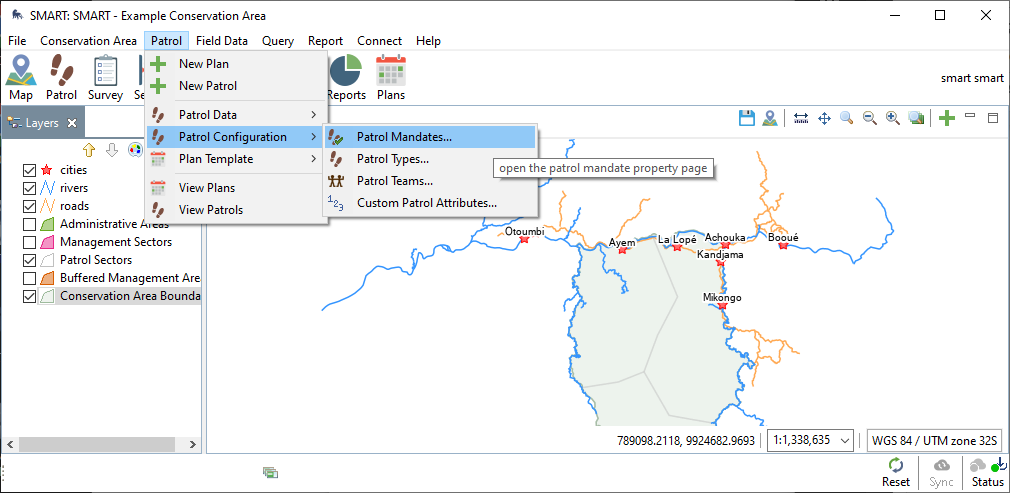 |
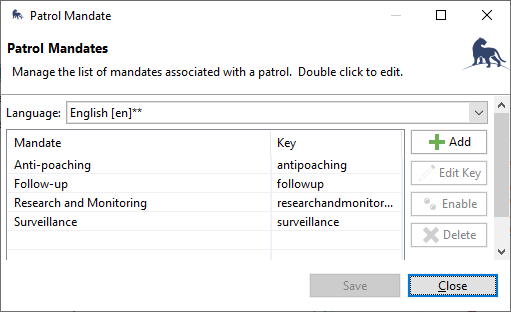 |
6.3.4.6. Objective
Patrol Objective is a freeform text attribute.
6.3.4.7. Comment
Patrol Comment is a freeform text attribute.
6.3.4.8. Members
Employees and their teams can be specified using the Employees dialog. This dialog is available via the Conservation area menu:
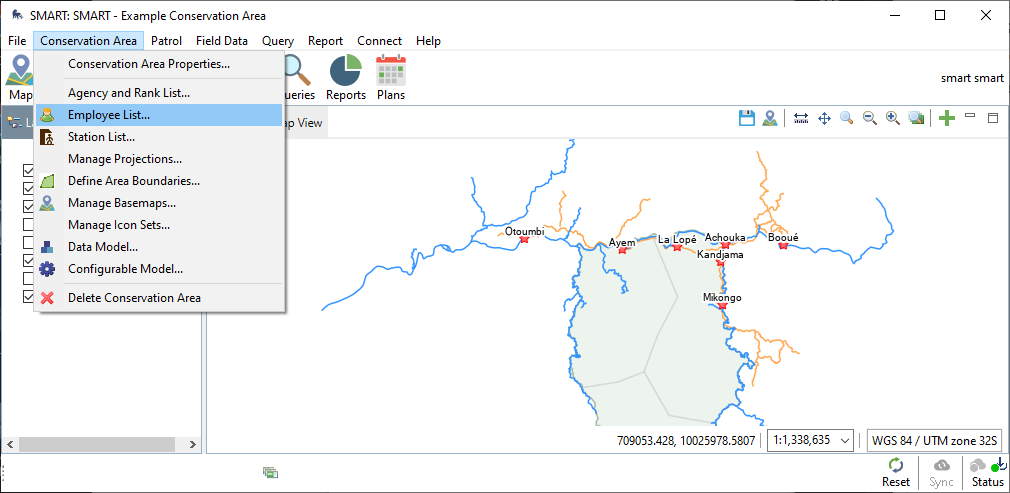 |
Employees may also belong to one or more teams. This can be specified on the Employee Teams tab:
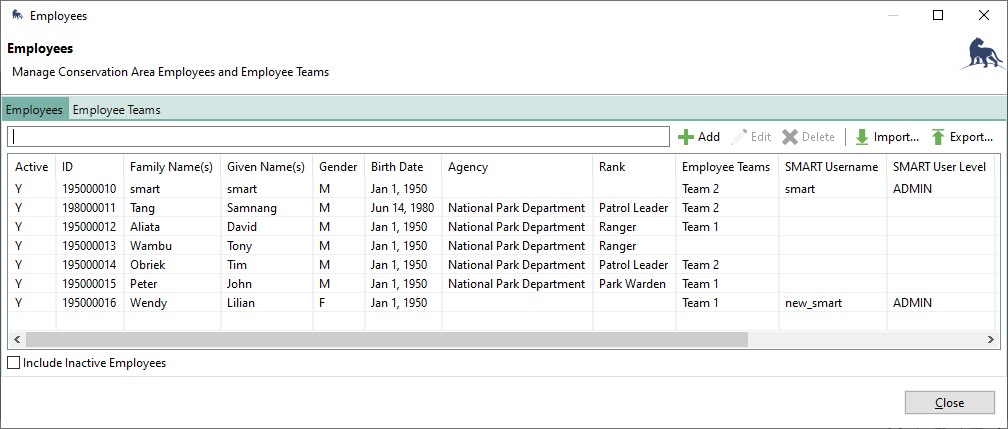 |
When specifying employees, teams will be listed first. This is primarily used to help find team members quickly:
 |
6.3.4.9. Leader
After the employees have been specified, the Patrol Leader attribute can be set. Note that the leader must be one of the employees in the employee list. If the leader is set and then that employee is removed from the list of employees, they will be removed from the leader attribute.
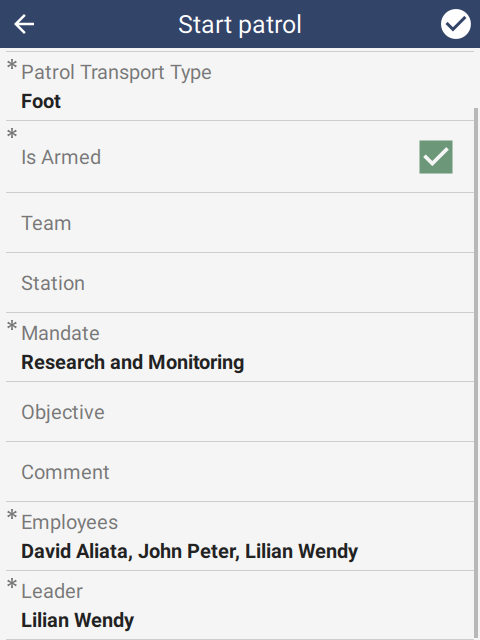 |
6.3.4.10. Pilot
If the Patrol Transport Type attribute is set to Water or Air, then a Patrol Pilot attribute will become visible. Similar to the Leader attribute above, the pilot must be a member of the selected employees.
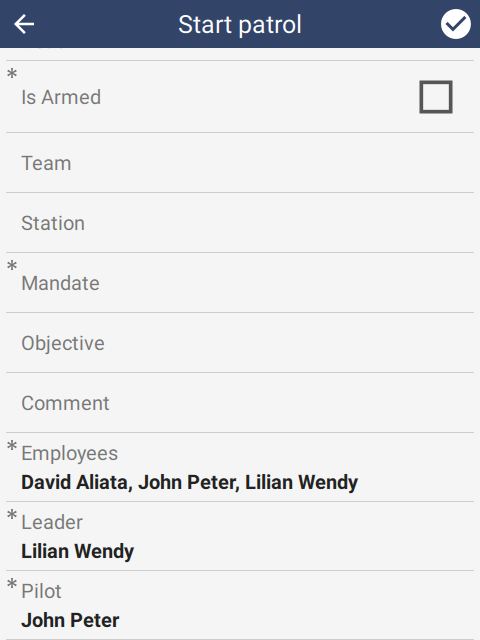 |
6.3.5. Basemap settings tab
SMART Mobile supports offline map layers, i.e. maps that work without a network connection. These are configured on the Basemap Settings tab of the SMART Mobile Packages dialog.
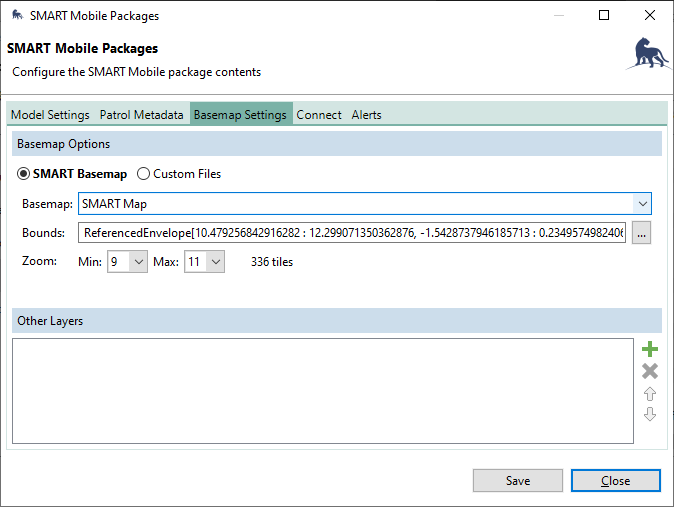 |
The SMART Basemap option will automatically generate an offline map from the SMART Desktop map view. In order to support high resolution and zooming, the map is captured at different zoom levels and segmented into tiles. More zoom levels means more tiles. The recommendation is to experiment with different zoom levels until the resolution is good enough and the map is reasonably sized:
 |
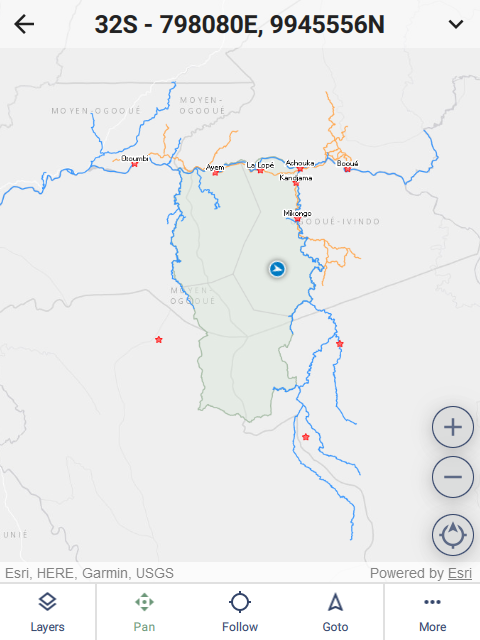 | 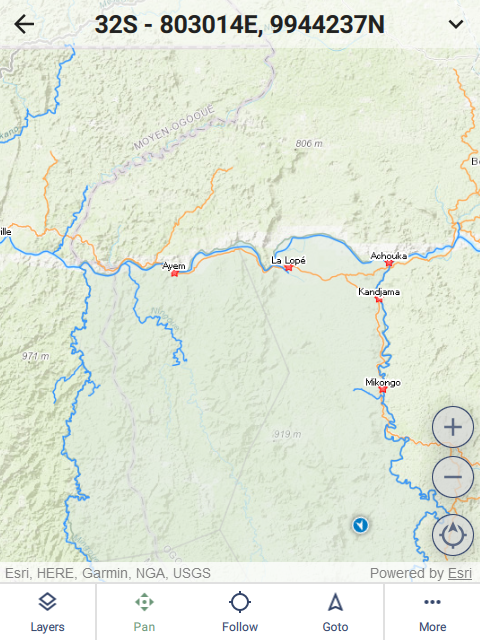 | 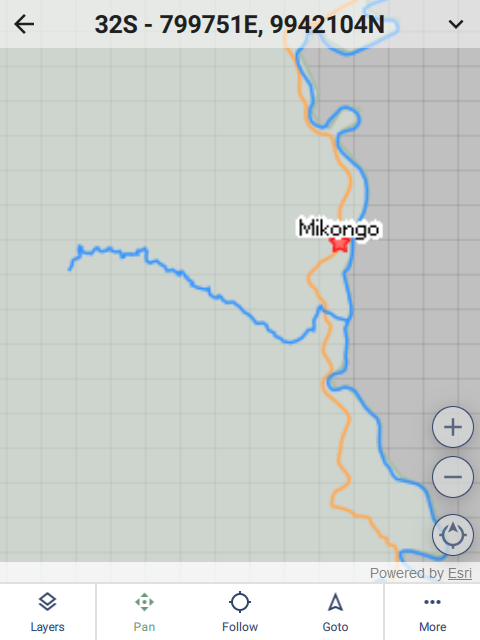 |
6.3.5.1. Custom files
If existing map files are available, then these can be used directly by selecting Custom Files. SMART Mobile supports SHP, GeoTIFF, ArcGIS TPK, ArcGIS VTPK, PNG, JPEG and KML.
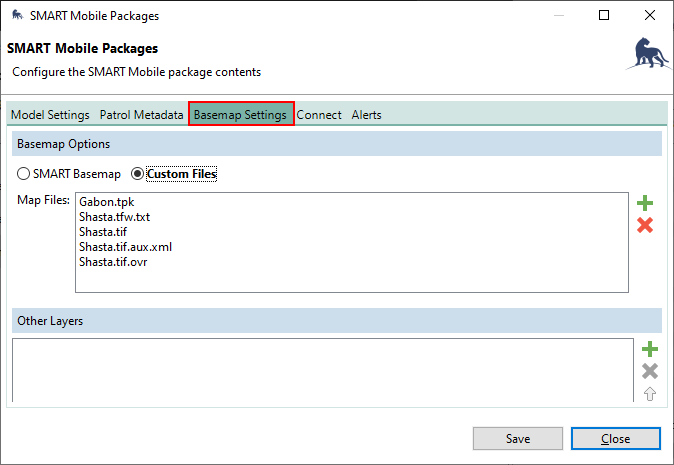 |
 |  |
6.3.5.2. Other layers
SMART Mobile supports online Web Map Service layers. More information on this type of layer: https://en.wikipedia.org/wiki/Web_Map_Service.
For example, a weather layer:
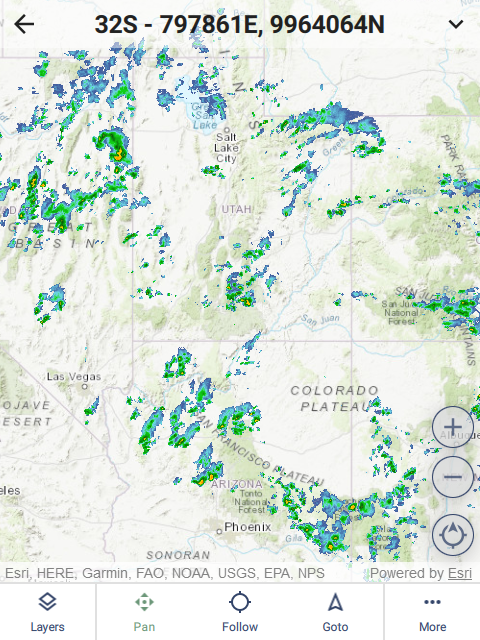 | 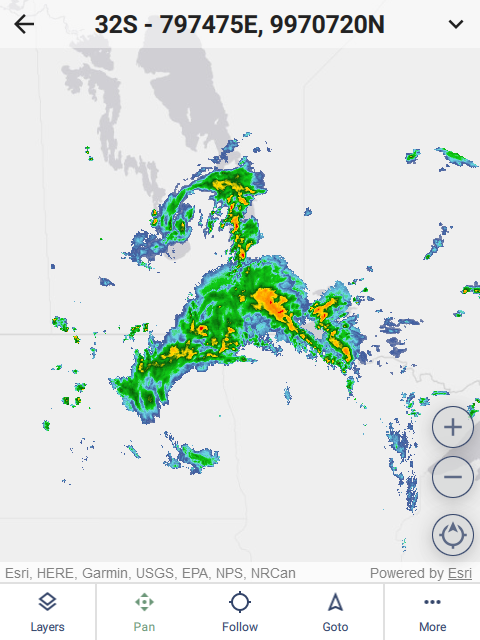 |
6.3.6. Connect tab
SMART Mobile can be configured to upload data to a Connect server. The Connect tab contains several configuration settings for this scenario.
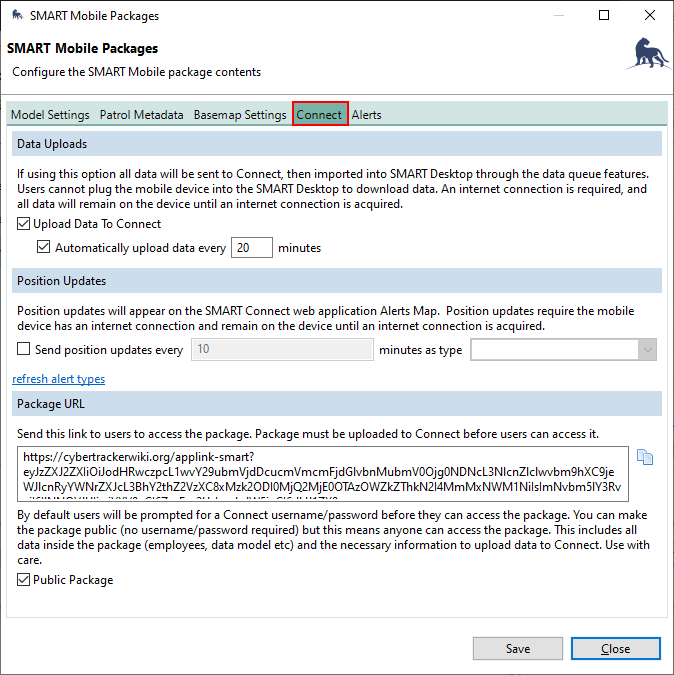 |
6.3.6.1. Data uploads
Data uploads respect the Upload requires WiFi setting.
If Upload Data To Connect is checked, then the data is expected to be automatically uploaded to the Connect server over the network. Export data will send any data that has not already been sent and also clear the history.
If Upload Data to Connect is unchecked, then the data is expected to be retrieved from the device over a USB cable. Export data will create one or more json files which can be downloaded from the desktop.
If Automatically upload data every n minutes is checked, then data will be sent to the server at regular intervals. While the data reaches the server more quickly with this approach, it cannot be edited after saving.
If Automatically upload data every n minutes is unchecked, then data will not be sent to the server. Export data will send all data to the server at once. An advantage of this approach is that incidents can be edited before they have been sent to the server.
 |
6.3.6.2. Position updates
Position updates are treated as data uploads and respect the Upload requires WiFi setting.
If Send position updates every n minutes as type X is checked, then SMART Mobile will send a location to the Connect server over the network at the specified interval. This is useful for tracking the last known location of the device.
6.3.6.3. Package URL
The Package URL is a link to the package on the Connect server. See section 7.1 on Package Installation.
6.3.7. Alerts
Alerts are treated as data uploads and respect the Upload requires WiFi setting.
When an incident is saved, each of the observations within it are matched against the list of alerts. For example, if a Fire observation is made, then an event is sent to the Connect server as soon as it is saved:
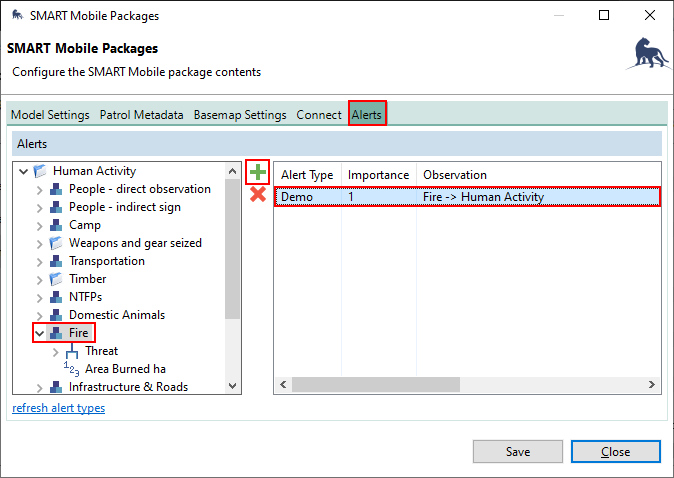 |
Alerts can be viewed on a map in real-time:
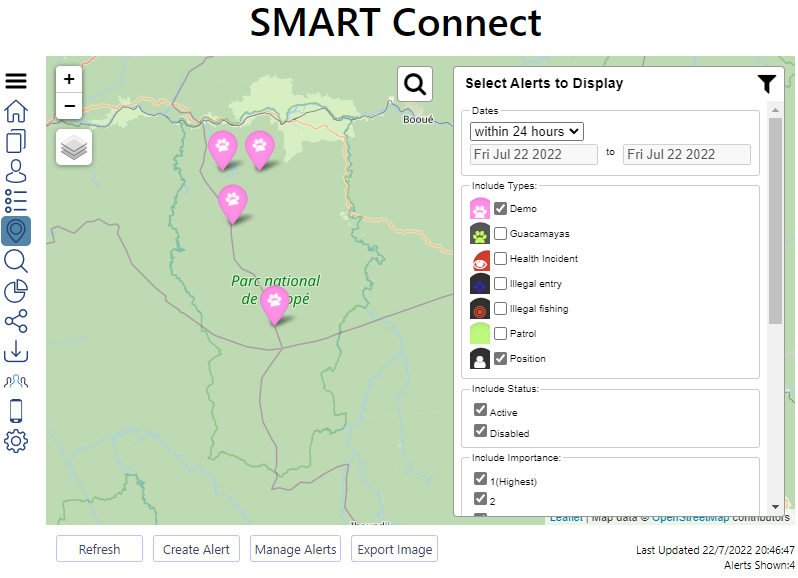 |
6.4. Routes
Routes are points and lines which can be overlaid on a map. They typically represent points of interest or paths which need to be followed. The Routes… menu will open the SMART Mobile Routes dialog.
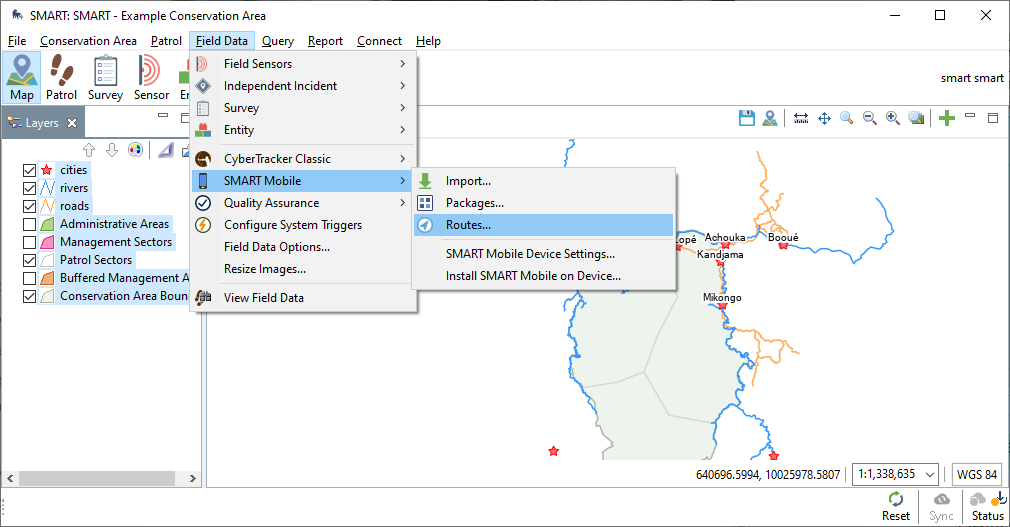 |
Routes work in the same way as Packages - they can be exported to a device using a USB cable or a Connect server.
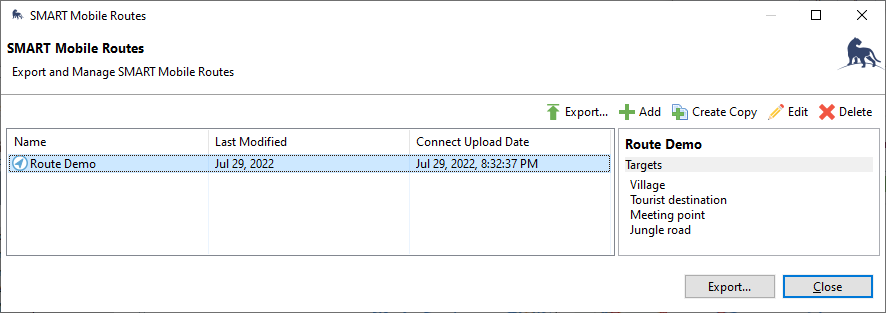 |
They can also be exported at the same time as a Package using the Export SMART Mobile Packages dialog:
 |
6.4.1. Creating route points and lines
Routes are composed of points and lines. These can be configured on the Route editing dialog (clicking Edit on the SMART Mobile Routes dialog):
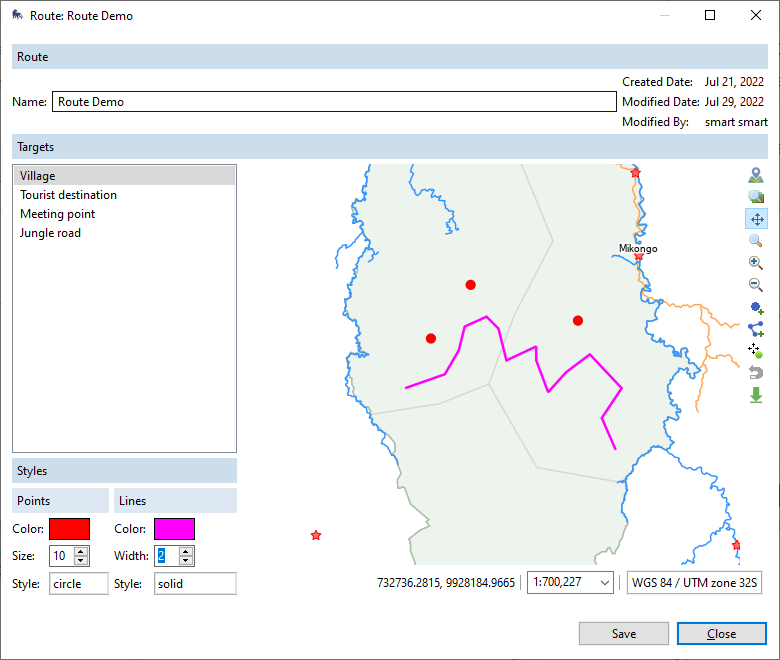 |
6.4.2. Viewing routes
Routes are visible in SMART Mobile on the map. They can be enabled and disabled on the Layers page. More information on routes can be found in the Map section.
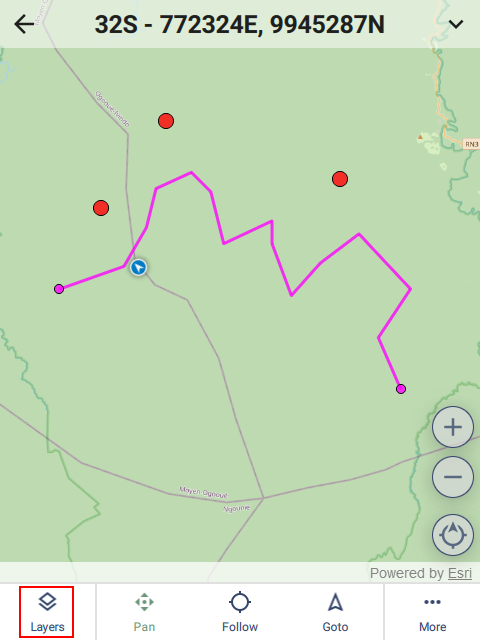 |  |
6.5. Device Settings
Device Settings are part of the SMART Mobile configuration. These can be reached from the SMART Mobile Packages dialog or from the SMART Mobile menu. It is possible to have several different settings profiles for different scenarios.
 |
6.5.1. General tab
The General tab provides options for high level SMART Mobile functions.
 |
6.5.1.1. Incident group UI
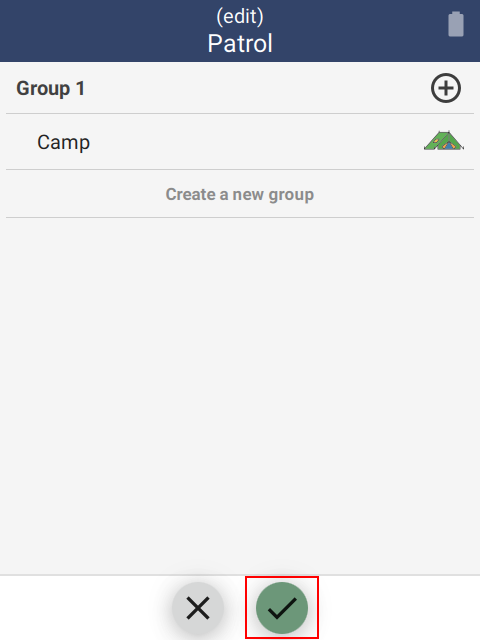
Incident Group UI is a way to create observations which are grouped together. When checked, the observation page shows groups. Tapping the + icon adds an observation to an existing group. Tapping on Create a new group will add a new group to the list.
In order to remove a group (and all observations in it), swipe left on the group row and tap YES to delete it.
 | 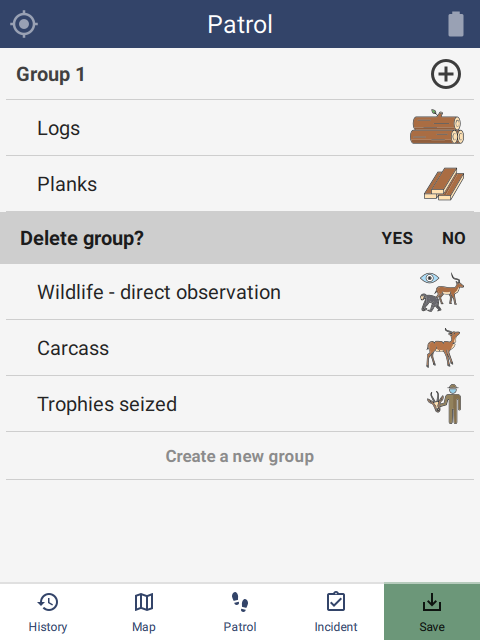 |
6.5.1.2. Kiosk mode
This option is described in section 4.
6.5.1.3. Kiosk mode exit pin
This option is described in section 4.
6.5.1.4. Can pause
Both Patrols and Surveys can be paused. This option appears on the Patrol popup menu if the Can Pause option is checked. Note that the icon in the bottom right of the home screen changes to Resume Patrol.
Data cannot be exported while on patrol. The patrol must first be resumed and then stopped.
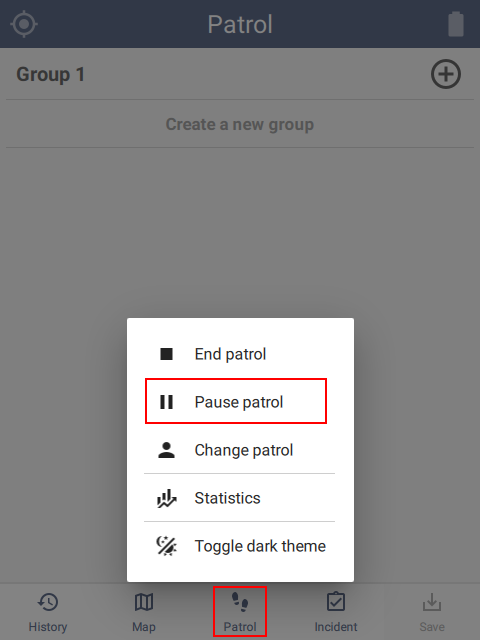 |  |
6.5.1.5. Disable editing
Before data has been exported, it can be edited. However, editing can be disallowed by checking this option.
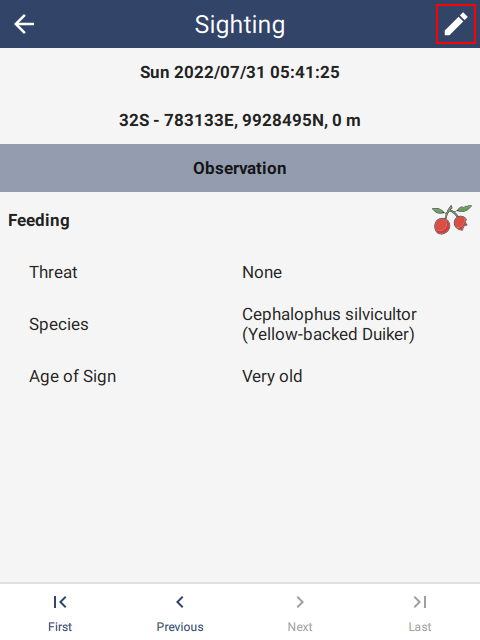
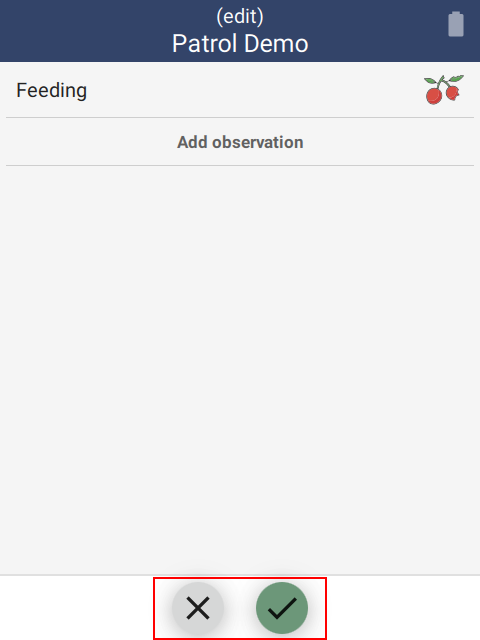
Editing is done by navigating to the history page and selecting the observation to be edited. Then tap the pencil in the top right corner of the screen. From there the observation can be edited as usual.
When editing is complete, tap the highlighted check mark at the bottom of the screen. The X button cancels the edit operation.
 |  |  |
6.5.2. GPS tab
The GPS tab contains settings related to GPS behavior.
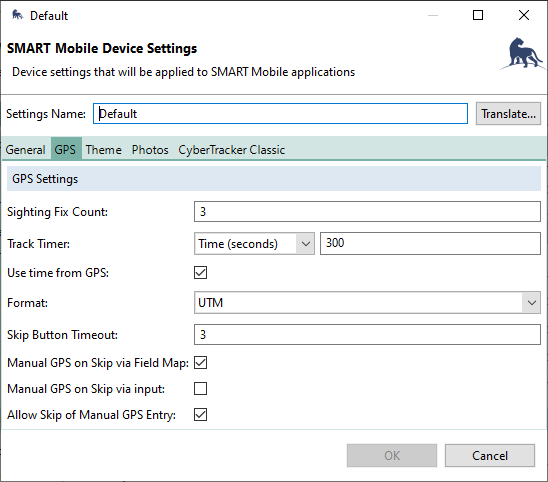 |
6.5.2.1. Sighting fix count
Sighting fix count is the number of GPS readings to discard after powering it on. On many devices, the first readings of the GPS are stale or sometimes wildly inaccurate. Waiting for a few readings to come through first generally improves location quality.
6.5.2.2. Track Timer
The Track Timer interval is specified here. This will be overridden by the Custom Track Timer Settings if they are provided. Note that the interval can be in time or distance. A distance interval will have a higher battery cost, since the GPS must remain on to determine when the distance threshold has been crossed.
6.5.2.3. Use time from GPS
For devices that are never connected to a network, the time is likely to be incorrect. If Use time from GPS is specified, then SMART Mobile will attempt to use the GPS time rather than the device time.
The message Waiting for time correction is displayed while waiting for the first GPS reading to be found.
6.5.2.4. Format
GPS location can be displayed in Degrees Minutes Seconds, Decimal Degrees or UTM. Format also affects the format of manual location entry.
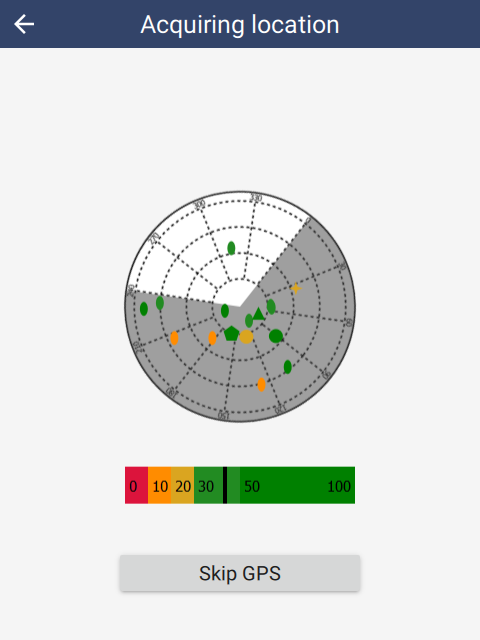
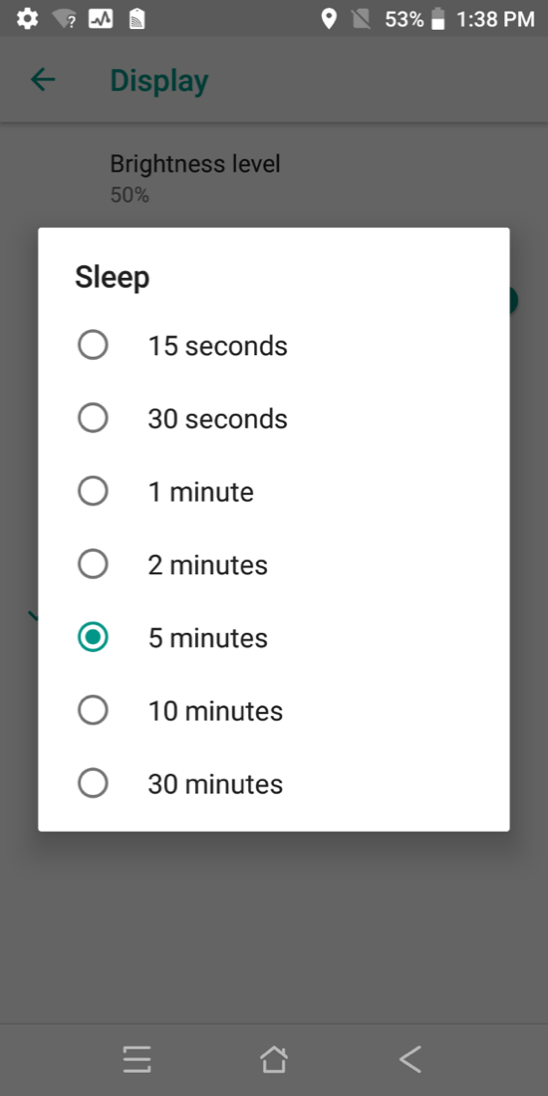
6.5.2.5. Skip button timeout
Taking a reading from the GPS can be skipped. This is usually done when the satellite signal strength is so weak that waiting for a fix would take too long. It can also be used when a location is being reported from another person or device. The Skip button timeout controls how many seconds to wait until the Skip GPS button is visible. The delay is intended to prevent accidental tapping as well as to encourage users to wait until the GPS has a fix.
To disable the Skip button altogether, set the timeout to 0.
 |
6.5.2.6. Manual GPS entry
If both Manual GPS on Skip via field map AND Allow skip of manual GPS entry are unchecked, then Skip GPS immediately completes the observation. If no GPS fix is available, then (0, 0) is used. However, if even a partial reading is available, then that will be used.
If either Manual GPS on Skip via field map OR Allow skip of manual GPS entry are checked, then Skip GPS will show the Manual GPS location screen.
6.5.3. Theme colors
SMART Mobile uses Material design styling and colors: https://en.wikipedia.org/wiki/Material_Design
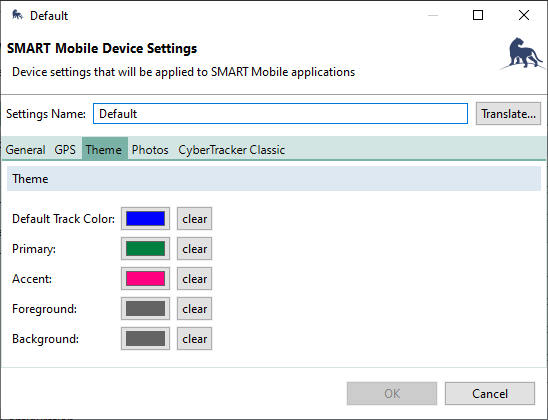 |
The colors are defined as:
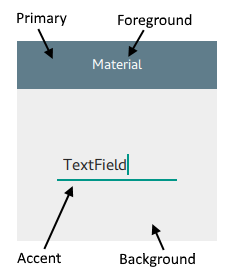 |
Note that currently Foreground and Background are ignored, so that the Dark mode feature functions correctly.
6.5.4. Photos
See Additional Photo Settings in the Configurable Model chapter.
7. General usage
This section covers the basic workings of SMART Mobile outside of the packages which are installed. This includes how to Connect to a package, manage it and configure settings.
7.1. Connect tab
After a package has been created in SMART Desktop, it must be installed by SMART Mobile. There are three ways to get a package to a device: USB cable, the internet or NFC (like Bluetooth).
7.1.1. USB cable
SMART Mobile should already be installed (see section 3) on the device. Check out the section on installing SMART Mobile first.
Connect the device to the PC using a USB cable. Make sure the device is configured to Transfer files and shows up in Windows Explorer as a device. If this does not happen, consult the troubleshooting section.
 |
 |
Now open the SMART Mobile Packages dialog from the Field Data menu and click the Export button:
 |
The Export SMART Mobile Packages dialog will display. Check Export to Device and then click the Export button:
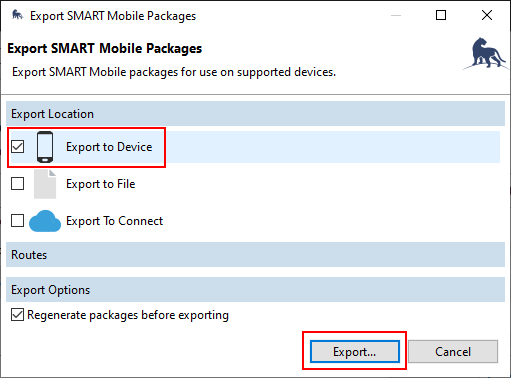 |
When the process succeeds, the following message will display:
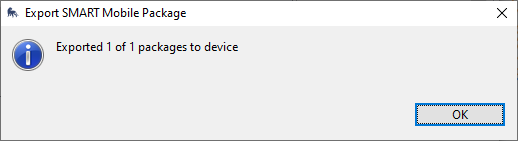 |
Now launch SMART Mobile on the device and go to the Connect tab and tap SMART Desktop - Scan for desktop projects:
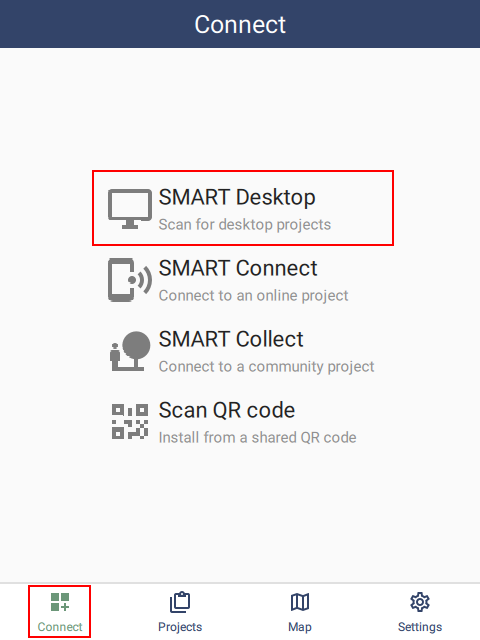 |
After a few seconds, the package will be found and installed as a project. SMART Mobile will automatically navigate to the Projects tab:
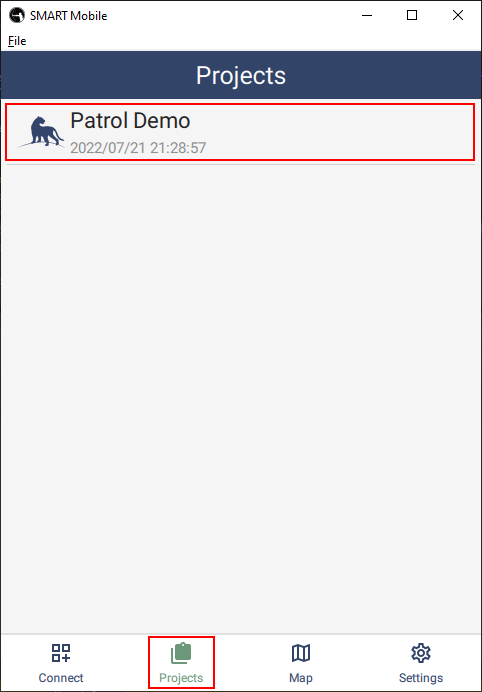 |
7.1.2. Connect
SMART Mobile should already be on the device. Check out section 3 on installing SMART Mobile first.
7.1.2.1. Uploading a package
Open the SMART Mobile Packages dialog from the Field Data menu and click the Export button:
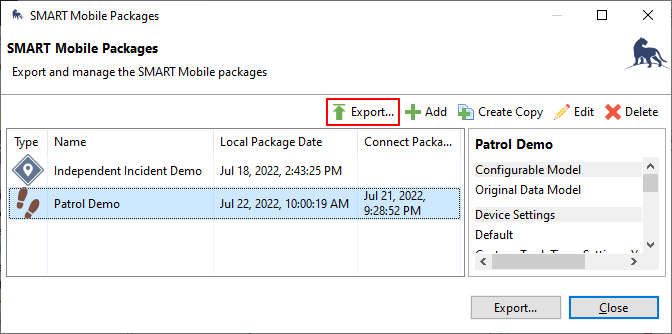 |
The Export SMART Mobile Packages dialog will display. Check Export to Connect and then click the Export button:
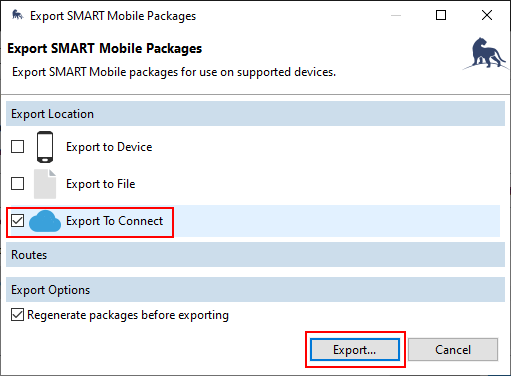 |
When the process succeeds, the following message will display:
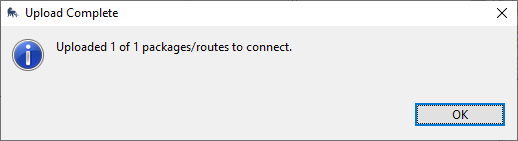 |
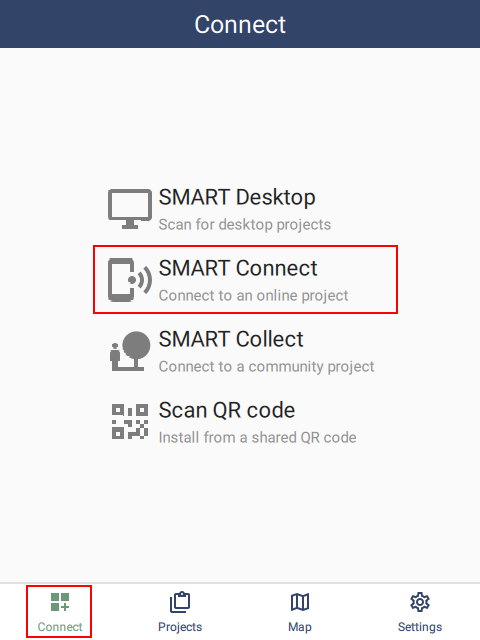
7.1.2.2. Installing from a server
Now launch SMART Mobile on the device and go to the Connect tab and tap SMART Connect - Connect to an online project. Select the server, username and password and tap Login. Then select the package to install.
 | 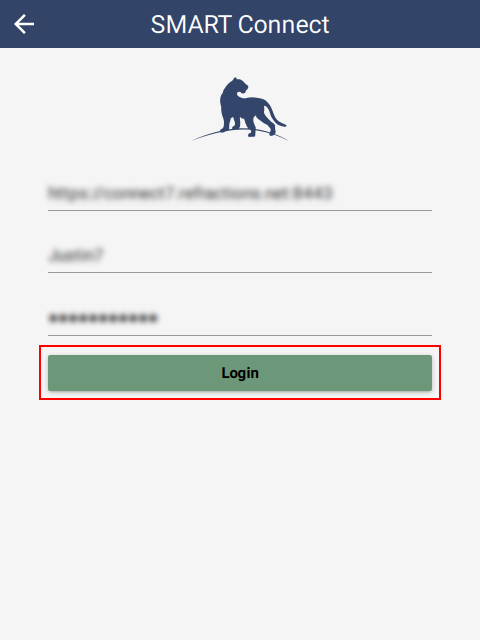 | 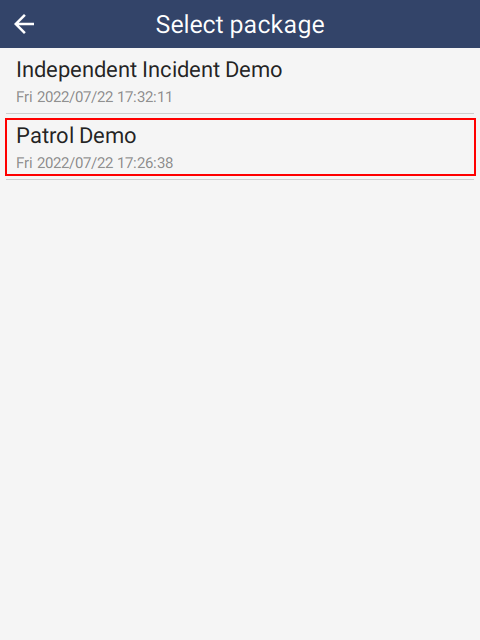 |
After downloading the package, Patrol Demo will be installed. The Projects tab will automatically be selected:
|
7.1.2.3. Installing from a Package URL
Once a package has been uploaded to Connect, it can be installed on a device using a Package URL. This URL is sent to a device using WhatsApp, SMS, Email or another system. The user taps on the link and SMART Mobile will be launched and install the package.
Click the button to the right of the Package URL to copy the link to the clipboard. Then paste it into an email and send it to users. Tapping on the link on a phone with SMART Mobile installed will trigger the install.
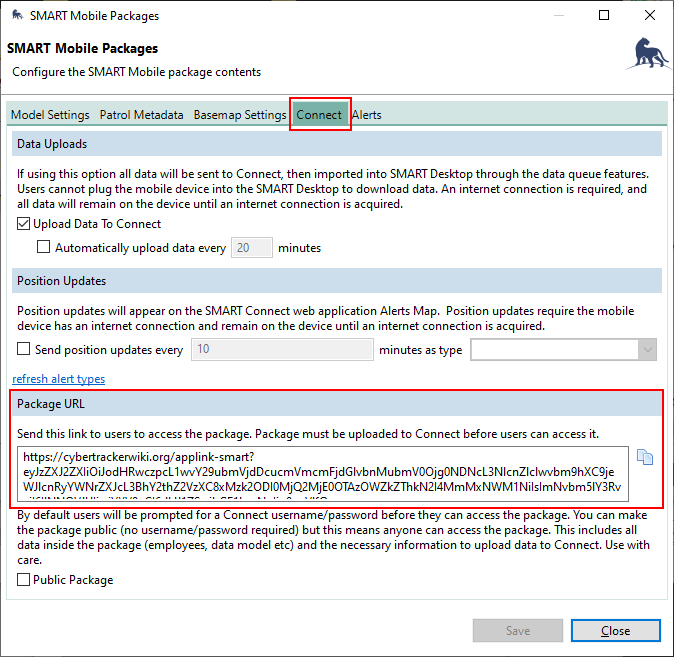 |
If SMART Mobile is not installed on the device when the user taps the link, the browser will navigate to the following web page. The button for App Store will appear on iOS devices and and the button for Google Play will only appear on Android devices. Tapping the button will open the store to the link for download.
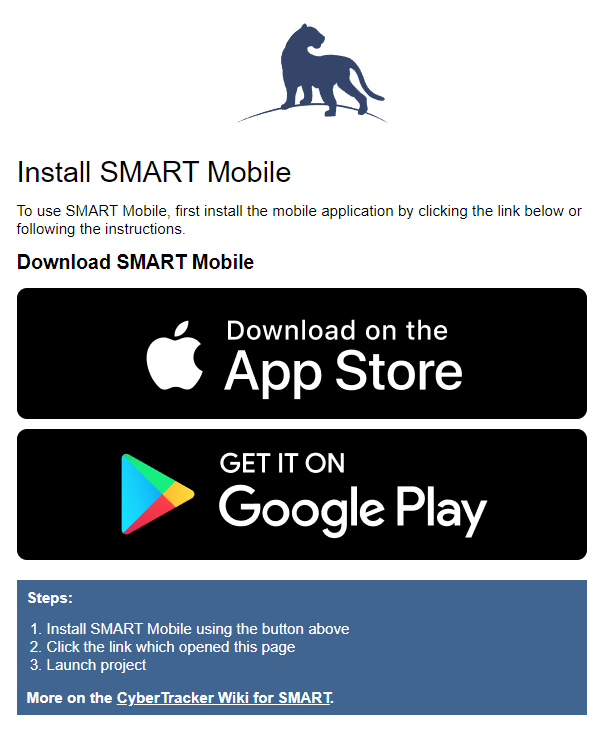 |
The Package URL can be used directly on the SMART Mobile Desktop Simulator. First copy the Package URL to the clipboard, then click the Connect using clipboard link menu option.
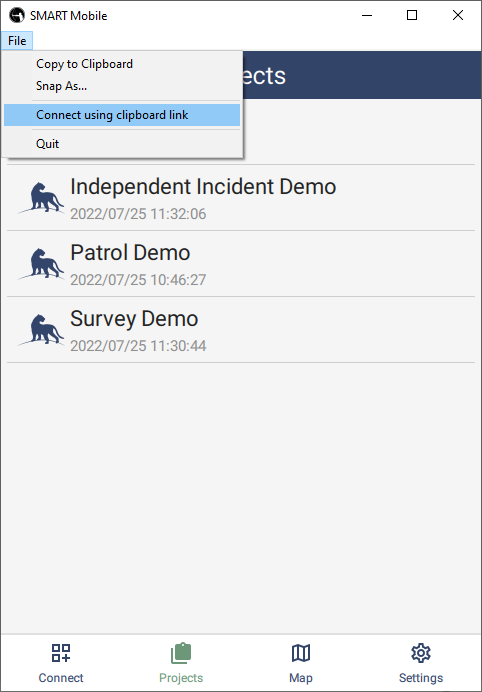 |
7.1.2.4. Installing with a QR code
SMART Mobile can generate a QR code for an online (Connect or Collect) package. When the code is scanned, SMART Mobile will launch and then download and install the package. To generate a QR code for a package, long press on the project until a project options page shows up.
 |  | 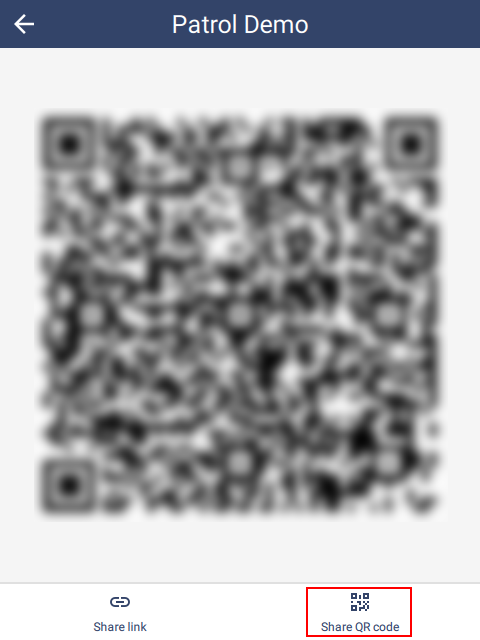 |
The QR code can be scanned by other devices directly from this screen. Alternatively, it can be shared over email for others to use. For example, it could be added to a document or poster for others to connect to directly.
For Connect packages, scanning the QR code will cause SMART Mobile to prompt with a username and password page. Enter credentials to download and install the package.
For public packages without security, the package will be downloaded and installed directly.
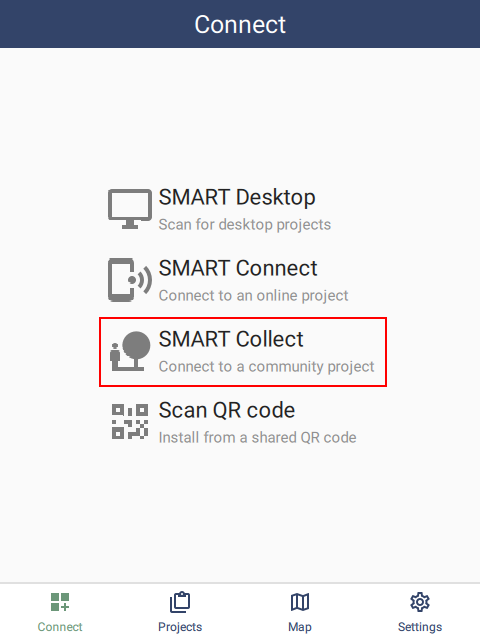
7.1.3. Collect
A Collect package is a package type suitable for distribution to the general public. The user interface is simplified and data must be uploaded to a Connect server.
Collect packages are created on the SMART Mobile Packages dialog:
 |
They are published to the server in the same way as any other package.
Collect packages can be discovered by publishing them to a central register. For example:
 |  |  |
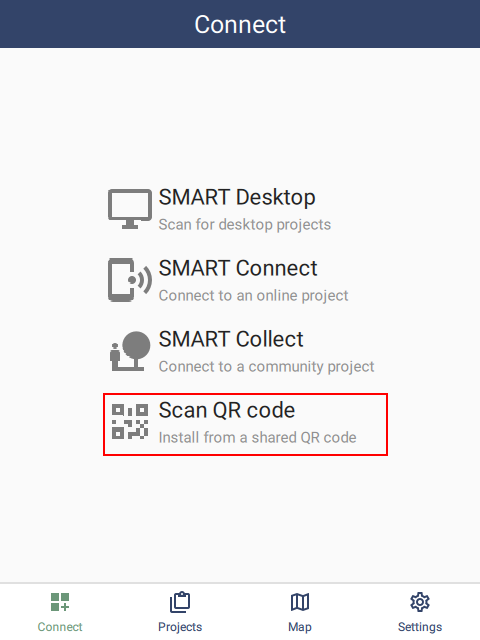
7.1.4. Scan QR code
Scan QR code opens a camera window which scans for a QR code. The QR code contains a Package URL (see above). If a QR code is found, the associated SMART Mobile package will be downloaded and installed in the same way as if the user clicked a Package URL link.
If the device has its own QR code scanner, SMART Mobile will be automatically launched and the package will be downloaded and installed.
 |
7.2. Projects tab
SMART packages are listed on the SMART Mobile Packages dialog:
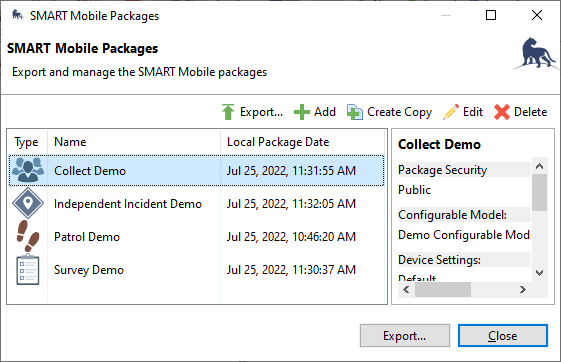 |
They are installed on SMART Mobile using one of the package installation mechanisms (see section 7.1). Long press (or press and hold) on a Project shows the Project details page.
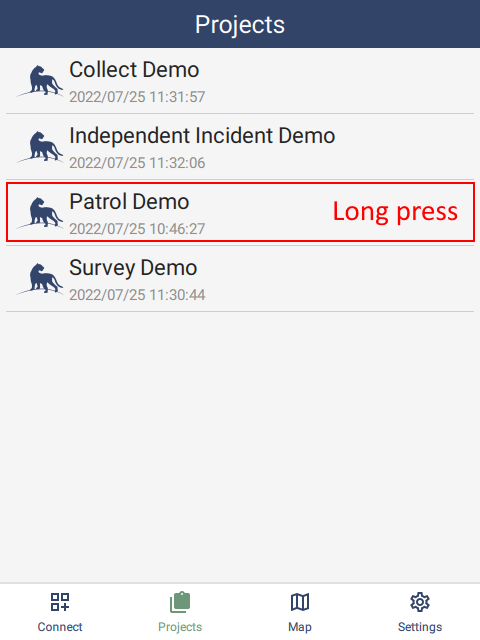 | 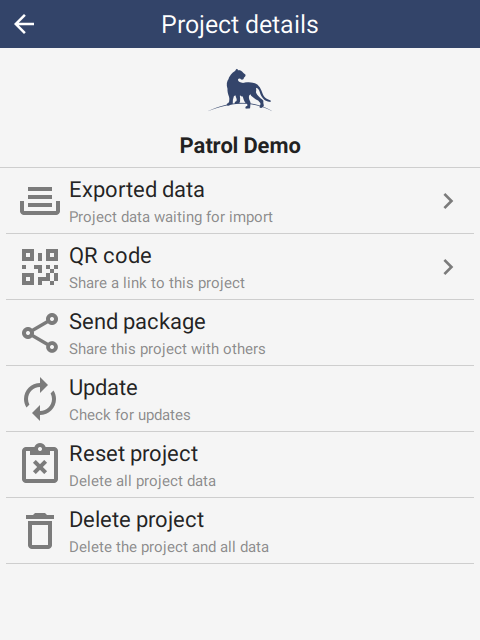 |
7.2.1. Exported data
Exported data are data files on the device that are awaiting import from SMART Desktop. The data in them cannot be edited or modified.
Data is typically exported after a patrol or survey by tapping the Export data button. If a new Patrol/Survey is started and the previous Patrol/Survey has not been exported, an export will be triggered automatically.
Data can be shared using the device sharing system (e.g. email). This is designed as a recovery mechanism in case the device cannot be connected to a PC.
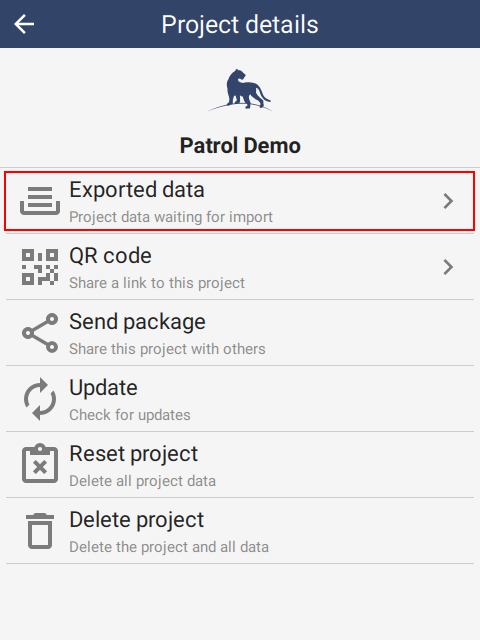 |  |  |
For the Connect configuration, data will be sent directly to the server and will never appear in Exported data.
For the USB cable configuration, a data file will be created when tapping Export data or starting a new Patrol/Survey when the previous one has not been exported.
Exported data is also visible from the Settings page inside the project (see section 8.6.5).
7.2.2. QR Code
QR Code is a method to share Projects with other users. See section 7.1.4.
7.2.3. Send package
Send package is a method to send a Project to another user using the device sharing system. See the section on Package Installation.
7.2.4. Update
Packages served from Connect may be updated on the server. Clicking Update here will test to see if a newer version of the package is available for download. If so, it will download and install it.
Packages are updated on Connect using the Export to Connect feature on the Export SMART Mobile Packages dialog.
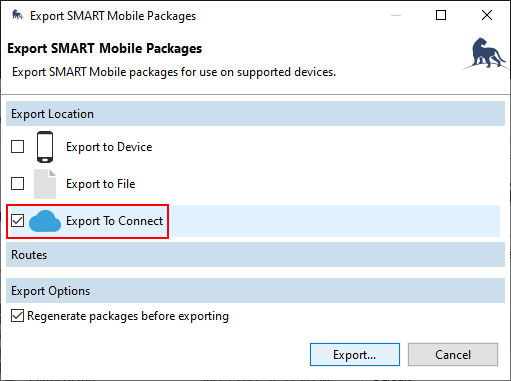 |
When a newer version of a package is detected, SMART Mobile will prompt the user that it is available for download. Tap either the button to the right of the project row to update. When launching, a prompt will appear if an update is available. To confirm, tap and hold Yes, update now. It is recommended to update as soon as an update is available, however failing to do so will not cause data loss.
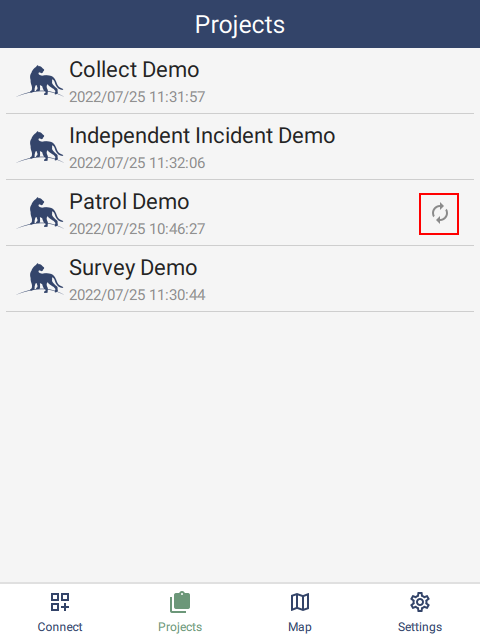 | 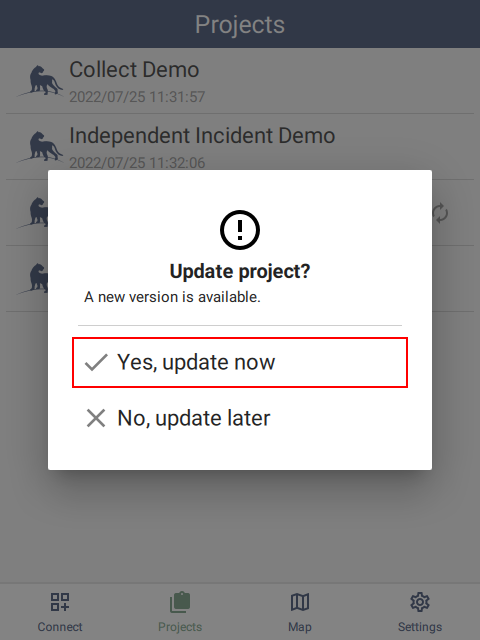 |
Before updating, all data must be exported. If it is not, then the Unsent data message will appear. To fix this, launch the project and tap Export data. Export data requires that a patrol is not running.
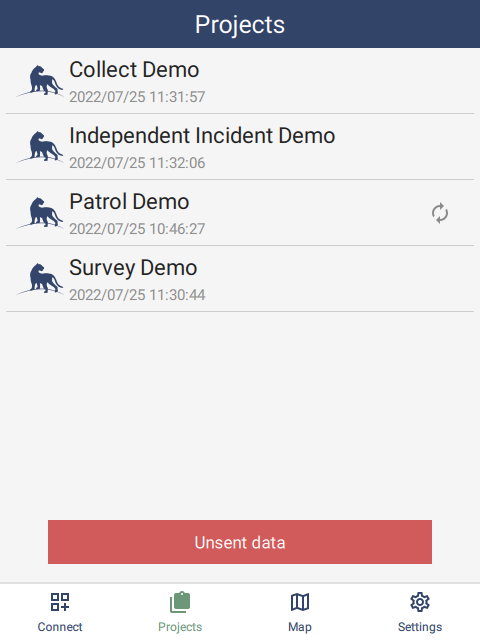 |
7.2.5. Reset data
Reset data is a troubleshooting feature which resets a project to its initial state. All project data is removed and reset.
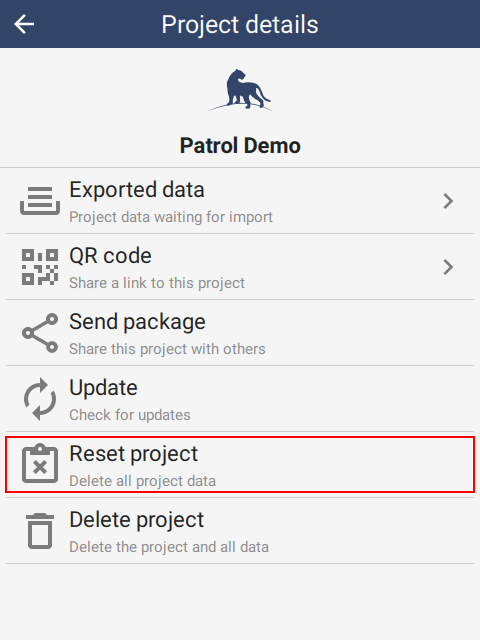 |  |
7.2.6. Delete project
Delete project permanently removes a project from a device. All project data is removed.
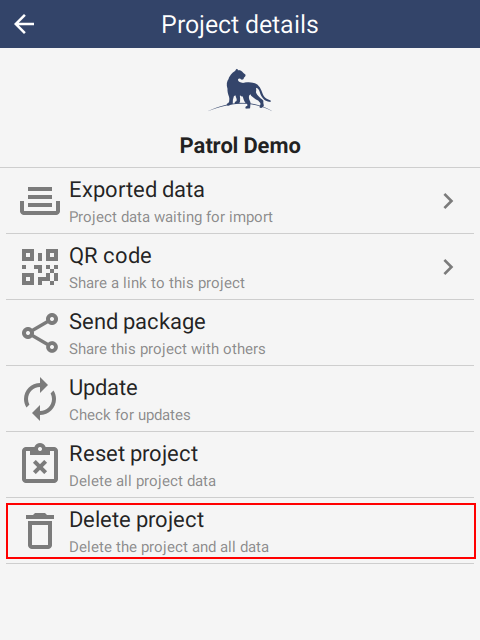 | 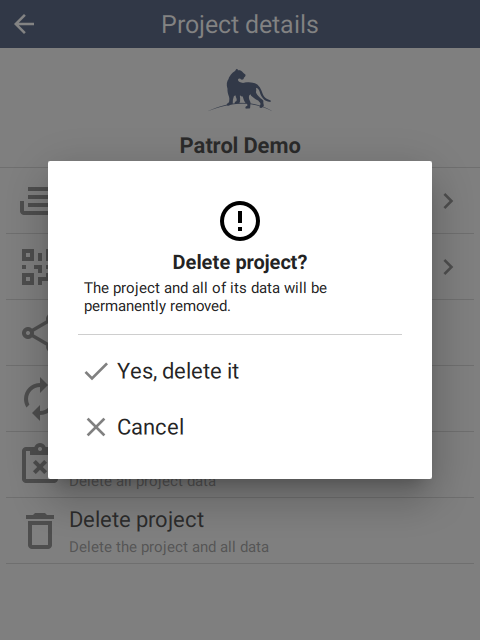 |
Swiping left on a Project row will also offer to delete the project. Tap YES to reach the confirmation dialog:
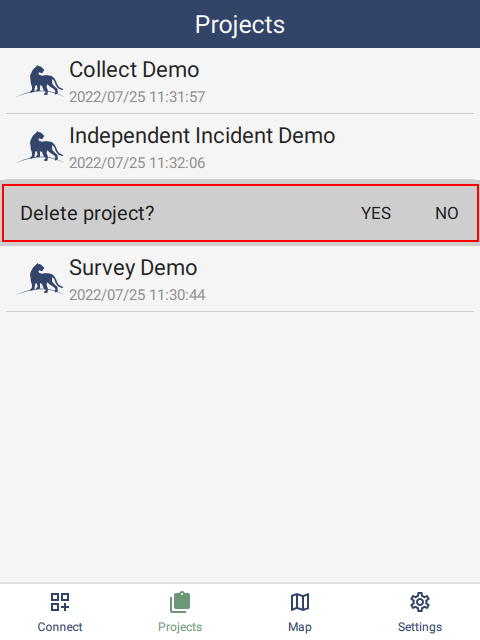 | 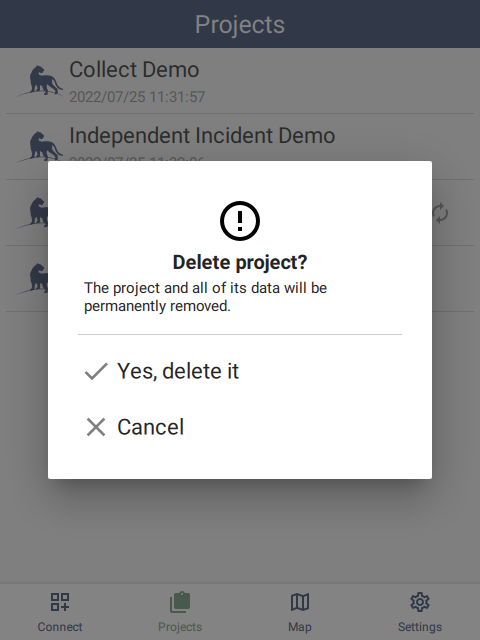 |
7.3. Map page
The Map page is available from several locations within SMART Mobile. There is a button on the home page, the project page and the Patrol/Survey observation page. The same page is displayed in each case, but when triggered from the Projects page (left-most), offline maps and observations from an individual project will not be available.
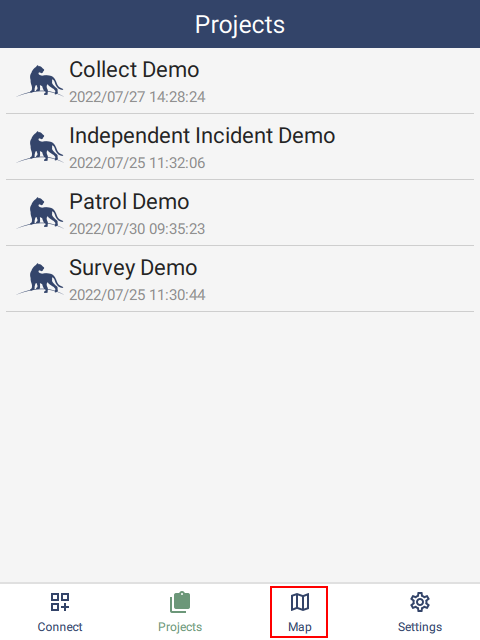 |  | 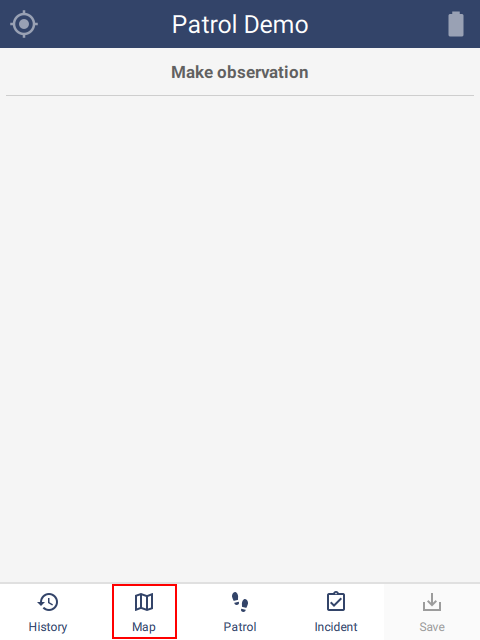 |
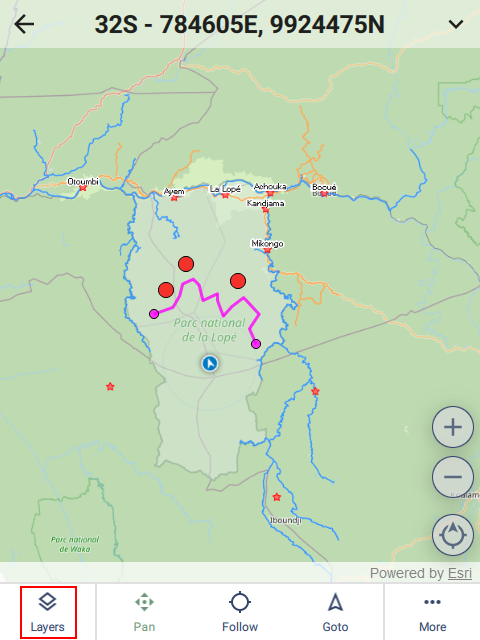
7.3.1. Features
The Map page has the following features:
 |
- Back to previous page
- Current location
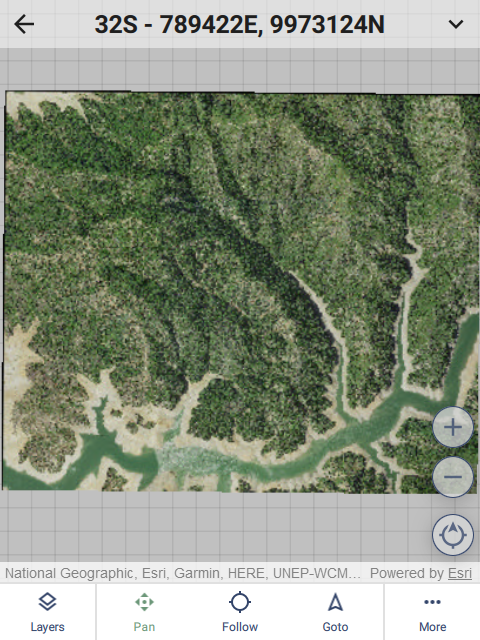
- Offline map overlaid onto online map
- Online map (requires internet connection)
- Current location marker
- Track timer
- Observation - tap to select and see metadata
- Navigation mode: Pan requires the user to move the map, Follow and Goto move the map automatically as the location moves. Goto is designed for navigation.
- Open the Layers page
- Show or hide the additional information overlay. See More (16).
- Route point - tap to set Goto.
- Route line - tap ends to set Goto.
- Zoom in by 10%
- Zoom out by 10%
- Orientation - tap to reset to north at the top.
- Show or hide the additional information overlay. See (10).
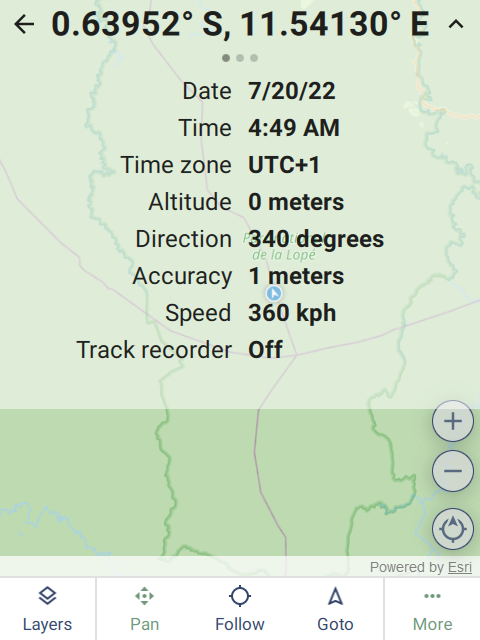
7.3.2. Data overlay
The Data overlay shows more detailed information about the state of the GPS. This includes the time, location, speed, heading and the state of the track recorder. This is purely informational.
 |
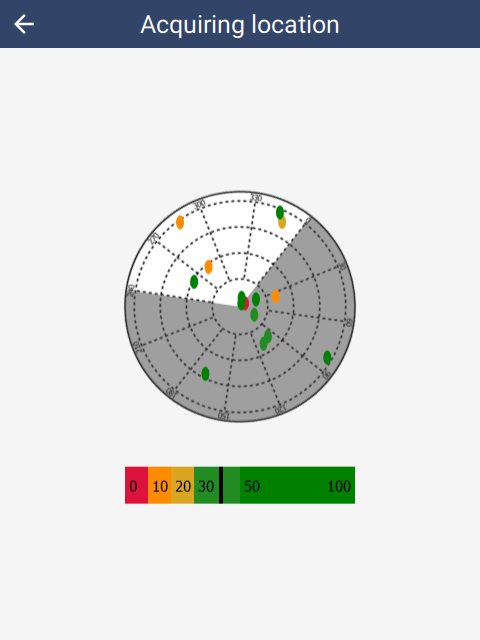
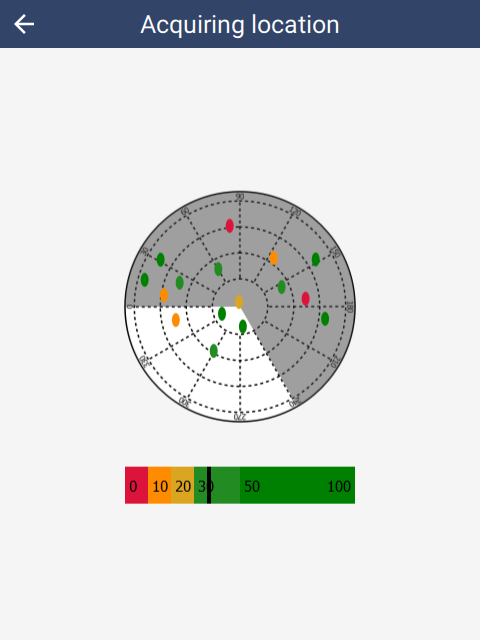
7.3.3. Compass overlay
The Compass overlay shows the compass and the location of the satellites that are being tracked by the GPS.
The compass needle is offset according to the magnetic declination.
The shapes on the dial represent satellites. The color represents the signal strength - green is strongest and red is weakest. Satellite views are not available on iOS.
The different types are: circle (Navstar), triangle (Glonass), pentagon (Galileo), star (Beidou), square (Qzss), diamond (Sbas), ellipse (other):
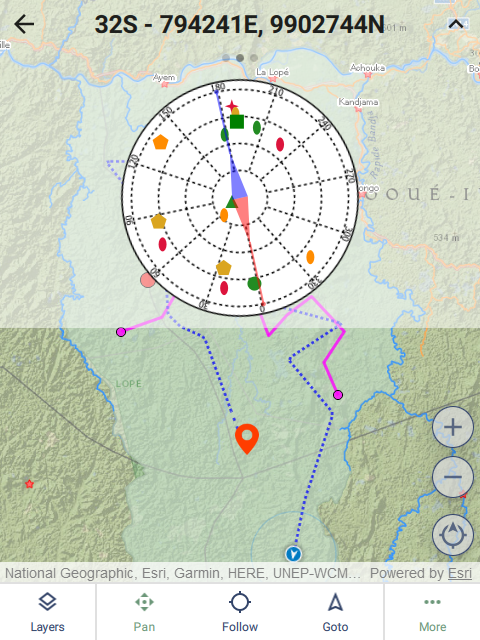 |
7.3.4. Goto overlay
The Goto overlay provides a simple directional navigation system. First tap the point - this will bring up the Identify page. Then tap Set goto. A red line appears connecting the current location with the destination. The overlay displaces the distance and direction from the current point.
 |  |  |
Tapping on the end points of a line route and tapping Set goto will configure the navigation system to target points along the line. Using Back and Next will move the target back and forward through the points on the line. If the device reaches one of the points, the system will automatically advance to the next point on the line. The direction of movement depends on which point was selected as the original target. Selecting the first point will move forward and selecting the last point will move backwards.
 |
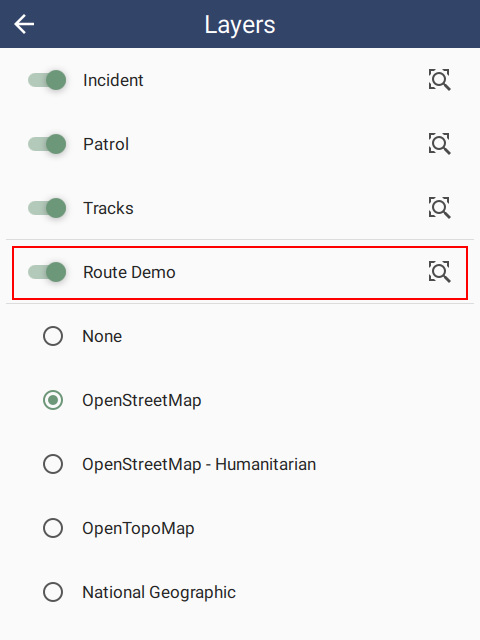
7.3.5. Layers
A map is composed of layers and they can be configured on the Layers page. The layers are ordered top to bottom with the topmost layer being the overlaid on all others.
 | 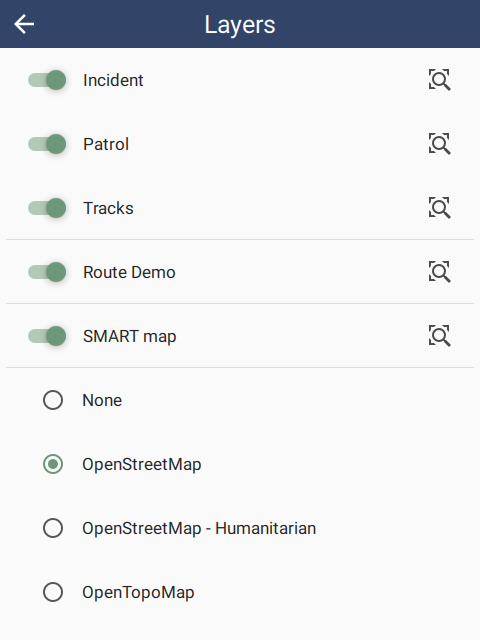 | 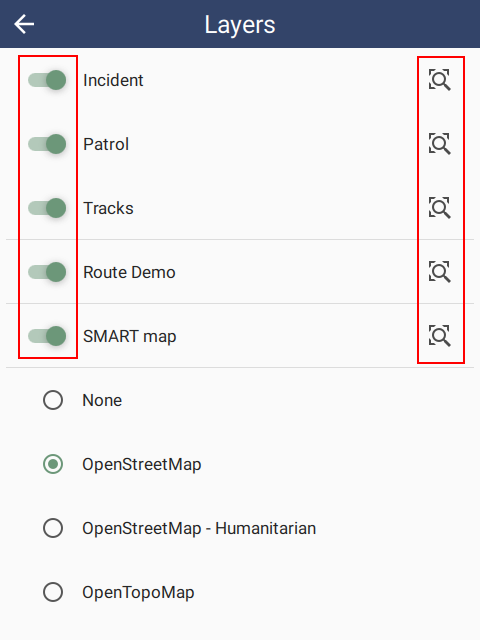 |
Incident and Patrol/Survey are the layers created by entering observations.
Tracks are the line captured automatically by the location track timer.
Route Demo is a route configured in the SMART Desktop (see section 6.4.). Routes can be deleted by swiping left on the route row and tapping YES to delete.
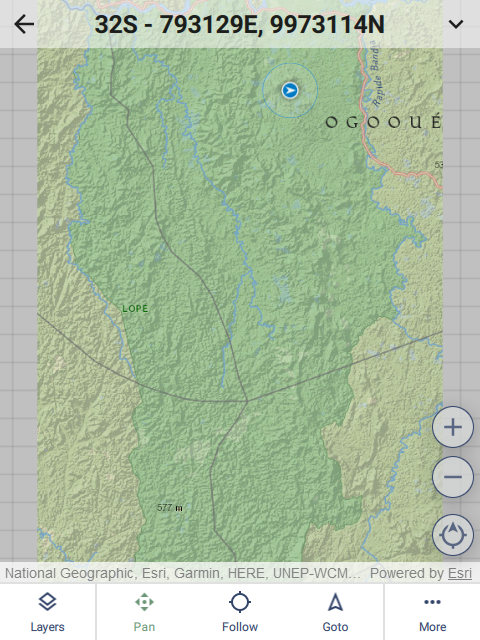
SMART map is an offline map configured in the Package settings (see section 6.3.5).
OpenStreetMap, etc are online layers which require an internet connection. None means that no online layer will be used. If no internet connection is available, the online map will not be used.
Layers can be shown or hidden by a switch on the left side of the layer row.
If a layer is enabled, a zoom to button is available on the right side of the layer row. This will zoom the entire layer into view, which is useful for navigation.
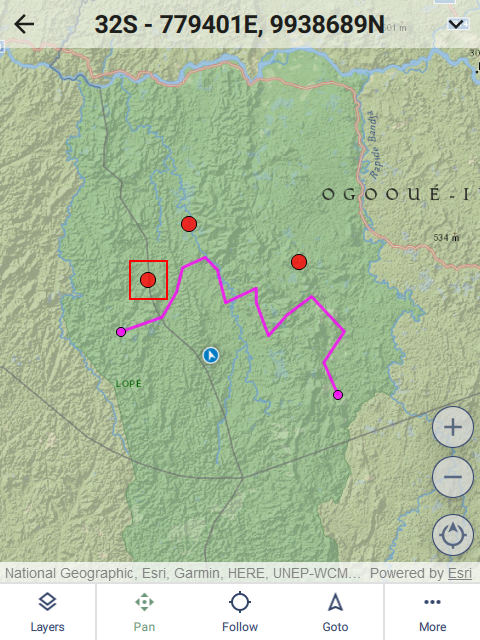
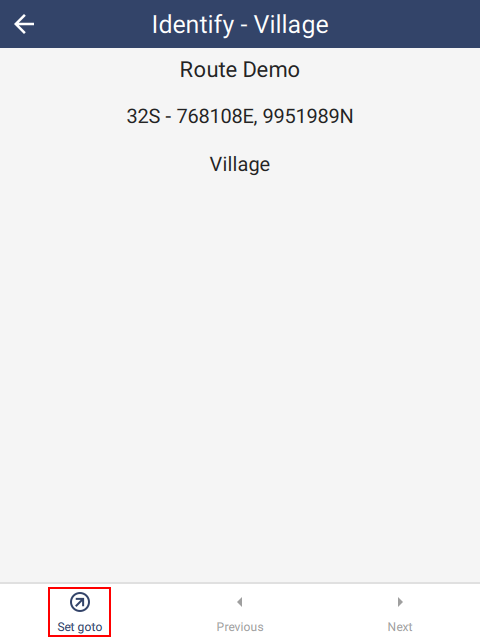
7.3.6. Identify
Tapping on a route point or observation will show the Identify page. Since tapping the screen may not be precise enough to select a single observation, all the points nearby the tap point are included and can be scrolled through one at a time using the Previous and Next buttons on the bottom toolbar.
If editing is allowed, the observation can be edited using the Edit button in the top right corner.
The location of the point can be used as a navigation target using the Set goto button in the bottom left corner.
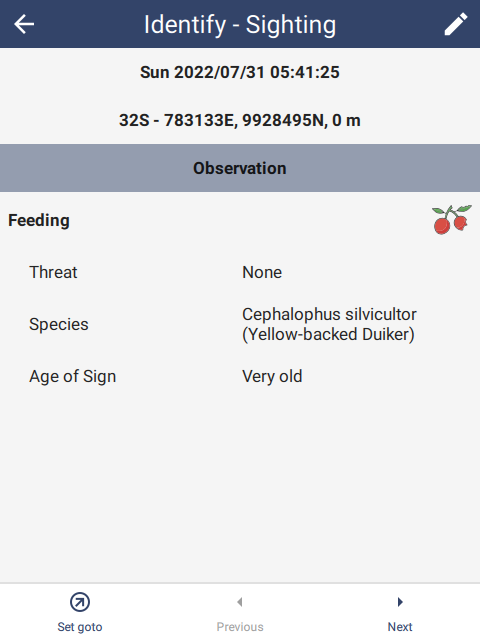 |
7.4. Settings tab
SMART Mobile has a Settings tab on the main page. These settings are for the whole application and cannot be configured by SMART Desktop:
 |
7.4.1. Check for Project updates
The Check for project updates option attempts to update all the projects at the same time. This is useful for keeping all projects up to date. Project that fail to update will not be updated and no error message will appear.
7.4.2. Language
Language governs the language of SMART Mobile, not the language of the data model. The data model language is specified in the package Settings, which is available only once the package has been launched.
SMART Mobile supports over 100 languages. New languages are routinely added and existing languages can be modified to improve correctness. Contact the SMART Forum to report an issue.
If the language is set to System, then SMART Mobile will use the current language setting from the device, i.e. if the device language is French, then SMART Mobile will automatically select French.
7.4.3. Dark theme
Light and dark themes are useful for improving the visibility of screen data. Dark theme is typically used for night viewing. It can also be toggled from the Project settings page and the Patrol/Survey popup:
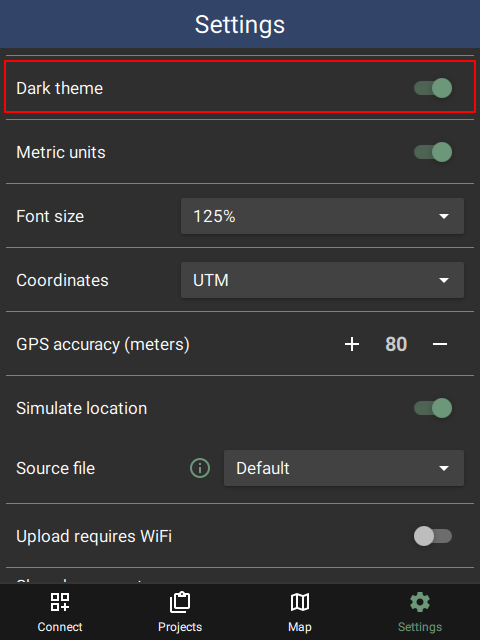 |
7.4.4. Metric units
Metric Units toggles between metric (meters, km/h) and imperial units (feet, mi/h). This is mostly used when viewing GPS data and Patrol leg data.
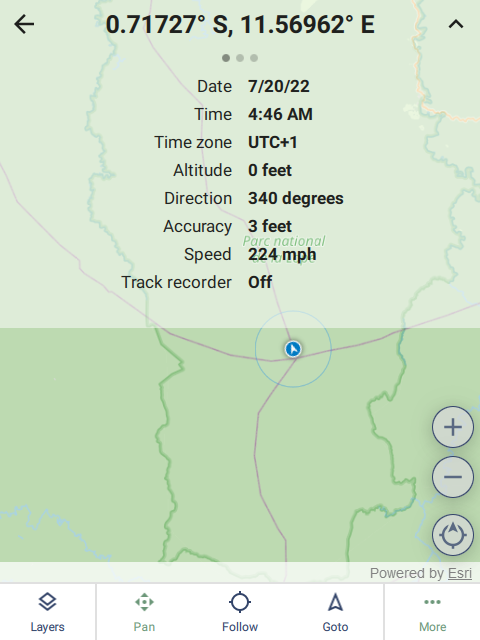 | 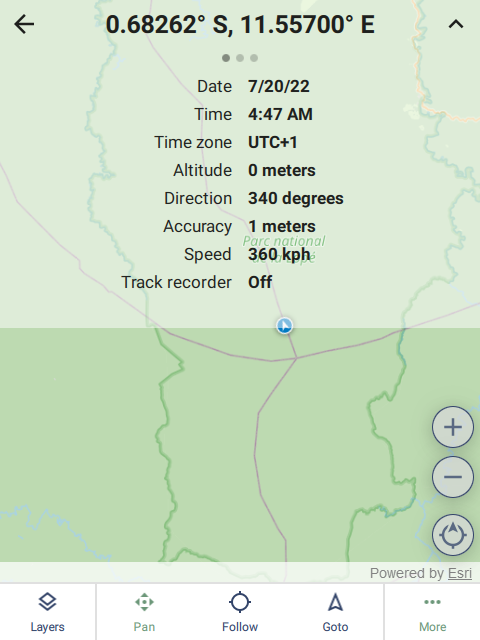 |
7.4.5. Font size
Font size governs the size multiplier for text in SMART Mobile. The options are 100%, 125% (default), 150%, 175% and 200%. All parts of the application are scaled accordingly. For example, this shows the setting at 175% across various screens:
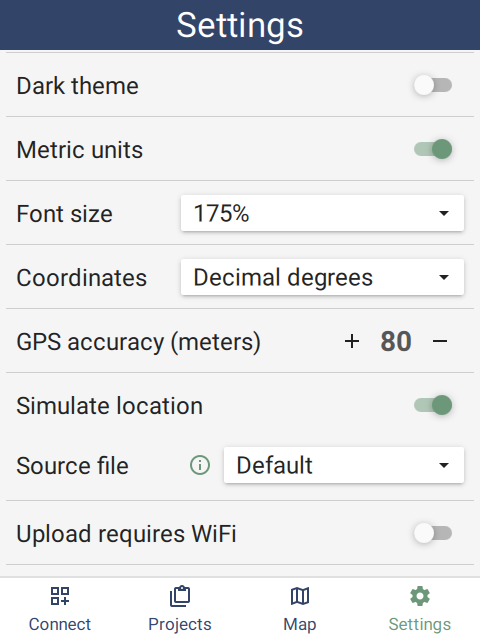 |  |  |
7.4.6. Coordinates
Coordinates specifies the format used for GPS coordinates throughout the application. The options are: Decimal degrees, Degrees minutes seconds, Degrees decimal minutes and UTM (Universal Transverse Mercator):
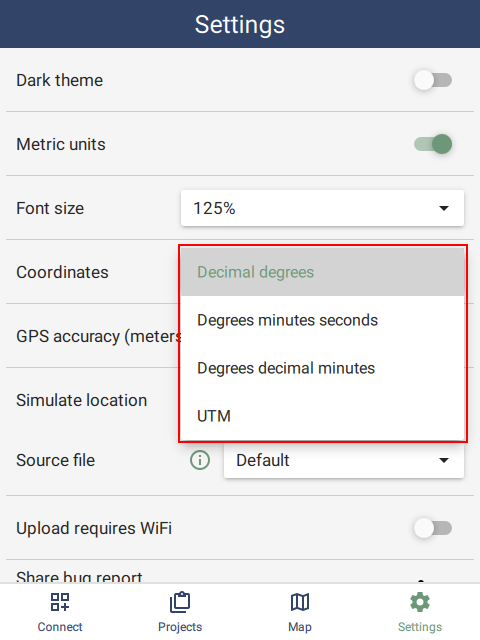 |
7.4.7. GPS accuracy (meters)
The device GPS estimates the uncertainty in the reading provided. High values are usually caused by poor satellite geometry or obstructions. This setting provides a top level filter to help reduce the overall error in location readings.
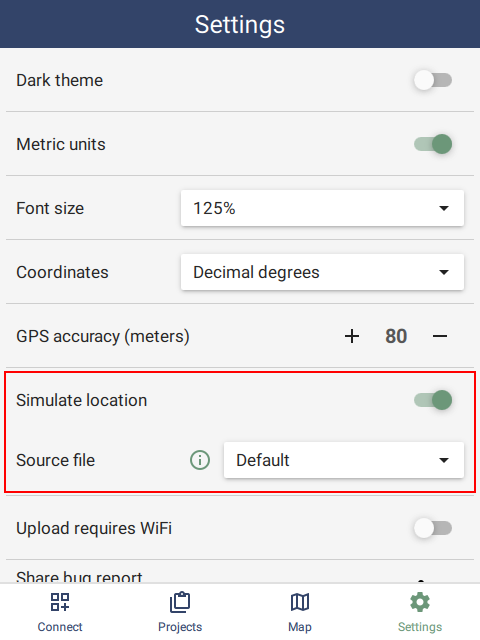
7.4.8. Simulate location (desktop only)
The desktop version supports a GPS simulator. This simulator can read locations from an NMEA file. A new simulator path can be created using https://nmeagen.org. Once a path has been defined, download the resulting nmea file into the Downloads folder. The next time SMART Mobile starts up, it can be selected as the Source file for locations.
 |
7.4.9. Upload requires WiFi (Android only)
Uploading data to a server will incur cellular data costs. If sending pictures, audio or long patrols, this could be a significant amount of data. This feature prevents data upload until the connection being used is WiFi.
7.4.10. Bug reports
See section 9.1 on creating bug reports.
8. Project usage
8.1. Patrols and Surveys
A Patrol or Survey is a group of observations. Along with observational data, the system tracks metadata, e.g. transport type, objective and employees. These properties can be configured on the desktop (see section 6). Patrols/Surveys can be started/stopped, paused/resumed and the metadata can be modified at any time.
8.1.1. Start patrol
To start a new patrol, tap START PATROL on the project start page. The metadata page will appear. Fill in the metadata and tap the check mark in the top right corner. Note that attributes marked with a ‘*‘ are required. If the Transport Type is an air or water type, then a Pilot row will appear.
 | 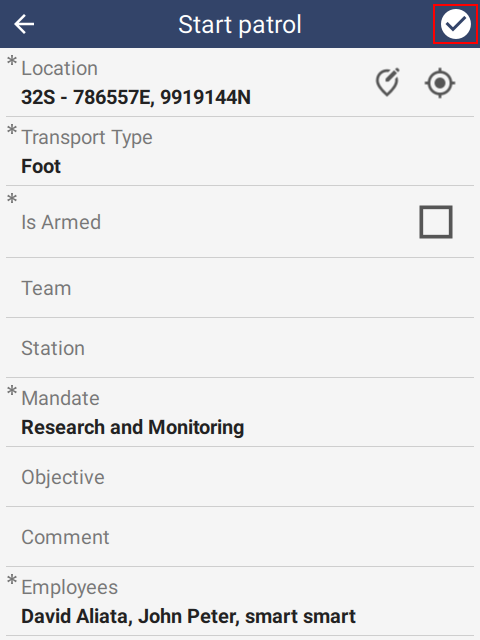 | 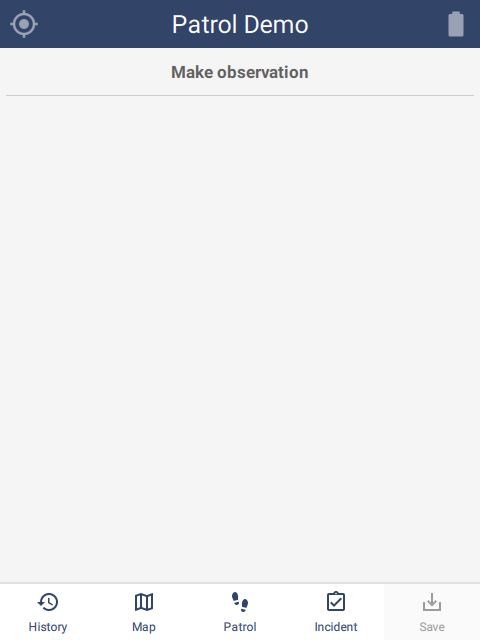 |
Once a patrol has started, the Observation page is displayed.
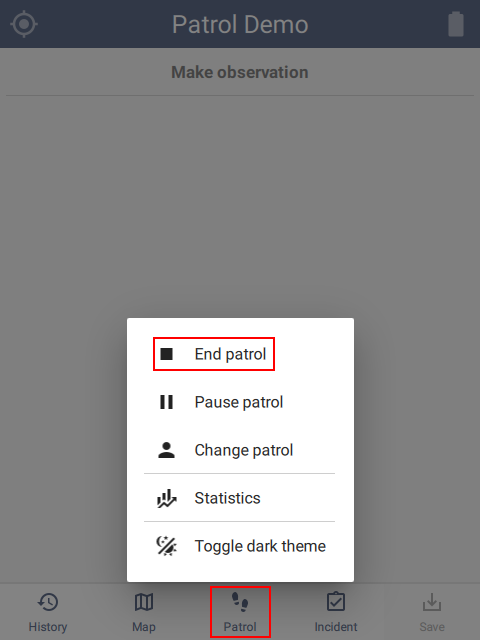
8.1.2. End patrol
To end a patrol, tap the Patrol button on the toolbar at the bottom of the Observation page. Then tap the End patrol option. A popup will appear asking for confirmation. Press and hold Yes. A final location will be taken and then the patrol will be completed. If the back button is pressed on the Acquiring location page, then the End patrol operation will be canceled.
 | 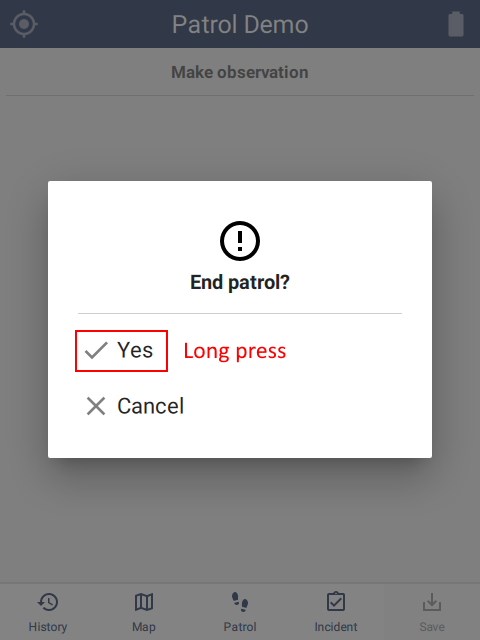 |  |
8.1.3. Pause patrol
To pause a patrol, tap the Patrol button on the toolbar at the bottom of the Observation page. Then tap the Pause patrol option. A location will be taken and then the patrol will be paused. The START PATROL button is now labeled RESUME PATROL.
Pausing a patrol can be disabled in the configuration (see section 6.5.1.4). In this case, the Pause patrol option will not be available.
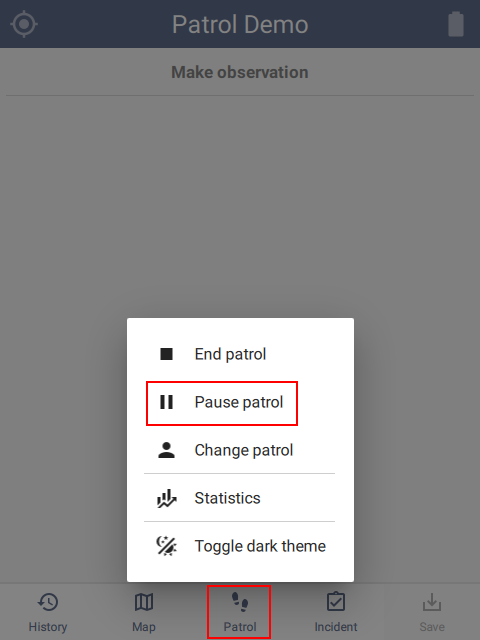 |  | 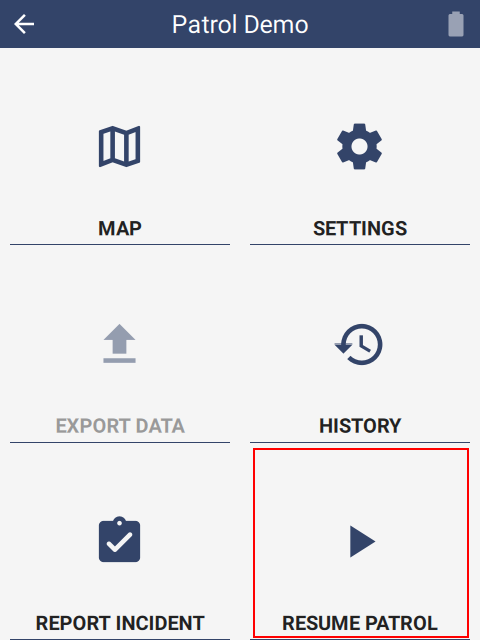 |
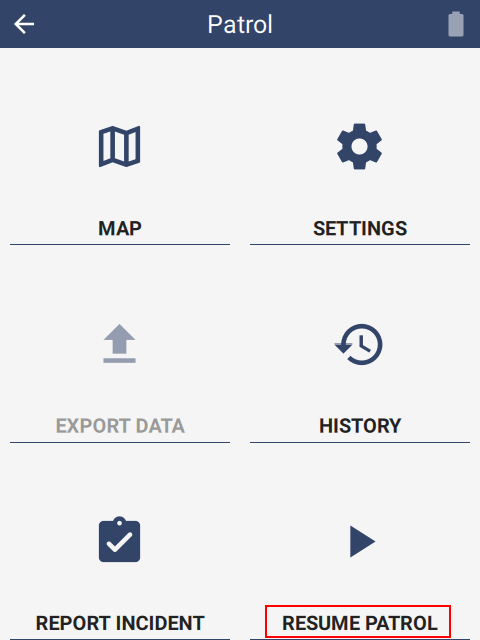
8.1.4. Resume patrol
To resume a patrol, tap the RESUME PATROL button on the start page. A location will be taken and then the patrol will be resumed.
| | |
8.1.5. Change patrol
During the patrol, it is often necessary to change the patrol metadata. For example, if the transportation type changes or team members change. To do this, tap the Patrol button on the toolbar at the bottom of the Observation page. Then tap the Change patrol option to bring up the metadata page. Several attributes will be disabled and cannot be changed at this time. If no change is made to the metadata, no observation will be saved. This means that the Change patrol feature can be used to verify the metadata at any time.
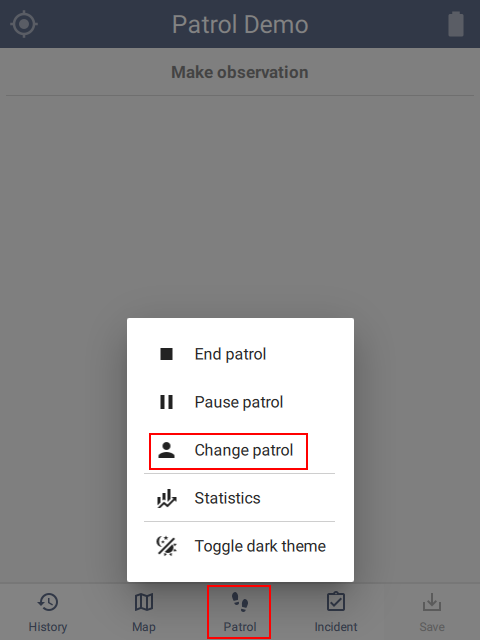 | 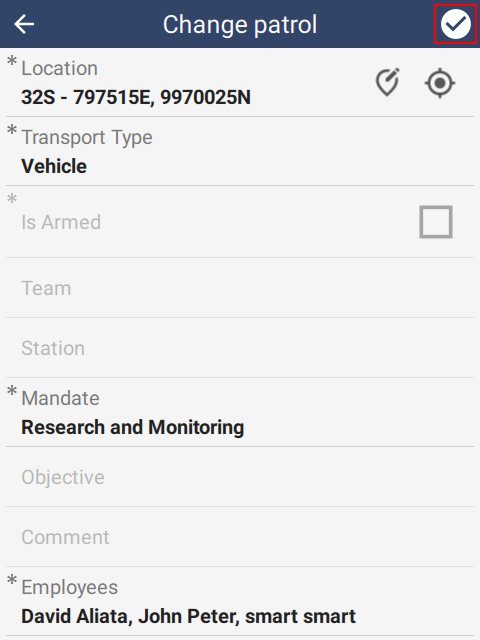 | |
8.1.6. Statistics
SMART Mobile keeps track of the legs of a patrol. To see these, tap the Patrol button on the bottom toolbar of the Observation page. Then tap the Statistics button to view the patrol state. Each change of the patrol metadata will result in a new leg. The current leg is topmost and highlighted.
 |  |
8.2. Independent incidents
Independent incidents are observations which are not connected to a Patrol/Survey. There are two ways of creating an Independent incident: directly from the start page with the REPORT INCIDENT button, or during a Patrol/Survey using the Incident button on the bottom toolbar. These two methods are identical.
Capturing an incident during a patrol/survey does not affect the patrol/survey in any way.
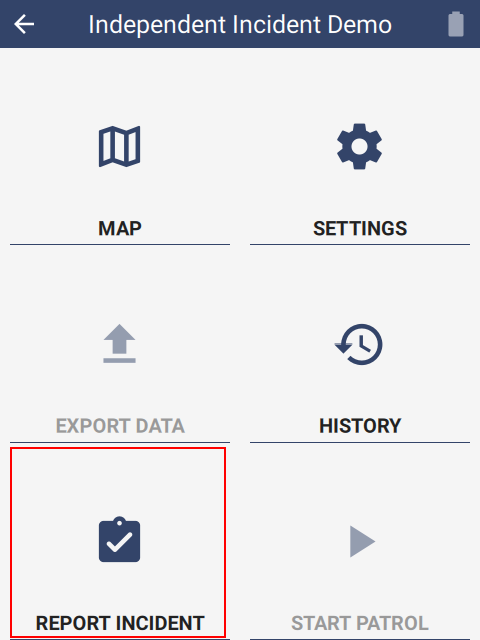 | 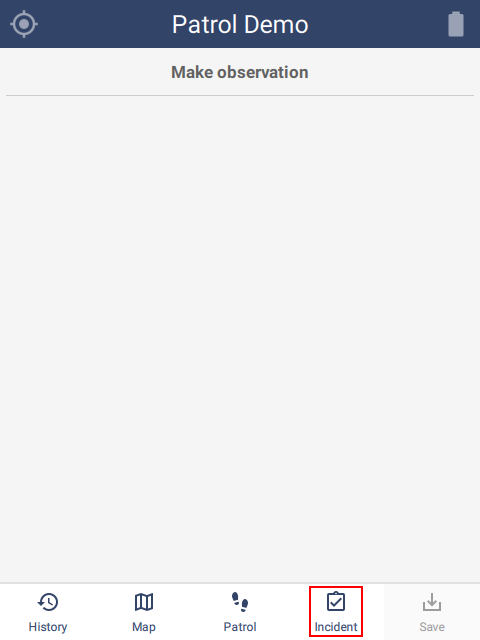 |
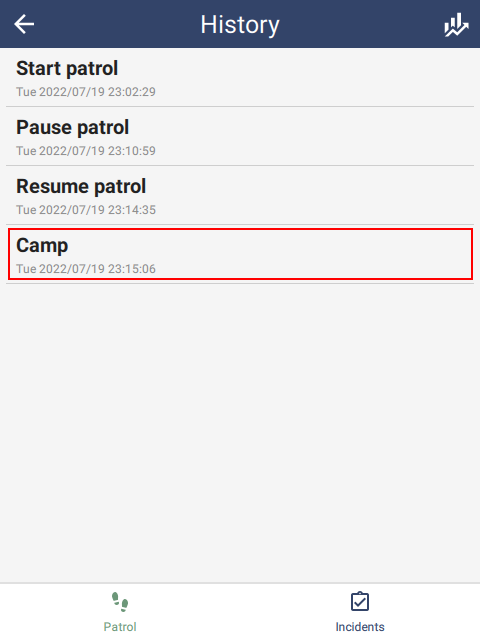
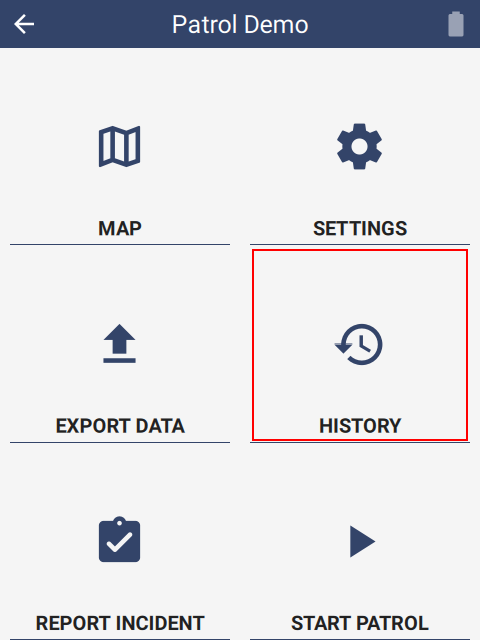
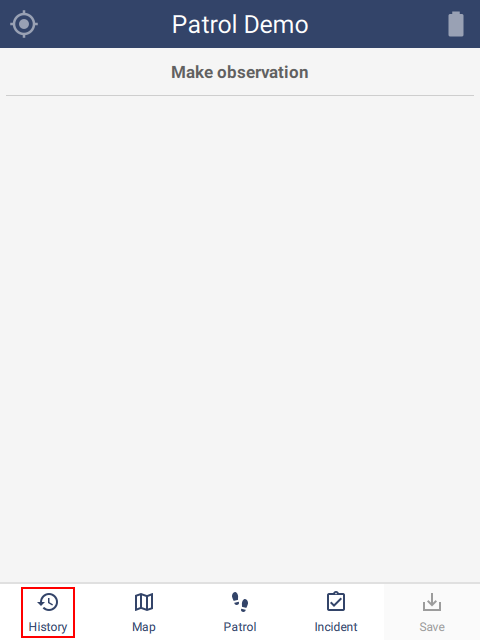
8.3. History
History shows the most recent patrol/survey and incident data. There are two ways to access the history: directly from the start page with the HISTORY button or using the History button on the bottom toolbar during a patrol/survey.
 |  |
The history page has a Patrol tab and an Incident tab. If the project does not have both a patrol/survey and independent incidents, then there will be no tabs, i.e. the screen will just have a single history list.
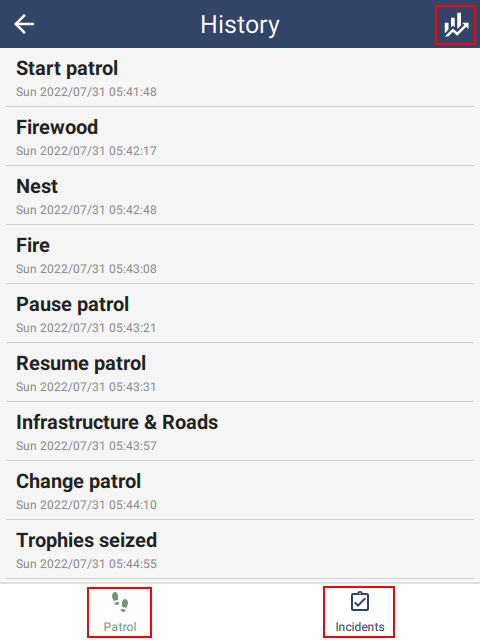 |  |
Statistics can be accessed using the button in the top right corner, even after the patrol/survey has ended.
8.4. Editing
Saved observations can be changed before export.
To edit an observation, locate it using Map identify or via the History page. Then tap the edit icon in the top right corner of the screen. The observation home screen will then be shown with two large buttons at the bottom. X cancels the edit and the check confirms any changes.
 |  |
Editing is disabled when:
- The device configuration specifically disables editing. See section 6.5.1.5.
- The observation is a patrol/survey management observation, e.g. start, stop, pause, resume, change metadata.
- The observation has already been exported.
8.5. Export data
See section 5 on Retrieving data..
8.6. Settings page
SMART Mobile has a Settings page for each Project. This provides configuration options and other features which are less commonly used.
 |
8.6.1. Language
The language here is defined in the Conservation Area Properties dialog, off the Conservation Area menu.
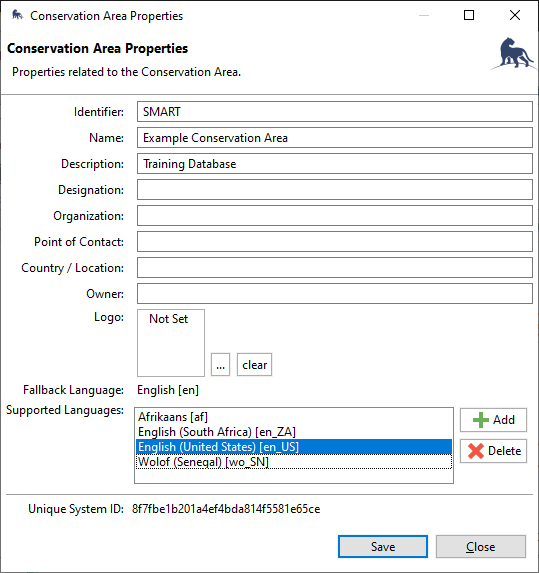 |
In SMART Mobile, the current language can be selected from the available languages in the Conservation Area.
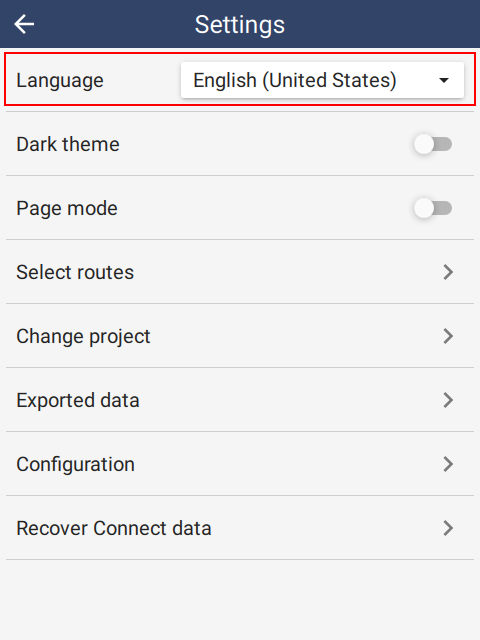 |
8.6.2. Dark theme
Light and dark themes are useful for improving the visibility of screen data. Dark theme is typically used for night viewing. It can also be toggled from the main settings page and the Patrol/Survey popup:
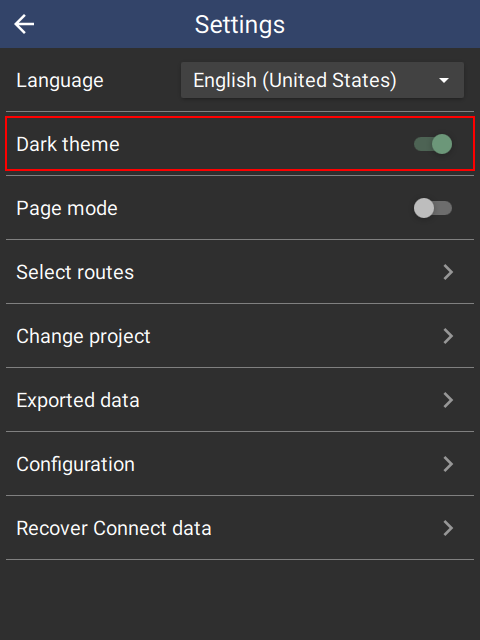 |
8.6.3. Routes
See section 6.4 on routes.
Routes are points and lines that are overlaid on the map. This option allows download of new routes from the SMART Connect server.
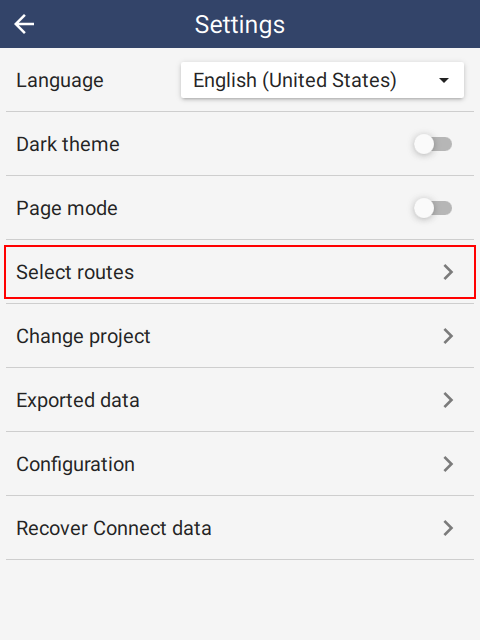 | 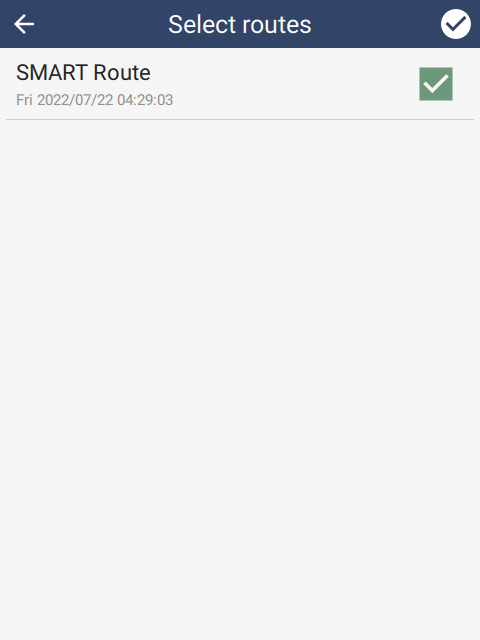 |
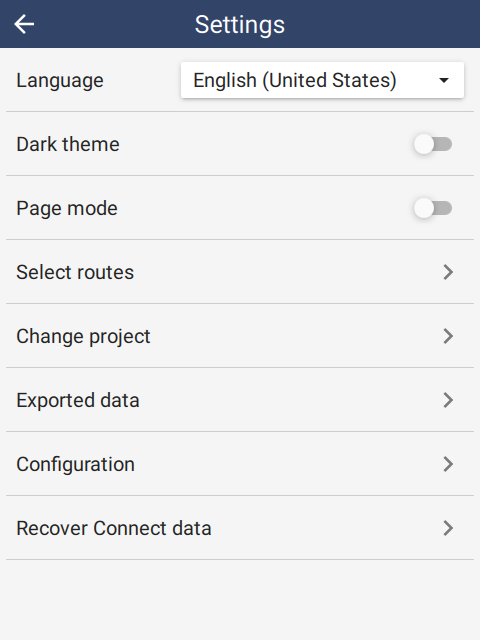
8.6.4. Change project
The Change project option provides a simple way to change the current project. Normally this would require exiting the project and returning to the main screen. However, by placing the option here as well, it works within Kiosk mode. See section 4.
|
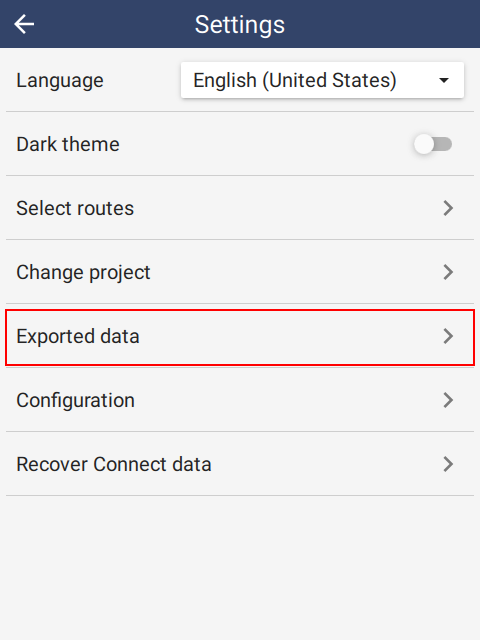
8.6.5. Exported data
The Exported data option shows data files that have previously been exported using the EXPORT DATA option on the project page. The primary purpose of this view is to provide visibility into the export process and help troubleshoot and prevent data loss. See section 9.2 on Recovering Exported data.
8.6.6. Configuration view
The Configuration view option shows the SMART desktop configuration settings. This is primarily useful for troubleshooting.
 | 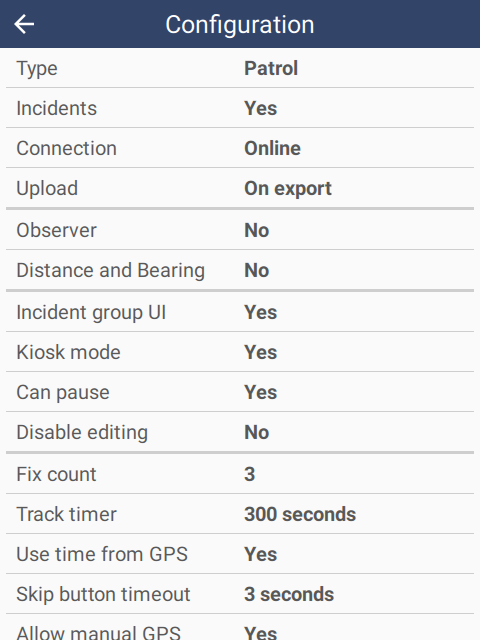 |
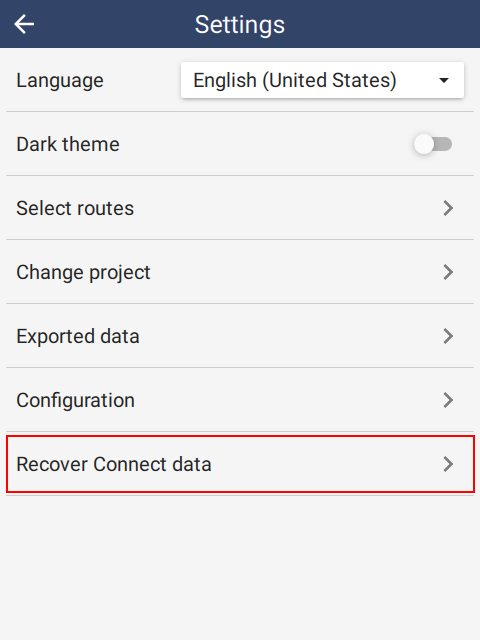
8.6.7. Recover Connect data
The Recover Connect data is designed to recover data when a Connect server is no longer working. See section 9.3 on Recovering Connect data.
8.7. Collecting data
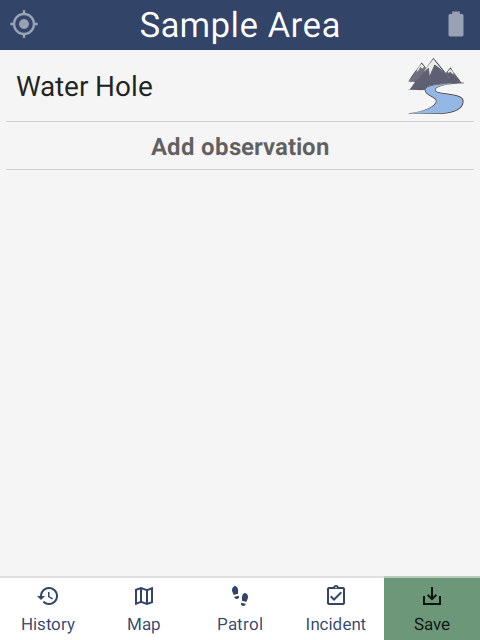
8.7.1. Adding observations
An incident is composed of one or more observations. To create a new observation, tap the Make observation button on the observation home page.
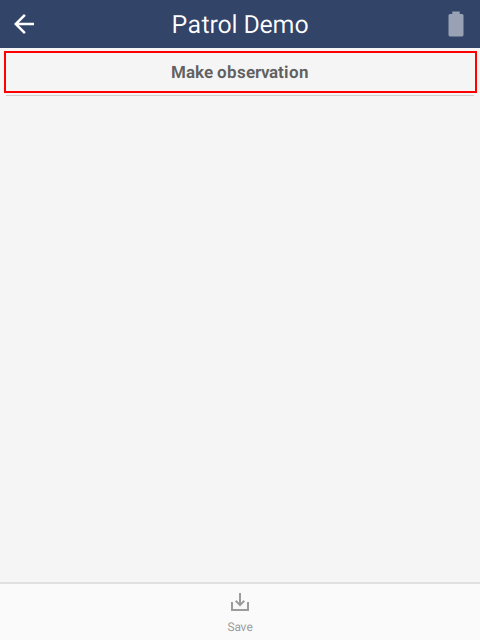 | 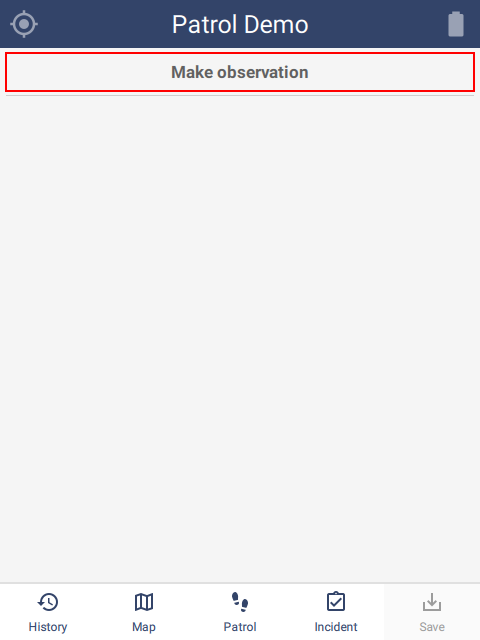 |
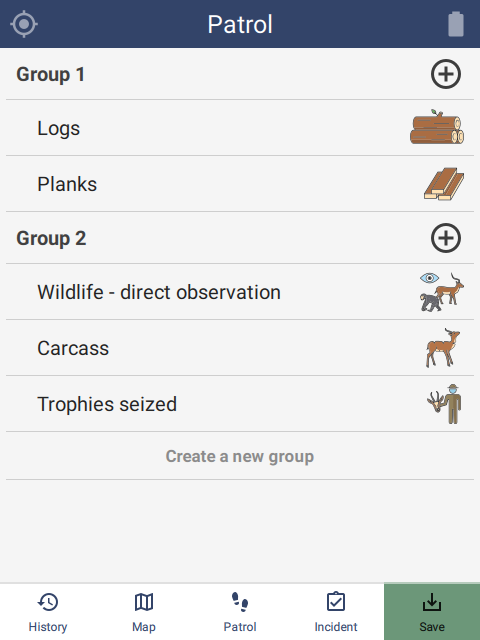
8.7.2. Adding observations with ‘Incident Group UI’
If Incident Group UI is enabled in Device Settings (see section 6.5.1.1.), then the process of creating new observations is different. In this case, observations are organized into groups. Tapping the ’+’ sign will add a new observation to that group. Tapping Create a new group will add a group.
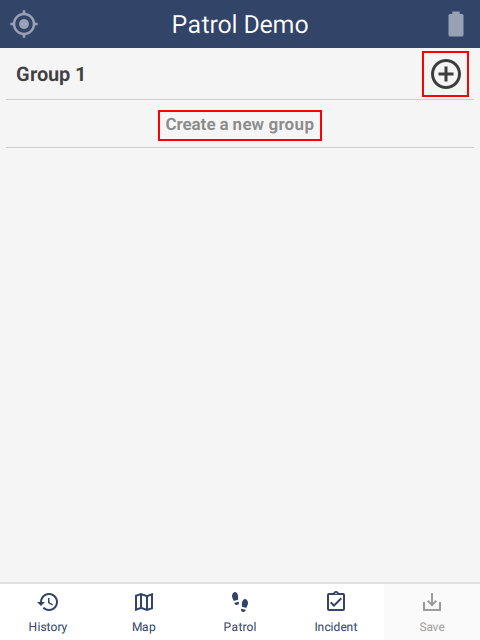 |  |
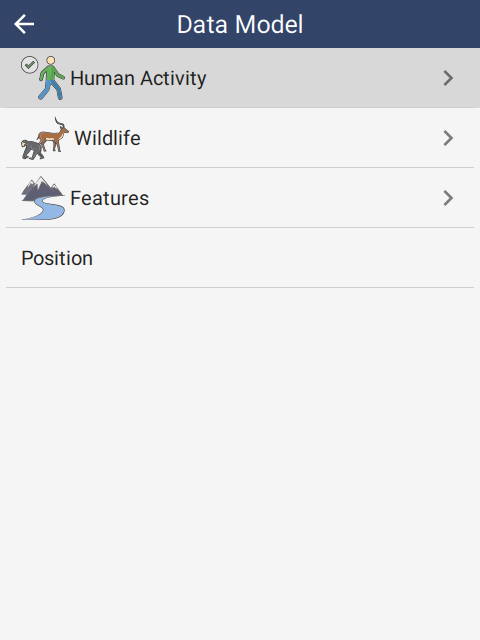
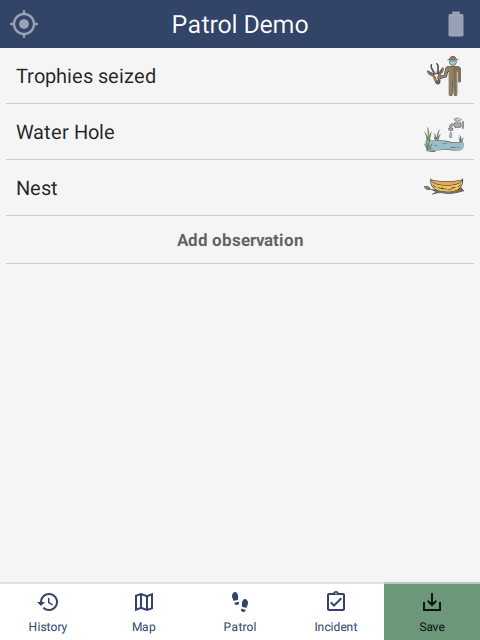
Make observation navigates the user to a data model selection page. Each option navigates the user through the model until a set of concrete questions are reached. For example, the user taps Wildlife then Trophies seized and then reaches a set of attributes to be completed.
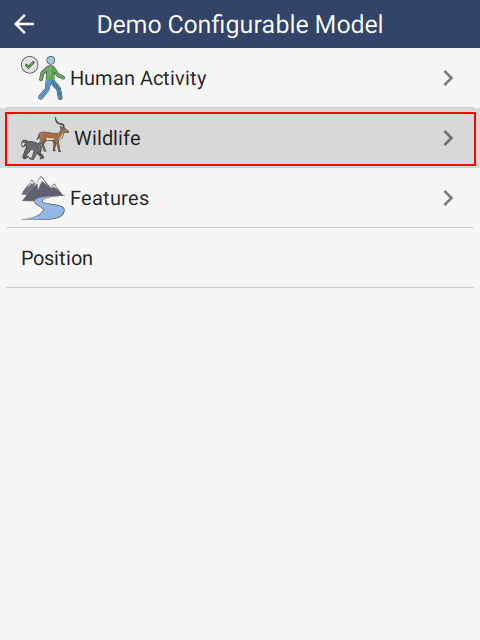 | 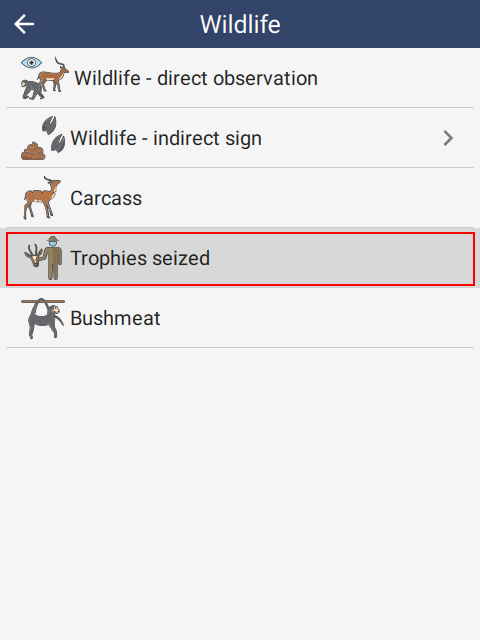 | 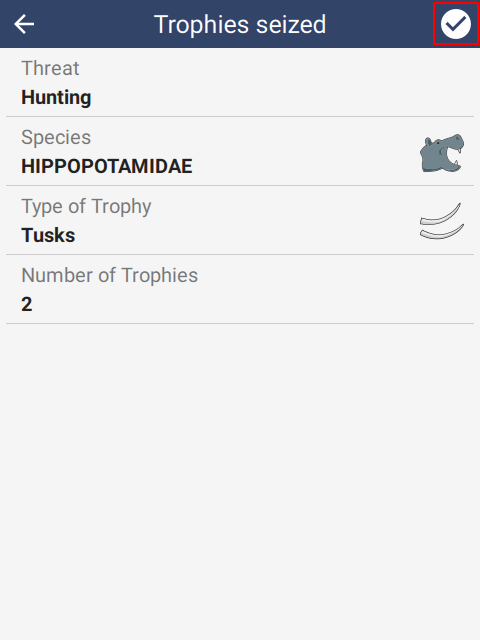 |
After tapping the check in the top right corner of the screen, the observation will appear on the observation home screen. Note that the Save button is now enabled. Other observations can be added using the Add observation button.
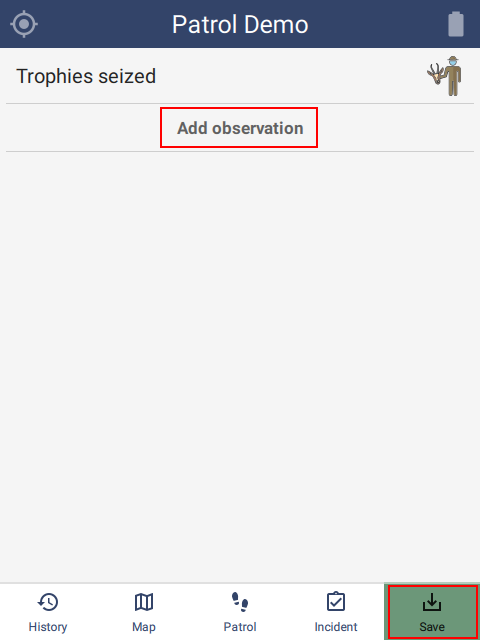 |  |
8.7.3. Delete observations and groups
Removing an observation or group can be done by swiping left and tapping YES to confirm.
8.7.4. Setting attributes
Attribute data is set according to the type.
- NUMERIC - see section 6.1.2.1.
- TEXT - see section 6.1.2.2.
- LIST - see section 6.1.2.3.
- MULTI LIST - see section 6.1.2.4.
- TREE - see section 6.1.2.5.
- BOOLEAN - see section 6.1.2.6.
- DATE - 6.1.2.7.
8.7.5. Reset attributes
Reset of an attribute can be done by swiping left and tapping YES to confirm.
9. Troubleshooting
9.1. Creating a bug report
When reporting an error or unexpected condition, a bug report is essential. When asked to create one, go to the main Settings tab and scroll to the bottom:
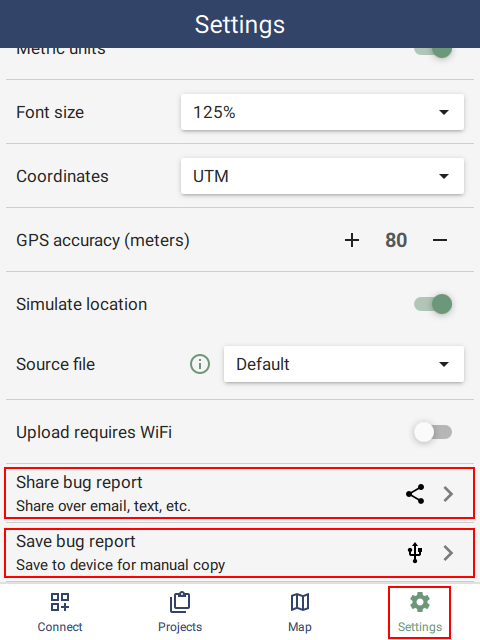 | 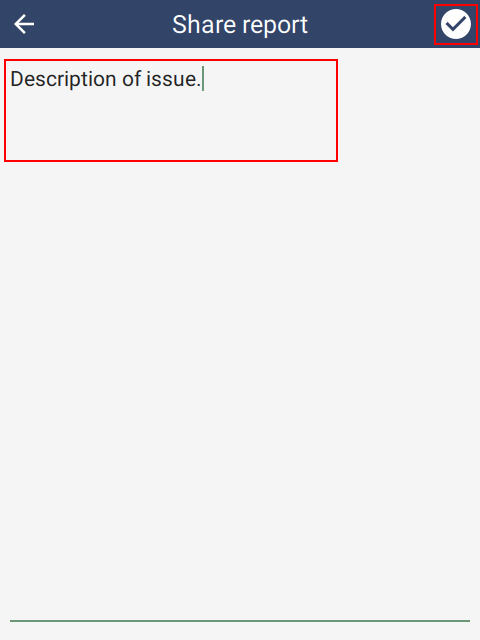 |
Share bug report requires that the device has a network connection. The bug report will be created and sent to the device sharing system. This allows sending over various channels like email, Whatsapp, etc. The report can also be beamed to another device via NFC or Bluetooth.
Save bug report is only available on Android. This saves the report to a file on the device and it can then be retrieved using a USB cable.
Bug reports contain a full copy of the SMART Mobile data on the device. This includes confidential information such as the access to Connect servers and even old data. They should therefore be handled carefully.
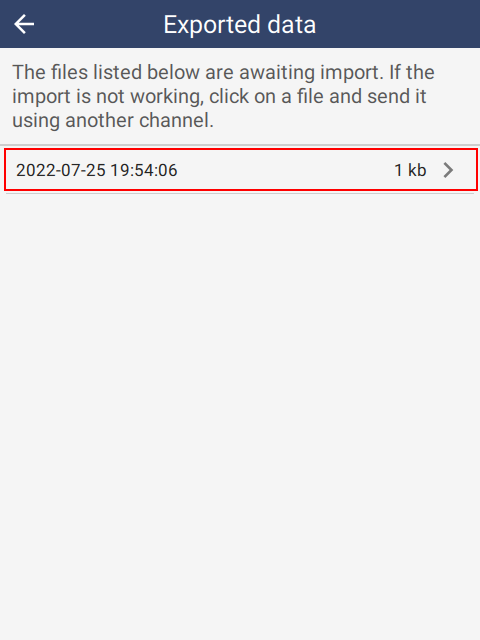
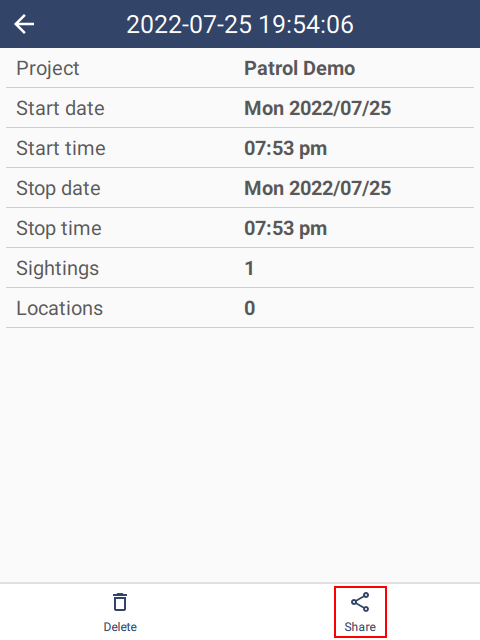
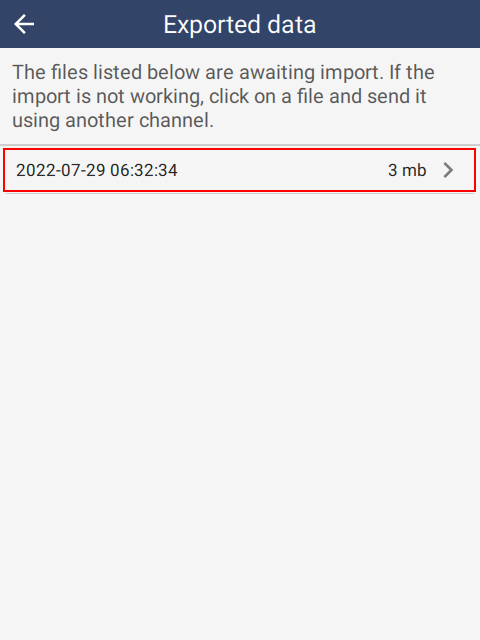
9.2. Recovering Exported data
SMART data is exported to JSON files. If the normal import operation is not functioning, then it is possible to retrieve the JSON files from the device and import them manually. To do this, go to the Settings page and tap Exported data. Then tap the file to retrieve and the Share button. This will open the sharing options for the device. Send the file through another channel and copy it to the SMART Desktop computer.
 |  | 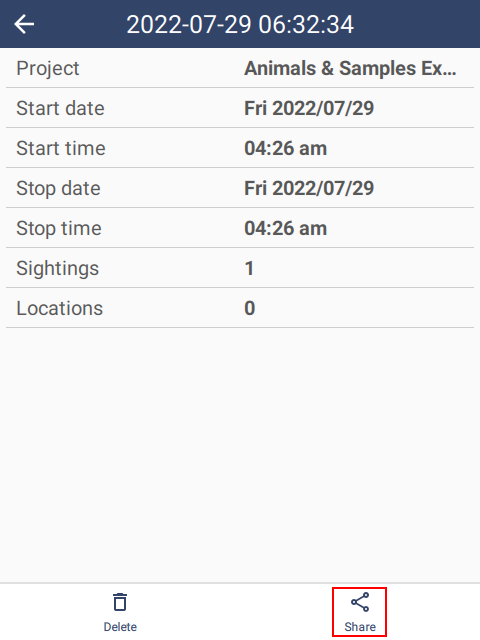 |
Open the Import SMART Mobile Data dialog, Add the file and click Import.
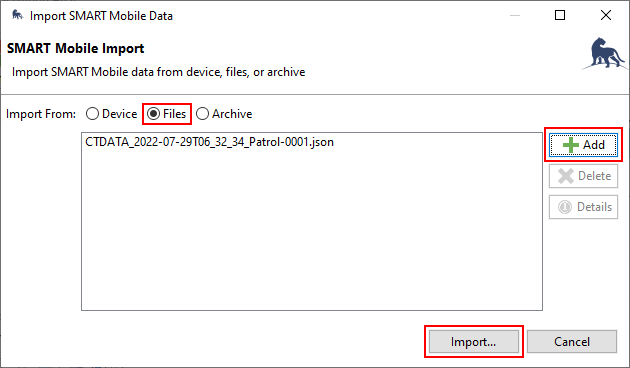 |
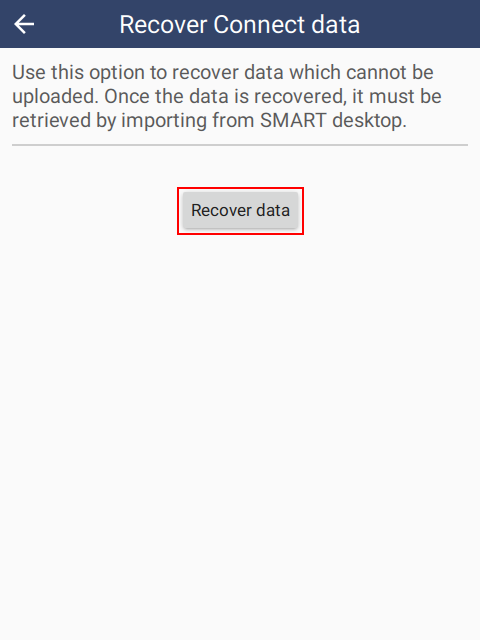
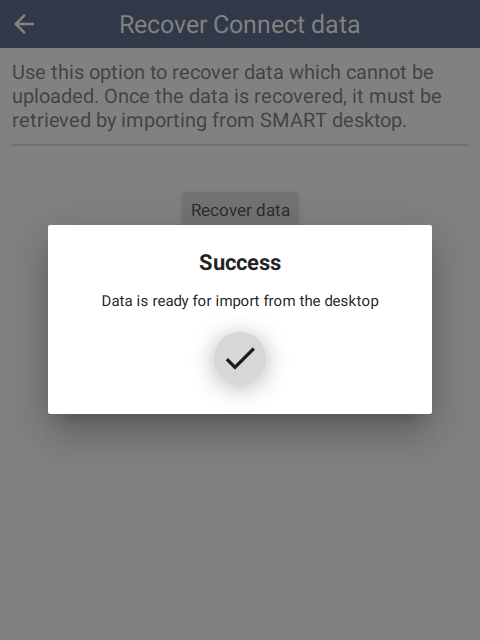
9.3. Recovering Connect data
If SMART Mobile is configured to send data to SMART Connect and the Connect server is not available, outstanding data can be recovered using the Recover Connect data option off the Settings page. All the data that would ordinarily have been sent to Connect is exported to a file. This can then be downloaded over USB cable or shared using another channel (see Recovering Exported Data above).
 |  |  |
9.4. Waiting for time correction
When the device is first used, the message Waiting for time correction may appear. This is a one time operation where SMART Mobile is calibrating the device clock to ensure that the time is correct.
If this is taking a long time, try taking the device into an open area to make sure that the GPS has a good reading.
9.5. Android device data
If importing the data from the device is not working, it is possible to retrieve exported data directly from the device.
Connect the device to Windows and set the USB mode to File transfer.
Open Windows Explorer and navigate to the folder:
\Android\data\org.cybertracker.mobile.smk\files\SMARTdata
This folder contains the JSON data files.
9.6. Blackview track logging
Some Blackview devices try to prevent background tasks from using the battery. The symptoms of this issue are that track logging is disabled after 10 minutes.
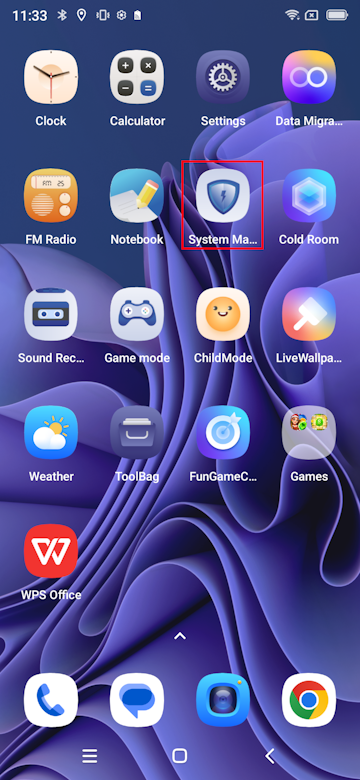
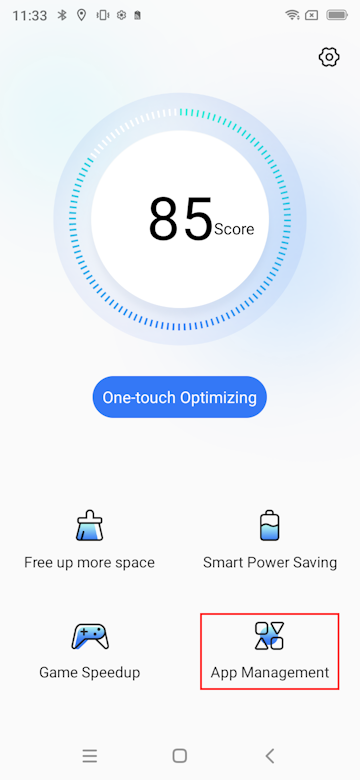
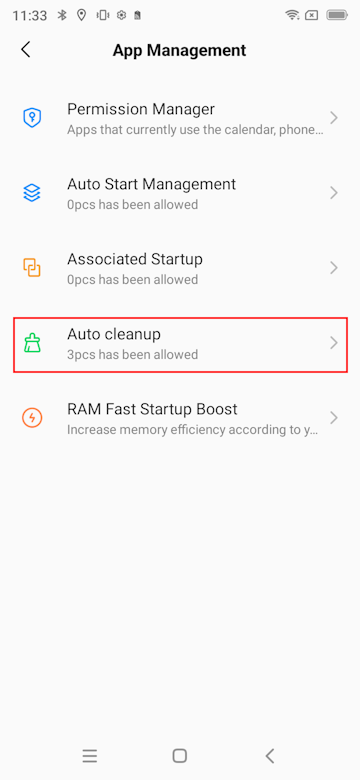
To solve this, Blackview has provided a System Manager application which allows applications to be excluded from this behavior. The steps are:
- Run the
System Managerapplication - Select
App Management - Select
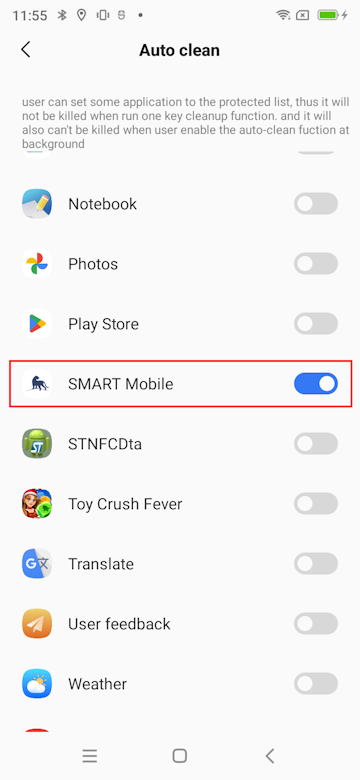
Auto cleanup - Scroll down to
SMART Mobileand enable the switch to prevent cleanup
If the below user experience does not match your device, check out Don’t kill by app.
 |  |
 |  |
10. Frequently Asked Questions
10.1 On which types of patrols should there be data collection?
ALL patrols should have data collected. Regardless of objective (e.g. law enforcement, surveillance, tourism) or transport types (e.g. foot, boat, motorbike, car, roadblock).
10.2 Which observations should be recorded?
All observations that fall under the categories in the data model (e.g. signs of wildlife live and dead, human activity, natural features) should be seen as a priority to record. Consider the needs, threats and objectives of the protected area and how the data collected will be used (i.e. adaptive management, research, etc.). Each site should detail the data collection procedures relating directly to the needs at the site.
10.3 What handheld devices/smartphones should we buy for our protected area?
General Considerations
Each site is unique and therefore it is difficult to prescribe a specific device to suit all needs. However, we recommend SMART users consider the following before selecting the device they wish to use and consulting the SMART Community Forum for advice from other users. Tip: It is recommended that sites try to standardize the devices they are using, to avoid conflicting or variable results.
- Ruggedness: How much abuse will the device take from its users and how wet and/or dusty is the environment the devices will be used in.
- GPS sensitivity: How difficult is it to get a GPS reading in the environment in which they will be used? Some devices are better at dealing with tree canopy, cloud, terrain, etc. than others.
- Form factor: Device size, screen size, weight, etc. Larger screens make text entry easier and help to prevent inadvertent selection of incorrect choices in lists. The advantages of larger devices and screens must be weighed against their increased power requirements and bulkiness. While there are many ruggedized tablets on the market, this discussion focuses on devices that are similar in size to smartphones or PDAs, under the assumption that tablets will be too bulky for most rangers to carry in the field.
- Battery life: How long must the devices be used in between charging? This is highly dependent on how the devices are used, i.e., how many observations are recorded each day, what is the frequency of track log point collection, how detailed are the observations being recorded (lengthier entries require the screen to be on longer and using the screen is one of the major sources of power consumption). Also, especially at sites where power fluctuates, battery failure is one of the most common causes of device problems. Many mobile devices nowadays have built-in batteries that cannot be easily changed, meaning that when the battery goes bad, they have to be returned to the manufacturer for service or replaced.
- Operating system: SMART can be locked to run in kiosk mode using the installation process described above.
10.4. What should we do if SMART Mobile device stops working during a patrol?
It is best practice to always have a backup. Collect data using GPS and datasheets/notebooks as well whenever possible. Note down when the device stopped working.
10.5. What should we do if GPS battery dies?
As above. Keep collecting data – ensure to write down the date and time of observation. Carry on patrol as normal.
10.6. What should we do if we run out of datasheets?
If you have a notebook, you can make notes, or use the back of the datasheets to collect data. Try to ensure the same information is recorded. Carry on patrol as normal.
10.7. What should we do if the camera stops working/battery becomes flat?
If you have a phone with you that takes photos, you can use that. If not just carry on your patrol as normal and describe the observations as best as possible using comments and/or during the patrol debrief.
10.8. I am running SMART on a Mac computer but cannot import patrols from SMART Mobile, why?
The desktop application of CyberTracker is only available for Windows, meaning that the import or export of Patrol/Survey Configurable Models or data collected from the field cannot be currently done on a Mac OS or Apple computer not running Windows.
10.9. My Android device will not connect to my computer and I can’t install CyberTracker/import patrols, what can I do?
- Make sure the device is plugged into the computer and enabled to ‘Transfer Files’. To do this, swipe down on the top of the screen and change from ‘USB Charging’ to ‘Transfer Files’. - This is a common issue with getting the .apk file for CyberTracker for the first installation.
- With the device plugged in, ‘Export the Patrol Configurable Model’ to the device, the first time, you should get an error message saying that Before CyberTracker can be used it must be installed on the device.
- Check the ‘File Manager’ for the .apk file. It should appear near the bottom of the Internal Storage window. Here, you will need to give the device permission to open the file.
- Once it is installed, you can resend the Patrol Configurable Model to the device and it should work. If the device has been disconnected, follow Step 1 again.
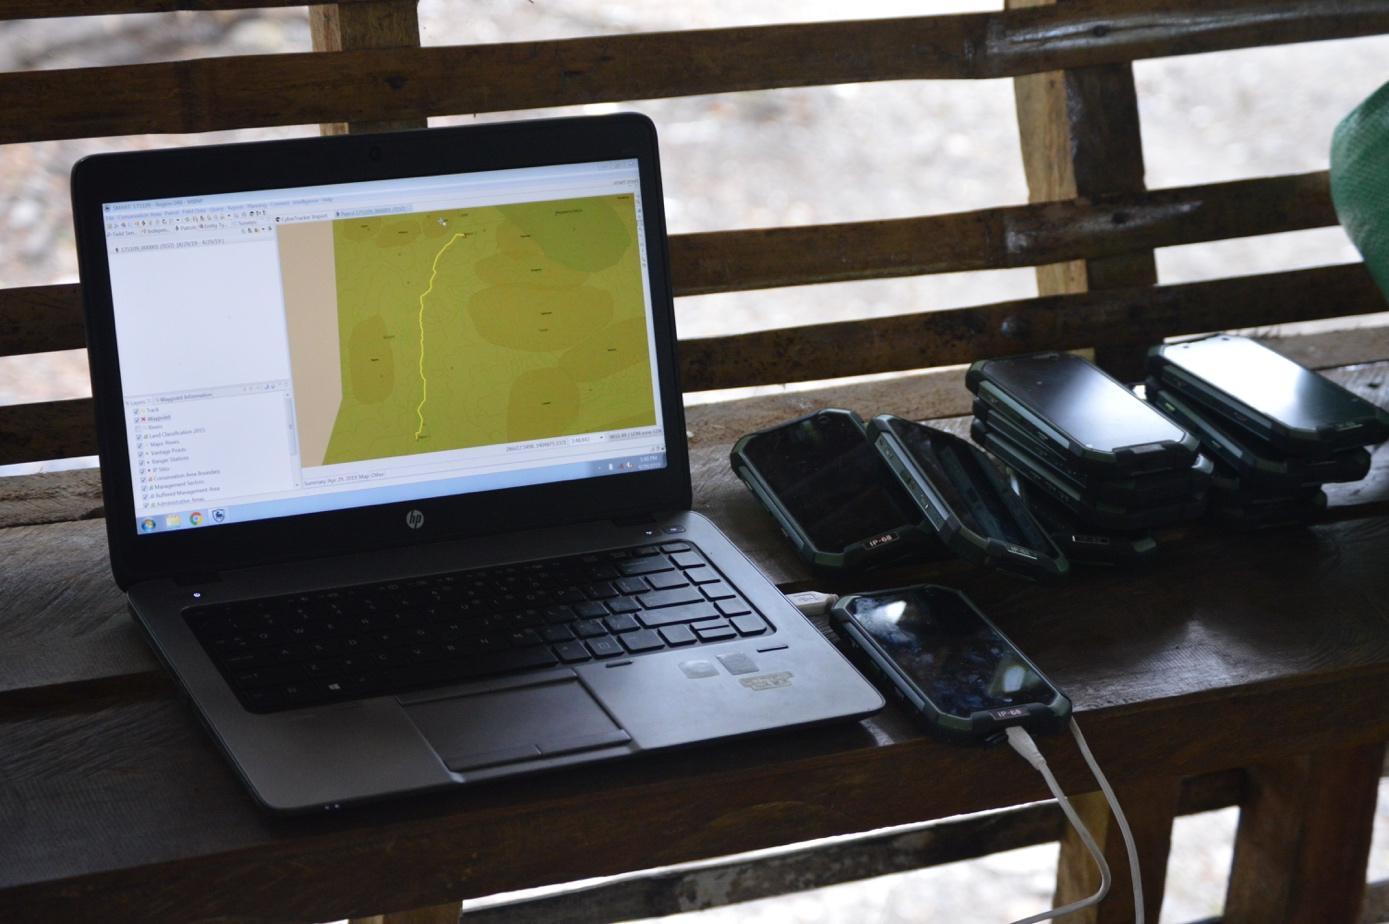 Figure 8. Devices not properly set to ‘Transfer Files’ under USB settings is a common issue when using CyberTracker/SMART Mobile. Photo: J.Slade/GWC
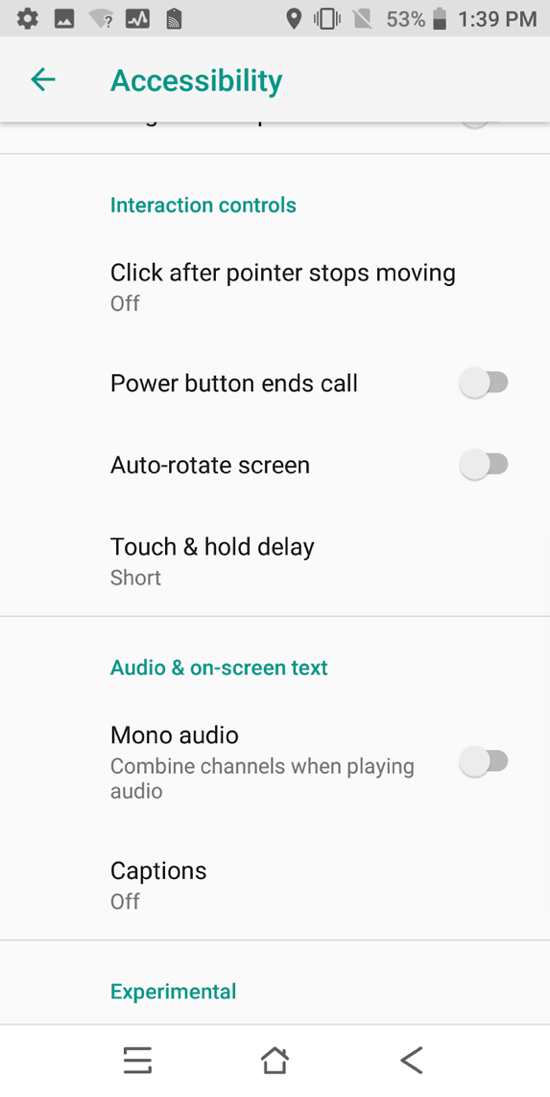
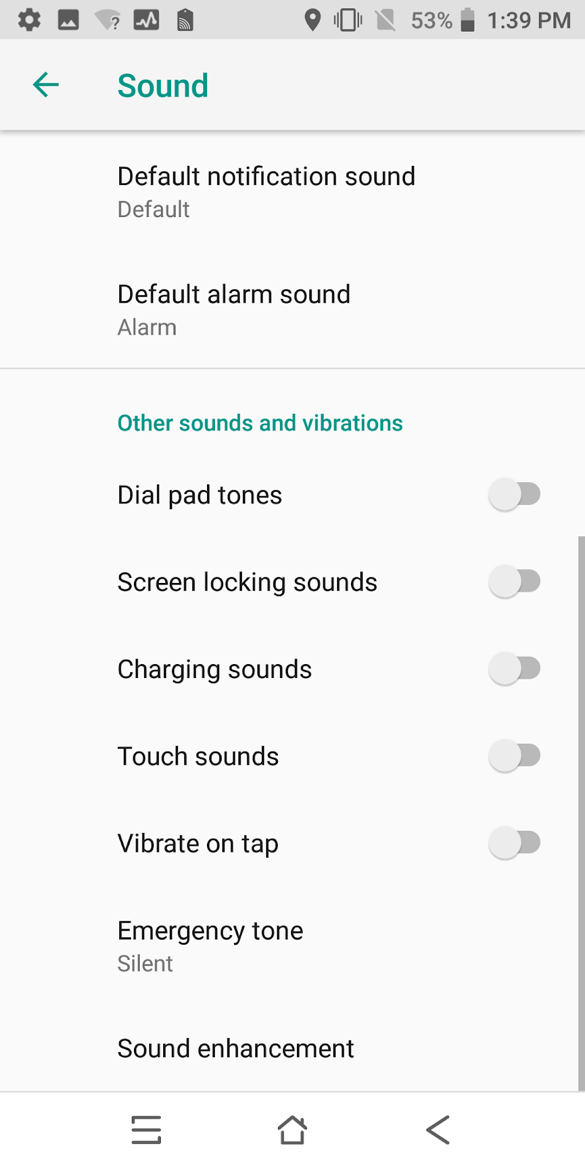
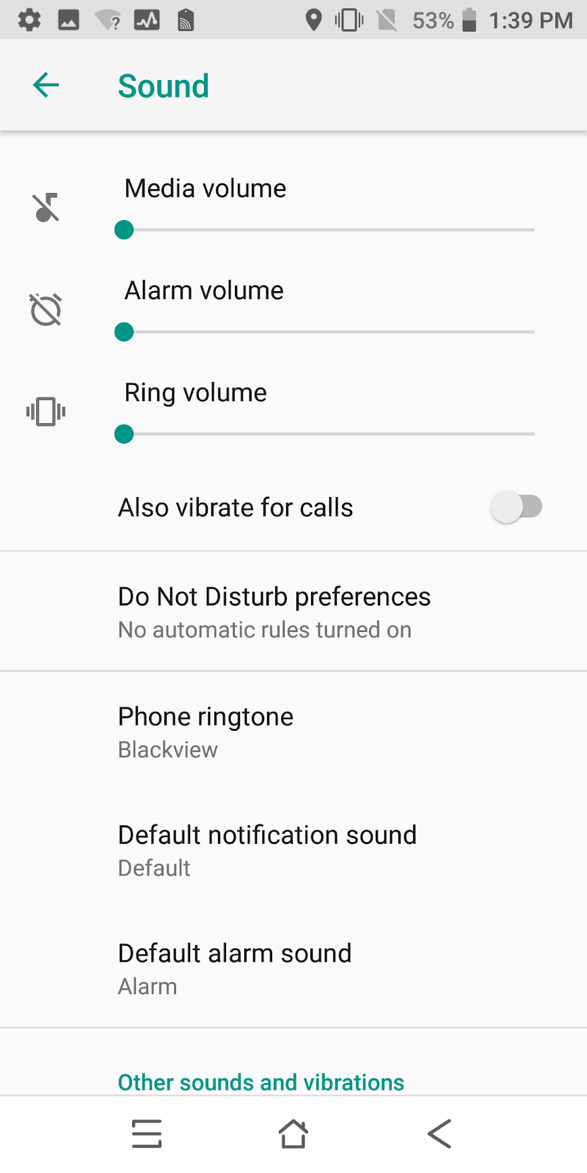
10.10 Android settings and troubleshooting SMART Mobile
For most SMART Mobile users we recommend turning off advanced location features, as these “high accuracy” setting are often less accurate in the places we work.
Below are details on how to set you phone to use GPS only location settings based on [this guidance from Google].
Android 10
- Open your device’s Settings app.
- Tap Location.
- Tap Wi-Fi and Bluetooth scanning.
- Turn both Wi-Fi scanning and Bluetooth scanning to off.
- Go back a screen
- Turn Emergency Location Services off
Android 9 To change location settings:
- Open your device's Settings app.
- Tap Security & Location
- If you have a work profile, tap Advanced.
Then
- Turn Location on. Tap Location.
- Scan for nearby networks: Tap Advanced Scanning. Turn Wi-Fi scanning or Bluetooth scanning off.
- Turn emergency location service on or off: Tap Advanced Google Emergency Location Service. Turn Emergency Location Service off.
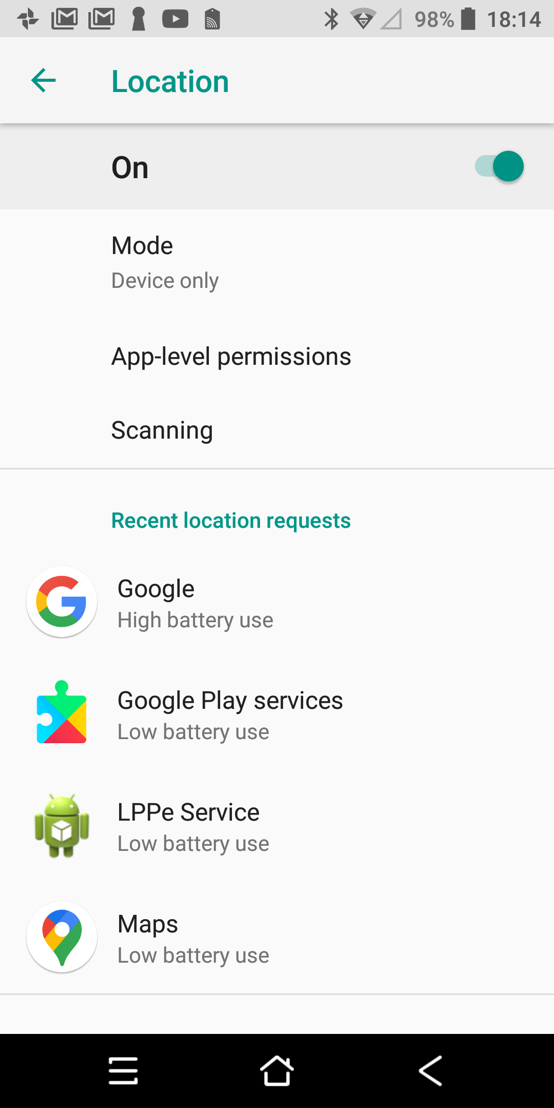
Android 6.0 – 8.1
- Open your phone's Settings app.
- Tap Security & Location. If you don't see "Security & Location," tap Location.
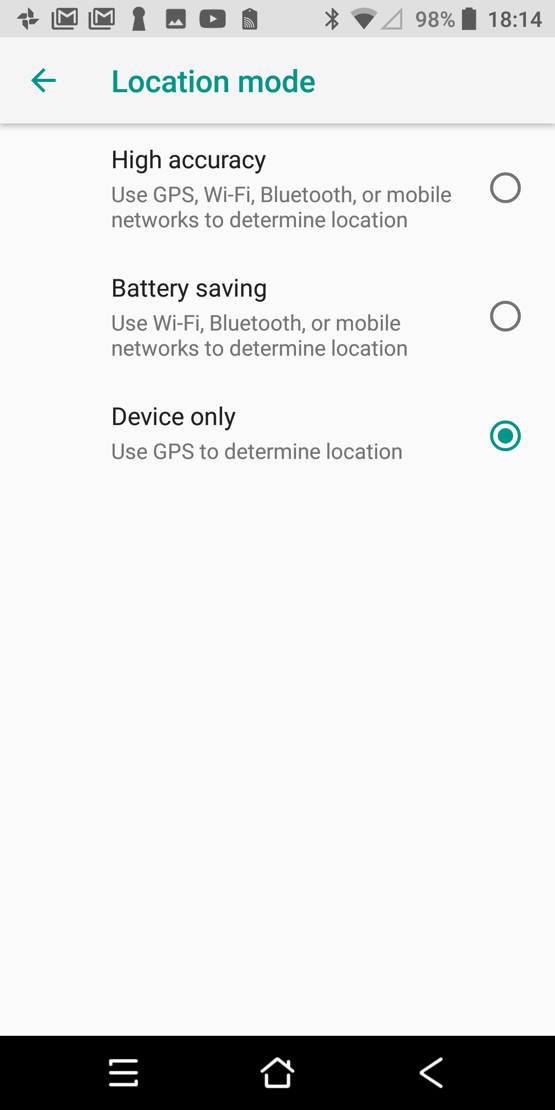
- Tap Mode.
-
Then pick: Device only: Use only GPS. Don’t use Google Location Services to provide location information. This can estimate your phone's location more slowly and use more battery.
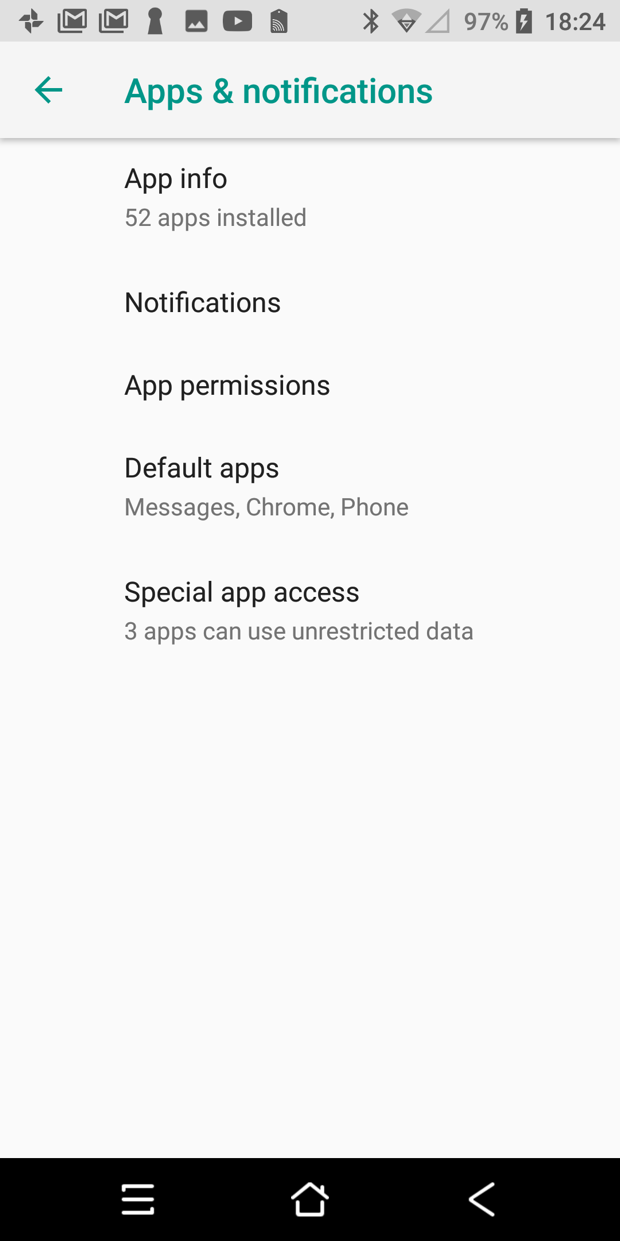
-
Set the location mode to device only
-
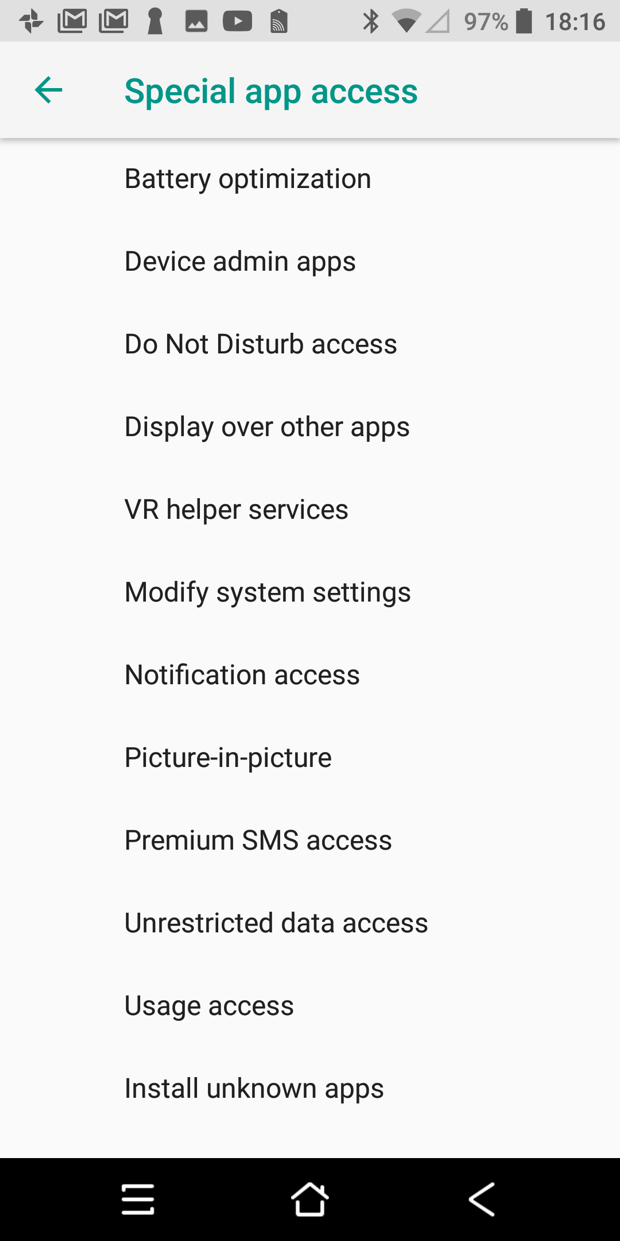
Other suggested Android general settings
10.11 BlackView, DoKe OS and Android 12
BlackView devices using DoKe OS clean up background apps when the device goes to sleep - typically after 5 minutes. When on patrol with a track, SMART Mobile will be detected as a background app and closed.
To prevent this from happening, do the following:
- Open the “System Manager” app
- Select “App Management”
- Select “Auto cleanup”
- Activate “SMART Mobile” - this will opt-out of the cleanup process
Another option which also works is to “Lock” the app:
- Select the Overview button in the navigation bar or swipe up if you are using gestures
- Select on the three dots menu for SMART Mobile
- Select the “Lock” button
SMART Partners
 |
 |
| The SMART Partnership is a group of global conservation agencies, conservation organizations, and individuals that share a mission to conserve biodiversity, reduce the impacts of illegal extraction and trade of natural resources, strengthen law enforcement related to biodiversity conservation and strengthen overall management of conservation areas. |
SMART Values
- Freely available and open source
- Responds to needs and feedback from front-line users
- Scalable and customizable to a wide variety of locations and contexts
- Packaged with an extensive support and training network
- Commitment to long-term funding and support through the SMART Partnership